Document Mode
Document Mode corresponds to the reading process, and you can view documents in PDF, Epub, video, audio and many other formats.
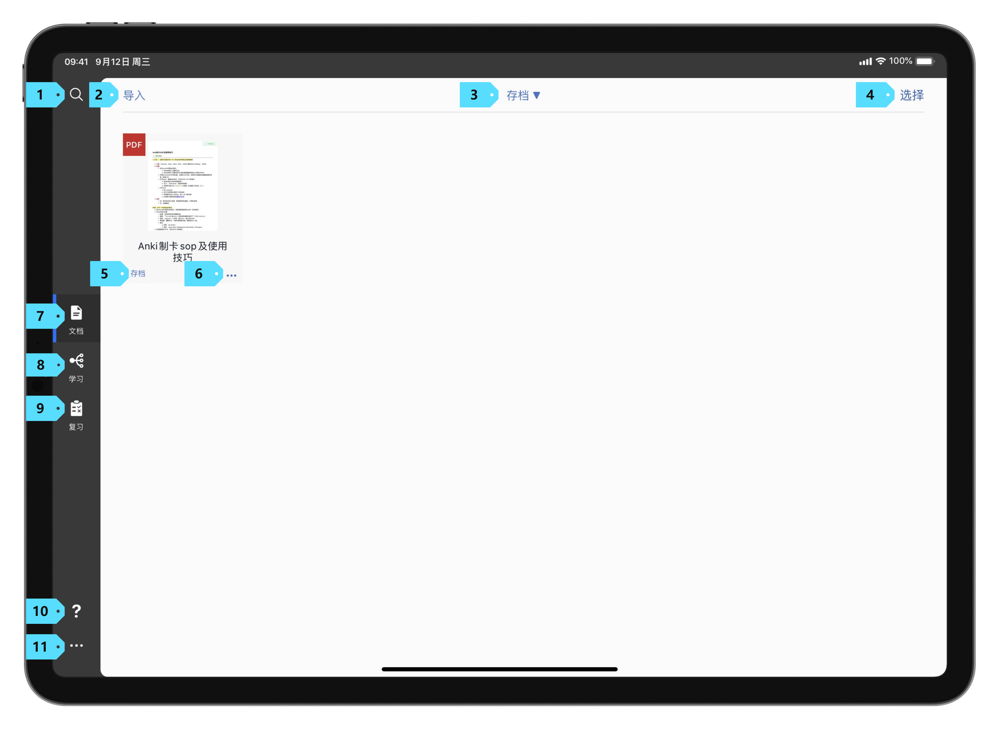
Document Mode Page
In the sidebar, select the "Documents" tab to switch to the Documents Mode Page. In this page, you can import and manage documents. If you tap a document in this page, you can enter the Document Reading Page.
The top bar of the Documents Mode Page contains three buttons: Import (2), Categories and Folders (3), and Select (4).
Import Files
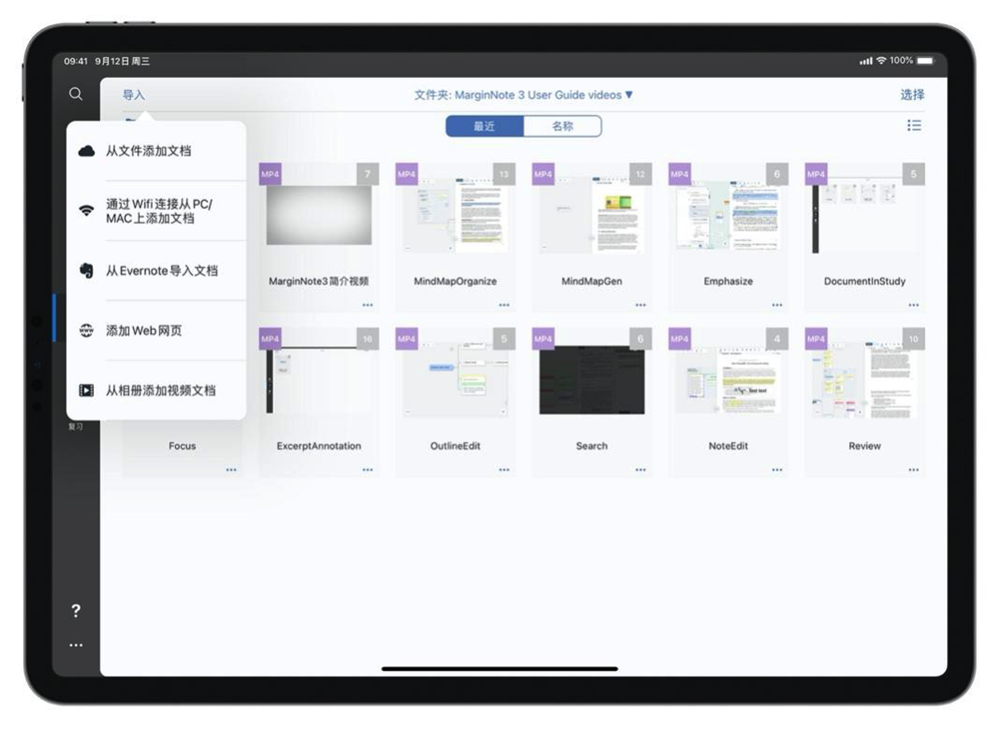
In MarginNote 3, Document Mode supports importing files in PDF, EPUB, MOV, MP3, MP4, M4V, M4A, and other formats. Tap the "Import" button and you can complete the import of your documents. You can choose to: Add Documents from Files, Add Documents from your PC/MAC via wifi, Add Documents from Evernote, Add Web Pages, Add Documents from Album.
| Name | Function |
|---|---|
| Add Documents from Files[1] | When selected, a file selection window will pop up. Select the file you need to add, and you can finish adding the file. |
| Add Documents from your PC/MAC via wifi (opens new window)[2] #3.1 | When selected, a guide window containing a link will pop up. Enter the link into any browser on your Mac or PC to add documents to your device on iPadOS/iOS. |
| Add Documents from Evernote | When selected, a login window to Evernote will pop up. Tap to switch between the international version of Evernote (Evernote) or the Chinese version (印象笔记). After logging in, you can select the notes in Evernote and complete the import. |
| Add Web Pages (opens new window) #3.1.10 | When selected, the MarginNote 3 built-in browser will pop up. When you find the web page you want to add, tap the Download icon in the center of the toolbar to download the web page. The downloaded pages will be automatically stored in the WebDownloads folder in the root directory. |
| Add Documents from Album[3] | When selected, a pop-up window will ask if you want to grant MarginNote 3 the permission to use camera. After granting camera access, you can add photos, which will be converted to PDFs, and videos, by selecting the corresponding photos or videos. |
Folders and Categories
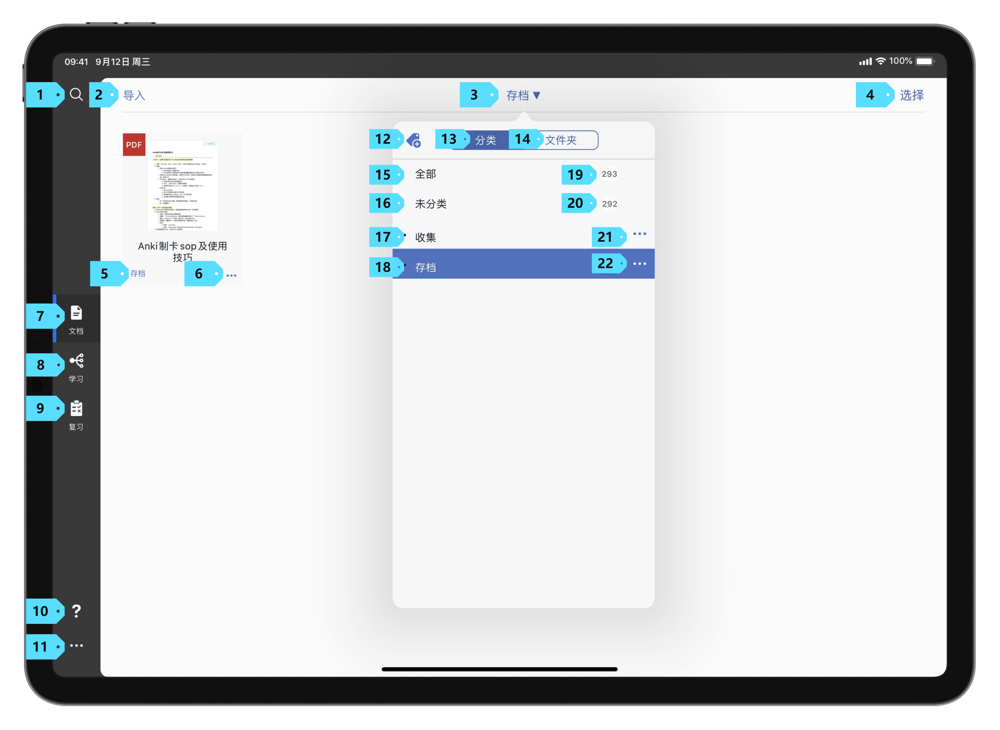
Categories and Folders list button is in the center of the top menu bar. By default, this list shows the category or folder to which the file belongs. MarginNote 3 supports two modes of file management: by Categories (13) and by Folders (14).
Categories

Categories are similar to tags. A file can belong to multiple categories. After selecting a category, you can manage the files under the category. Tap the Add icon (12) to add more categories.
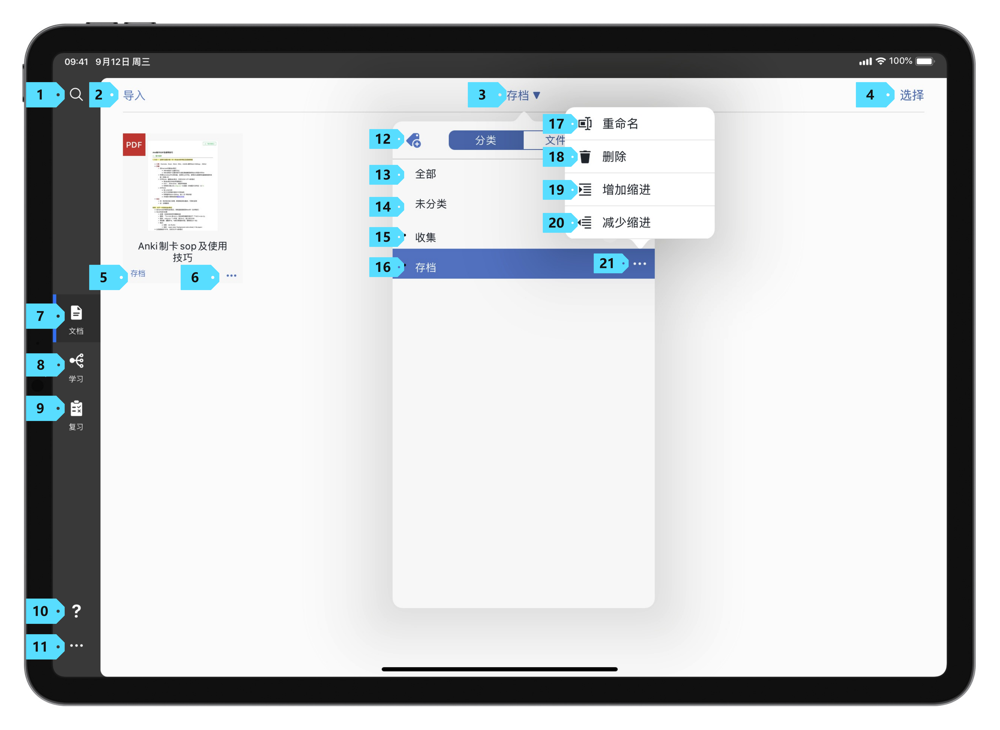
You can also tap the More icon [4] on the right of each category to Rename, Delete, Indent, or Outdent.
Folders (opens new window) #3.1
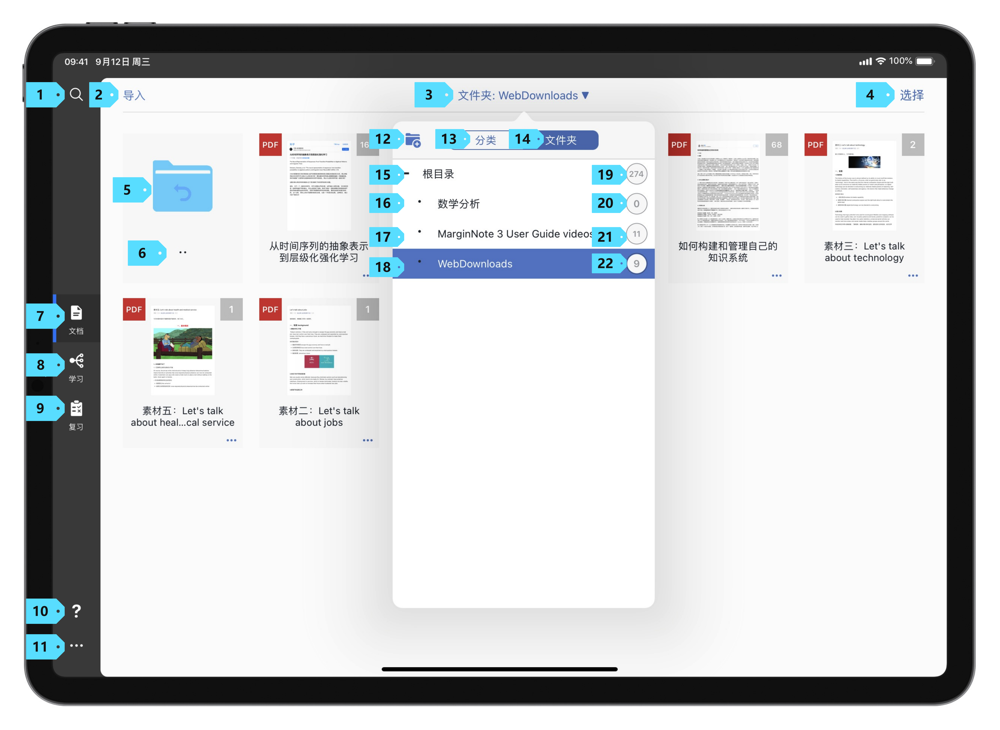
In MarginNote 3 's file management system, folders correspond to the actual location of files, and a file can be placed in only one folder. You can view the hierarchy of folders in the Categories and Folders list, or you can create a folder by tapping the Add icon (12). Unlike categories, you cannot adjust the hierarchy of folders here.
Select and Batch Editing
In the top menu bar, tap "Select" (4) to enter the batch editing mode. In this mode, you can complete batch editing on documents.

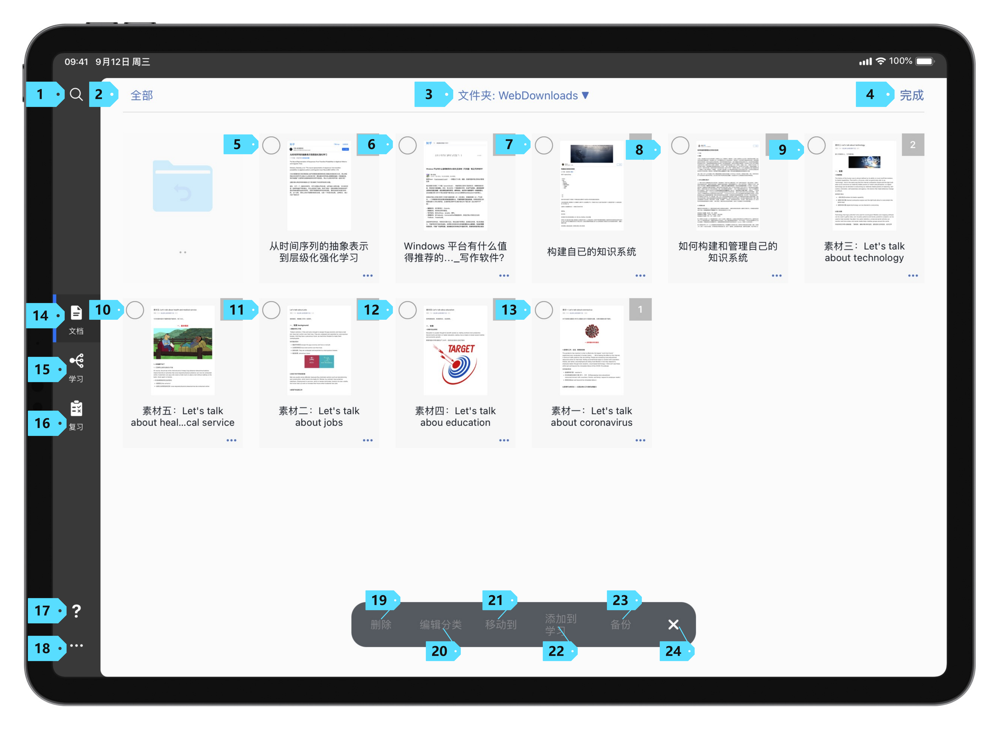
After selecting the files, you can Delete Files (19), Edit Category of Files (20), Move Files (21), Add Files to Study (22), and Backup Files (23).
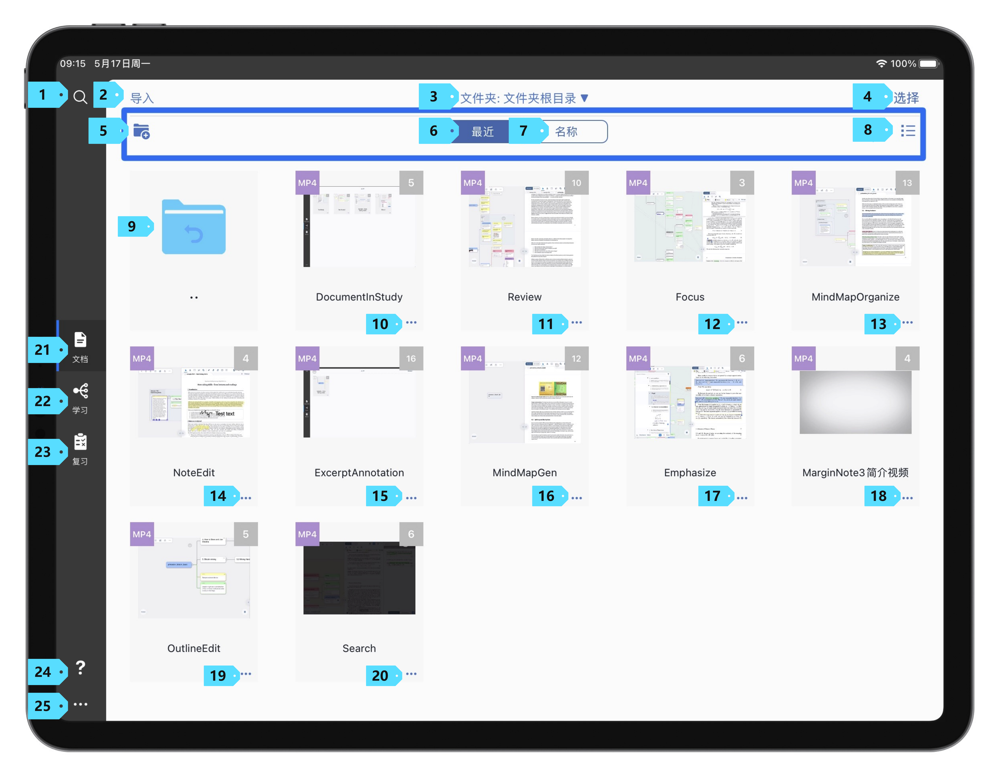
Document Mode Secondary Menu
In the Document Mode Secondary Menu, you can choose to create a new folder (5), change the order of files (6) (7), or change the display of files (8).
Document Reading Page
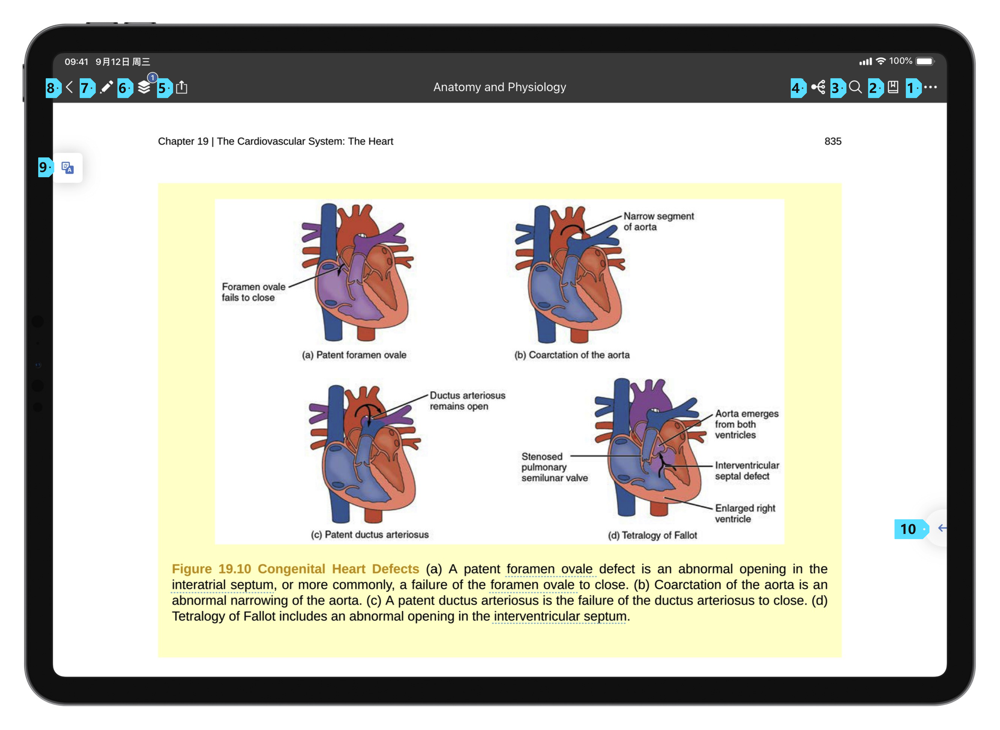
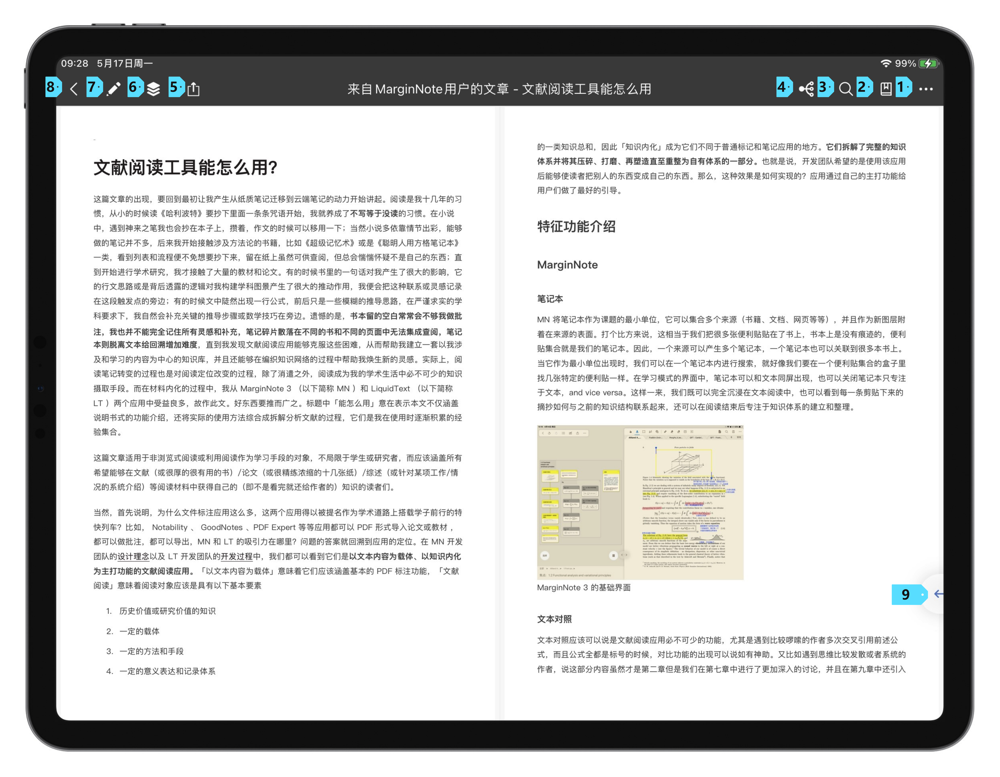
In the Document Mode, tap a file to enter the Document Reading Page. The page has a reading toolbar at the top. The arrow button (9) at the bottom right can be tapped or swiped left to display the notes area on the side of the page.
Reading Toolbar

The toolbar shown at the top of the Document Reading Page is the Reading Toolbar. The Reading Toolbar contains: Home button, Excerpt & Annotation button [5]/ Excerpt button [6]/ Play button [7], Notebooks button, Export button, Go to Study Mode button, Search button, Contents & Bookmarks button, and More button.
| No. | Name. | Function. |
|---|---|---|
| 1 | More button | Tap to view the settings related to reading. |
| 2 | Contents & Bookmarks button[8] | Tap to view the Contents, Thumbnails, and Bookmarks of PDF/Epub documents in the pop-up window. |
| 3 | Search button | Tap to view the pop-up search window. You can search for document contents and mind-map contents. |
| 4 | Go to Study Mode button (opens new window)#3.1.10 | If you have not created a study notebook, MarginNote 3 will pop up a window asking if you want to create a new study notebook. If you have created a study notebook, MarginNote 3 will switch directly to the study notebook corresponding to that document. |
| 5 | Export button | Tap and the Export window will pop up. |
| 6 | Notebooks button | Tap and the Notebooks window will pop up. You can create a new notebook, change the corresponding notebook, or switch to the mind-map notebook. |
| 7 | Excerpt & Annotation button[9](PDF) | Tap to display the Excerpt and Annotation toolbar. |
| Text Excerpt button[10](Epub) | Tap and MarginNote will enter Epub excerpt mode. Under this mode, any content you select in the Epub file will automatically generate excerpts. | |
| Play button (opens new window)[11](Video)#3.3 | Tap and MarginNote 3 will start playing the video. | |
| 8 | Home button | Tap and return to MarginNote 3 home page. |
Notebooks button
After tapping the Notebooks button, the multi-notebook view will pop up.
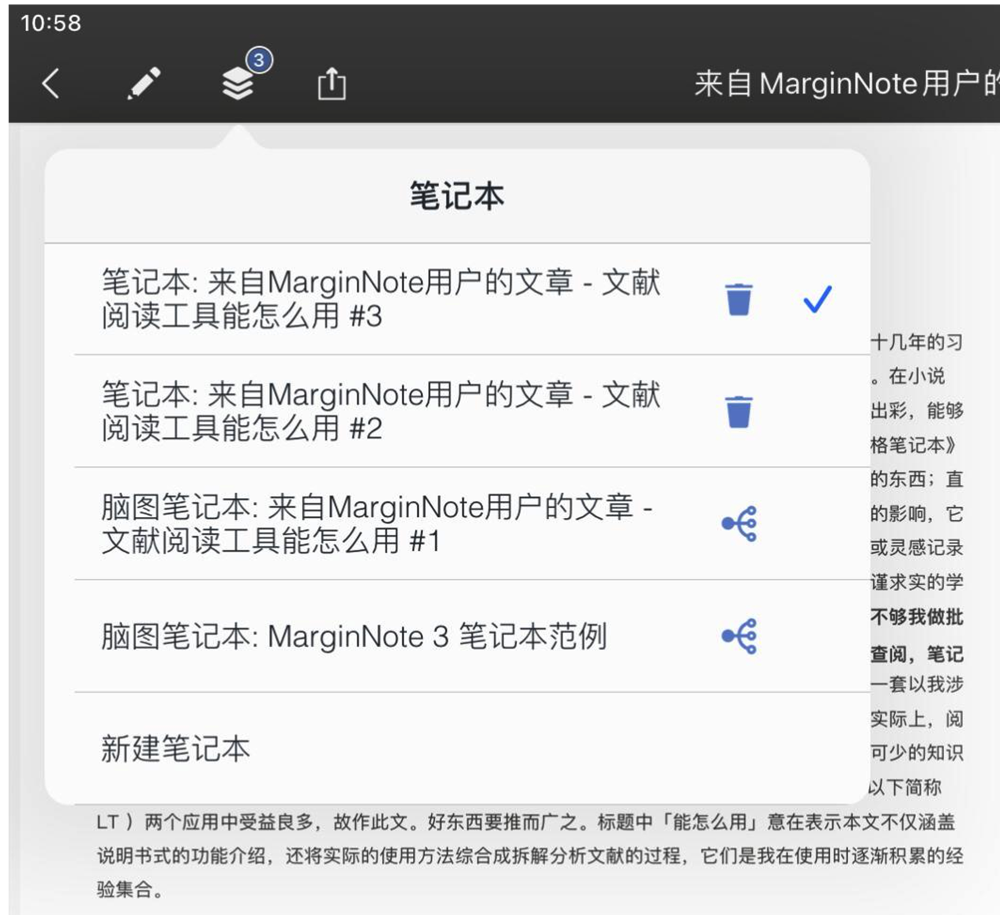
| Icon | Name | Function |
|---|---|---|
| Create a new notebook | Tap to create a new notebook | |
| Delete the notebook[12] | Tap to delete the notebook | |
| Current notebook | This icon will appear on the current selected notebook. | |
| Switch to mind-map[13]notebook | Tap to switch to mind-map notebook view. |
Search button
After tapping the Search button, MarginNote 3 will pop up the search view.
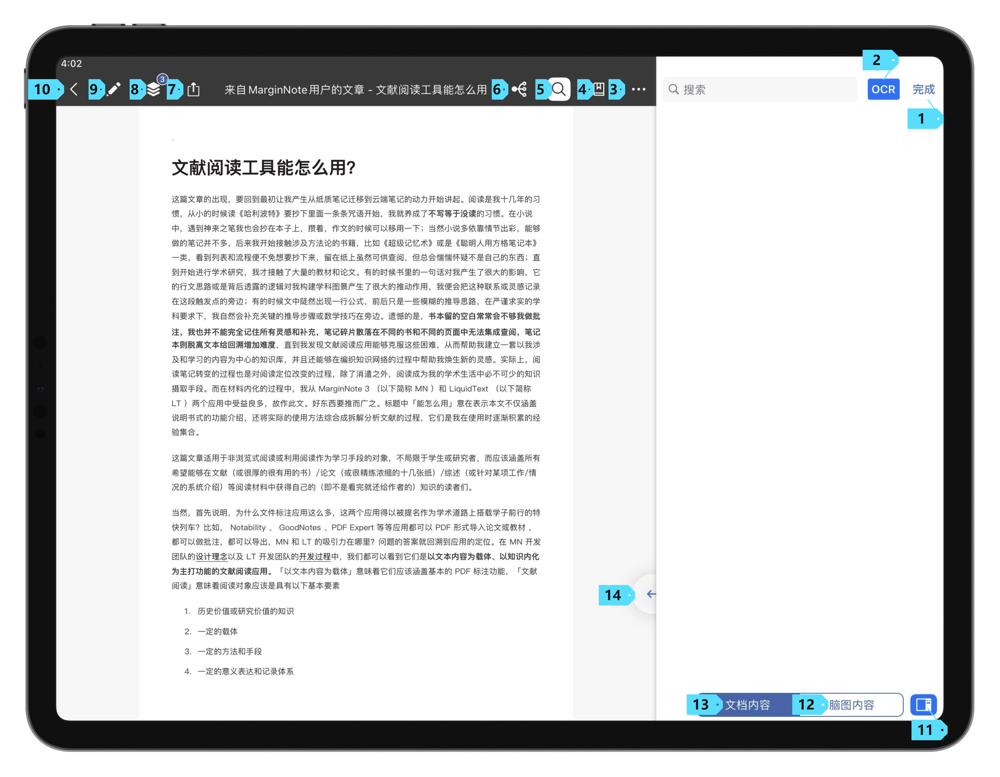
| No./Icon | Name | Function |
|---|---|---|
| Search box | Type in content in the search box. Tap the Enter to search. | |
| 1 | Done | Tap and MarginNote 3 will close the search window. |
| 2 | OCR (opens new window) #3.5.1 | Tap and MarginNote 3 will support searching texts in images. |
| 11 | Left-side Attached (opens new window) #3.2.5 | If Left-side Attached icon is selected, the search window will attach to the left side of the page. If the icon is deselected, the search window will be displayed as a hover. If the icon is deselected, the search window will be displayed as a hover.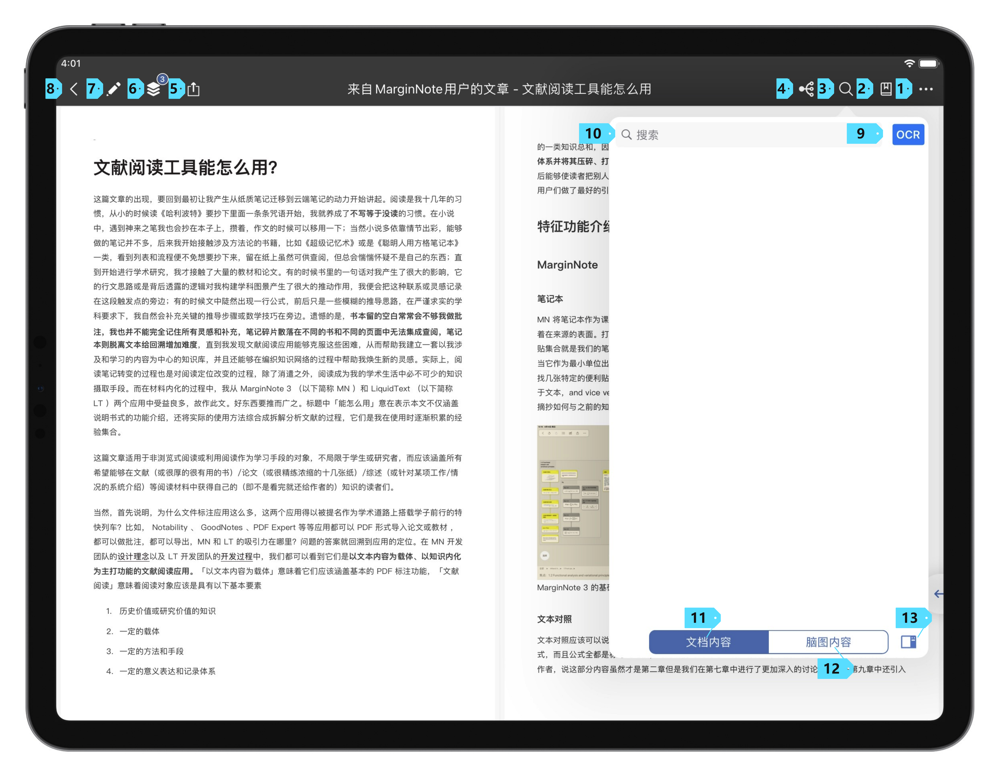 |
| 12,13 | Document, MindMap | If "Document(s)" is selected, MarginNote 3 will search for the input text in the entire document. If "MindMap(s)" is selected, MarginNote 3 will search for the input text in all excerpts. |
More button
Tap the More button to view the settings related to Document Reading Mode.
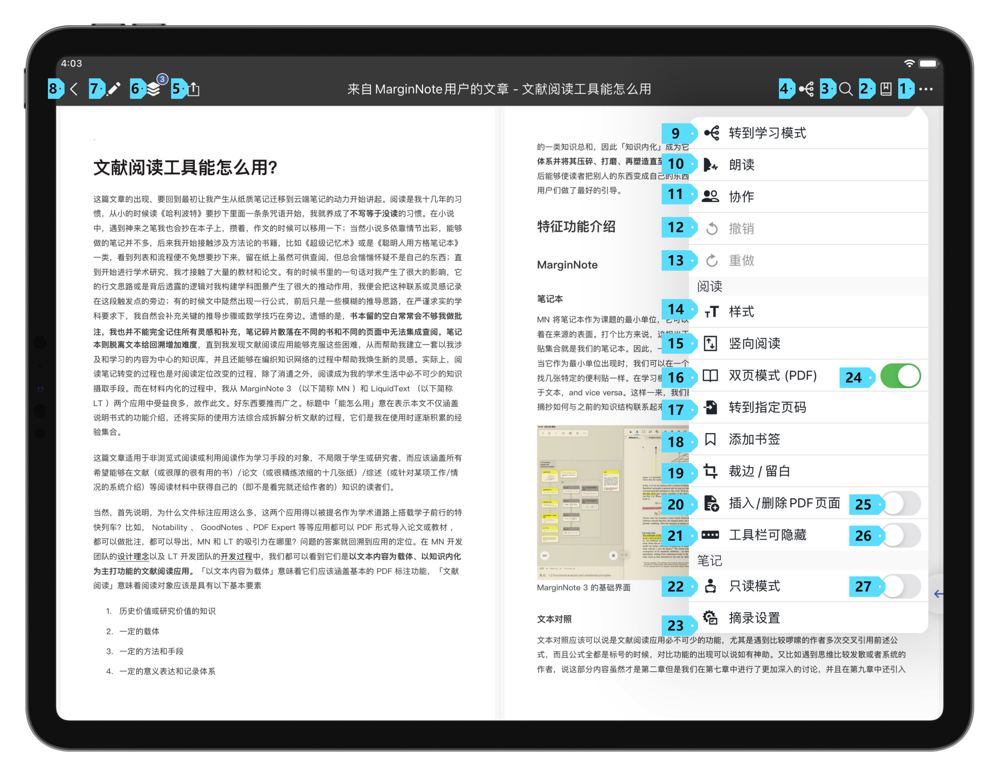
| Name | Format | Function |
|---|---|---|
| Go to Study Mode | PDF, Epub, Video | Tap to switch to the Study Mode |
| Speech (opens new window) #3.1.7 | PDF, Epub, Video | Tap and MarginNote 3 will start reading the file aloud. |
| Collaborate (opens new window) #3.7 | PDF, Epub, Video | Tap to enable the collaborative mode of a PDF document and share it with others to view it together. |
| Undo | PDF, Epub, Video | Tap to undo the previous edit. |
| Redo | PDF, Epub, Video | Tap to redo what you undid. |
| Styles | PDF, Epub, Video | Tap to change the reading styles. |
| Horizontal Flip/Vertical Scroll | Tap "Horizontal Flip" to switch to flip mode. Tap "Vertical Scroll" to switch to vertical scroll mode. | |
| Two page mode (PDF) (opens new window)#3.1.6 | Available only in flip mode. When enabled, you can display 2 pages of PDF at a time on the page. | |
| Go to page | Tap and a "Go to page" window will pop-up. Type in the page number in the text box to go to a specific page. | |
| Add Bookmark | Tap to add a bookmark for the current page. | |
| Crop/Leave blank | Tap to enter the "Crop/Leave blank" page. | |
| Insert/Remove PDF Pages (opens new window)#3.4 | Tap to enter the PDF editing mode. | |
| Hidden Toolbar | PDF, Epub, Video | Tap and the toolbar will be hidden when it is unnecessary. |
| Read-Only Mode | Tap and the PDF will enter read-only mode. You can not annotate the PDF. | |
| Excerpt Settings | PDF, Epub, Video | Tap to manage the settings on excerpt tools. |
| View Pictures in Document | Epub | Tap to view each image in an Epub document. |
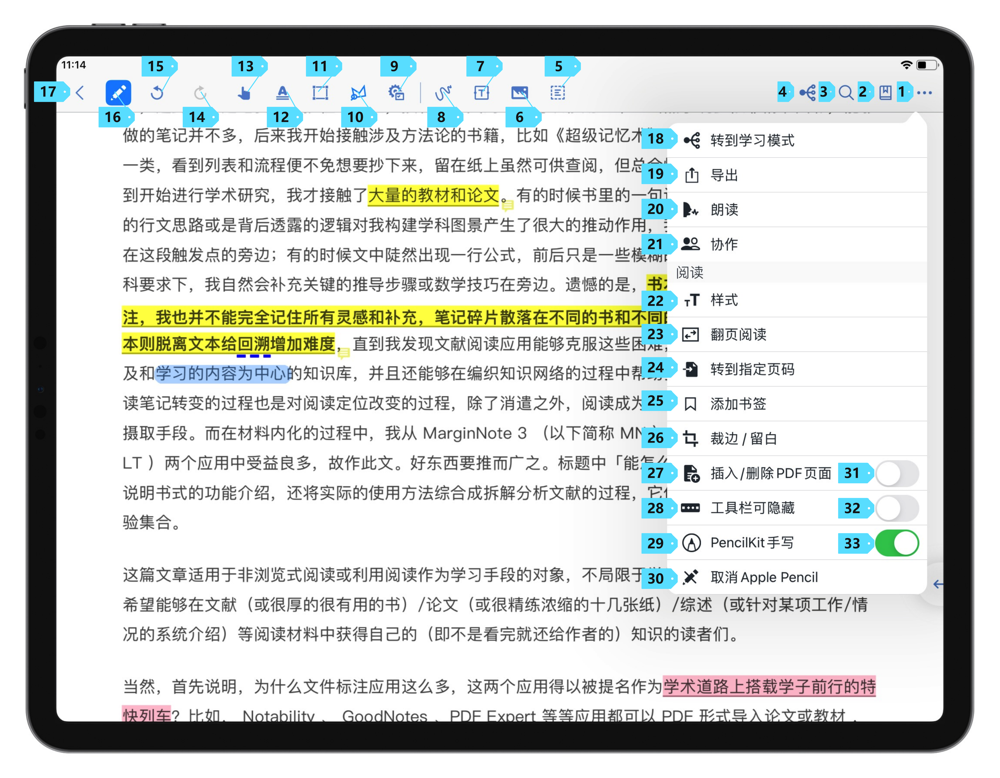
| Stop Apple Pencil | PDF, Epub, Video[14] | Tap and you cannot use Apple Pencil to select texts. |
| PencilKit Handwriting | PDF[15] | When enabled, MarginNote 3 will use PencilKit as the default handwriting engine. When turned off, MarginNote 3 will use MarginNote as the handwriting engine. [16] |
Crop/Leave Blank(PDF)
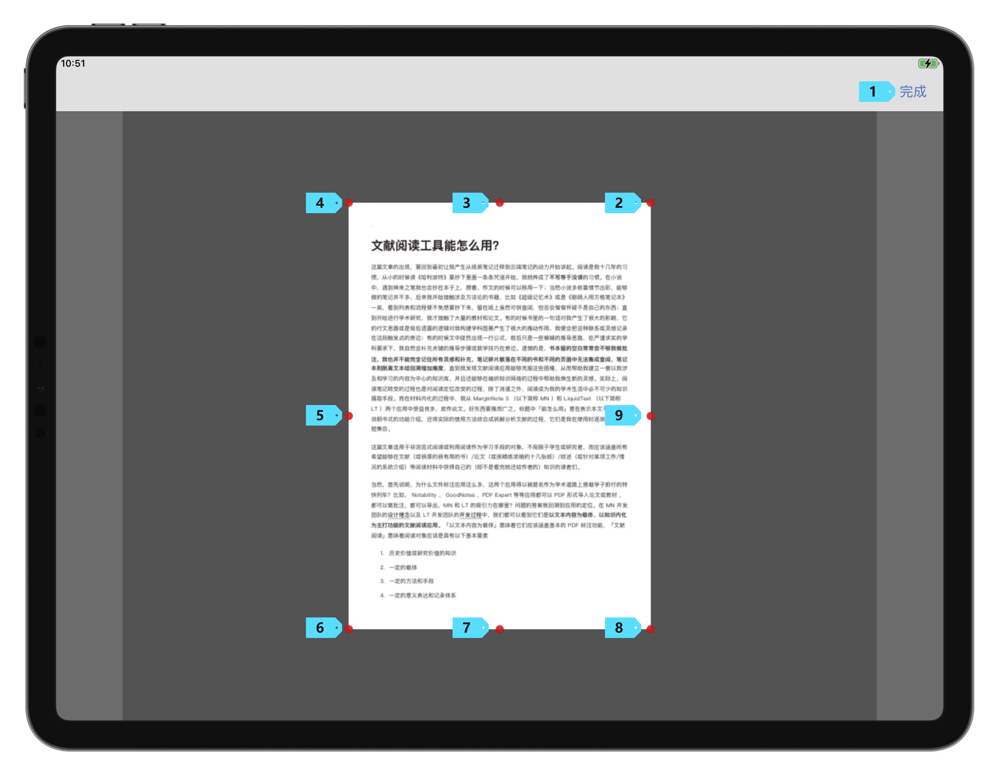
Tap the "Crop/Leave blank" button and MarginNote 3 will pop up the Crop/Leave blank window.
Insert/Remove PDF Pages(PDF) (opens new window)#3.4
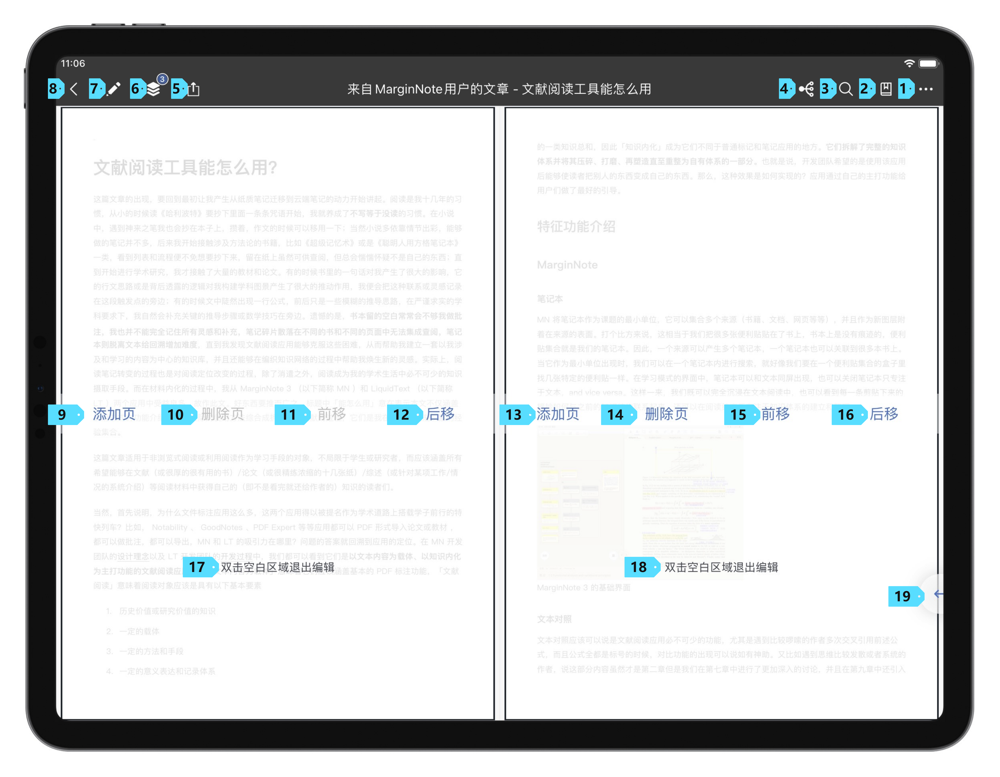
Tap to enter the PDF editing mode. (opens new window)#3.4
| Name | Function |
|---|---|
| Add Page (9) | Tap and the page selector will pop up. You can select a page template or choose to add one from the album. |
| Remove Page (10) | Tap to delete the current page. |
| Up (11) | Tap to move the current page forward, switching with the previous page. |
| Down (12) | Tap to move the current page backward, switching with the next page. |
Tap "Add Page" and the following window will be displayed.

| Name | Function |
|---|---|
| Cancel | Tap to cancel adding pages. |
| Add Blank Page | Tap to add a blank page after the current page. |
| Add Page From Files (opens new window)#3.7.10 | Tap to add selected/all pages from PDFs, which is implemented with virtualization technology. Now it is quicker and safer to add pages from images and other PDFs. |
| Add Page From Photos | Tap and the photo selector will pop up. When a photo is selected, it can be added as a new page after that notebook. |
| Add Page From Camera | Tap and the camera will pop up. After a photo is taken, it can be added as a new page after that notebook. |
Excerpt and Annotation
The excerpt and annotation are the core of MarginNote 3 note-taking system. With excerpt tools, you can excerpt texts and add notes to the excerpted texts. With annotation tools, you can directly record your ideas on the PDF.
MarginNote 3 's excerpt and annotation tools are most powerful when reading PDF files. Tap a document to open the PDF reader. Tap the "Excerpt & Annotation button" to enter the editing mode. In this mode, you can make annotations and excerpts on the PDF.

The editing mode toolbar inherits most of the buttons from the reading mode toolbar, and further includes the Undo (15) and Redo (16) buttons, the Excerpt toolbox, and the Annotation toolbox.
Excerpt Tools
| No. | Name | Function |
|---|---|---|
| 14 | Hand Tool | Tap to use the hand tool. The hand tool is a selection tool. If you drag on the text, you can directly select the text。 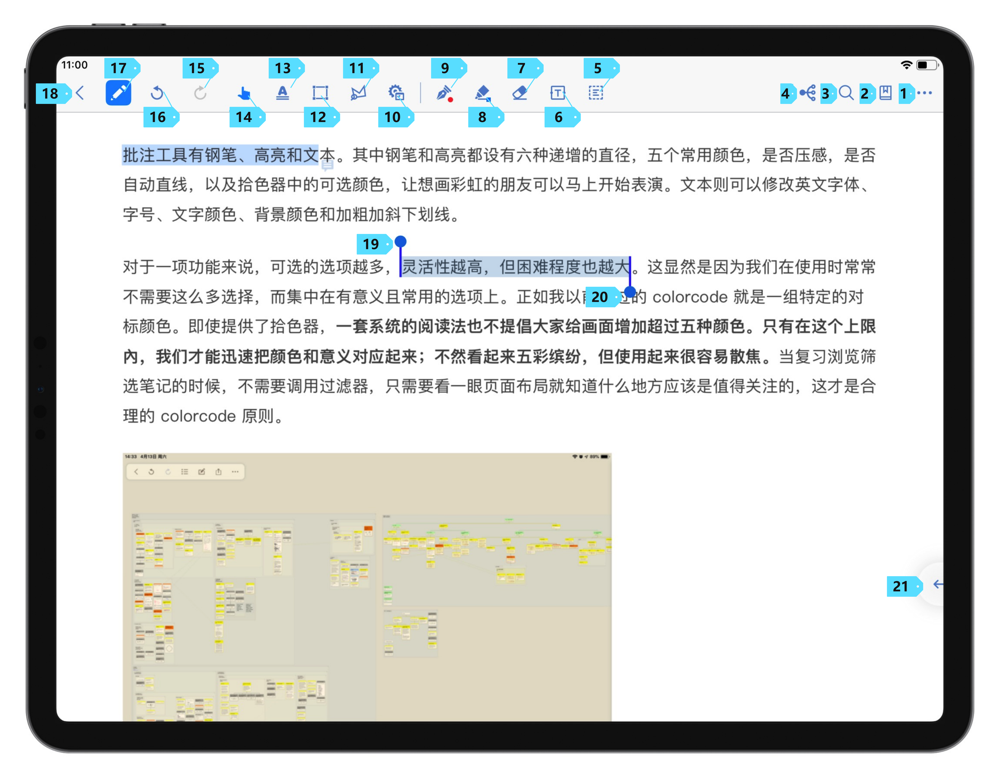 If you drag on the text-free area, you can select and take a screenshot of the text-free area. If you drag on the text-free area, you can select and take a screenshot of the text-free area.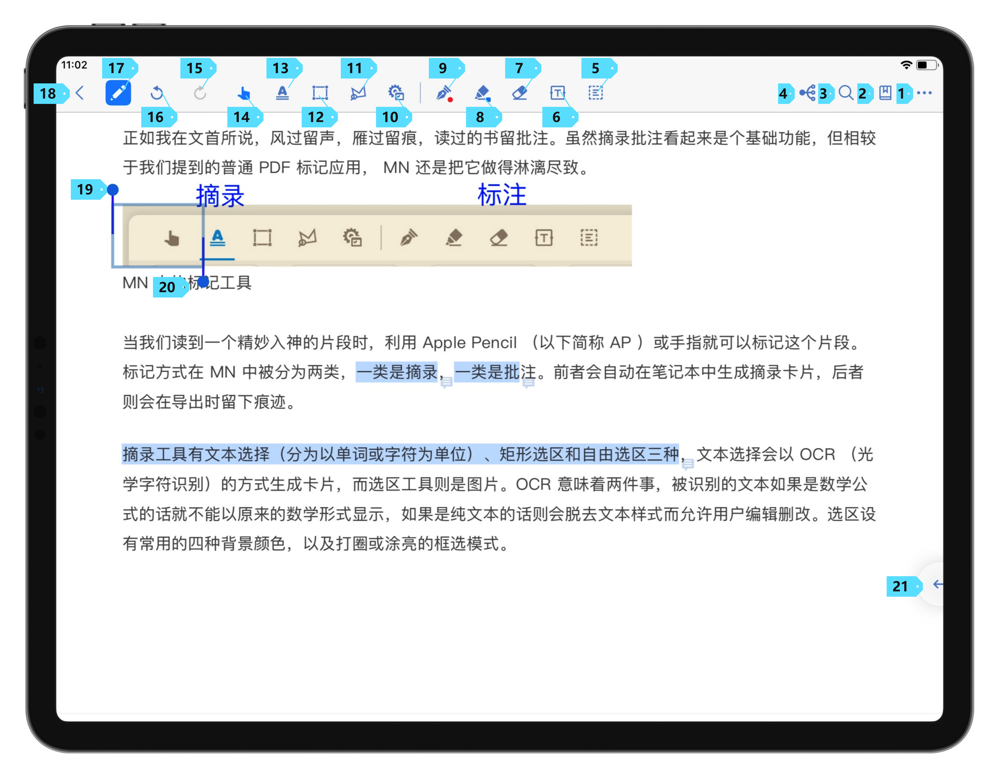 |
| 13 | Text Tool | Tap to use the text tool. After selecting the text tool, drag on text to directly select text and generate excerpts. 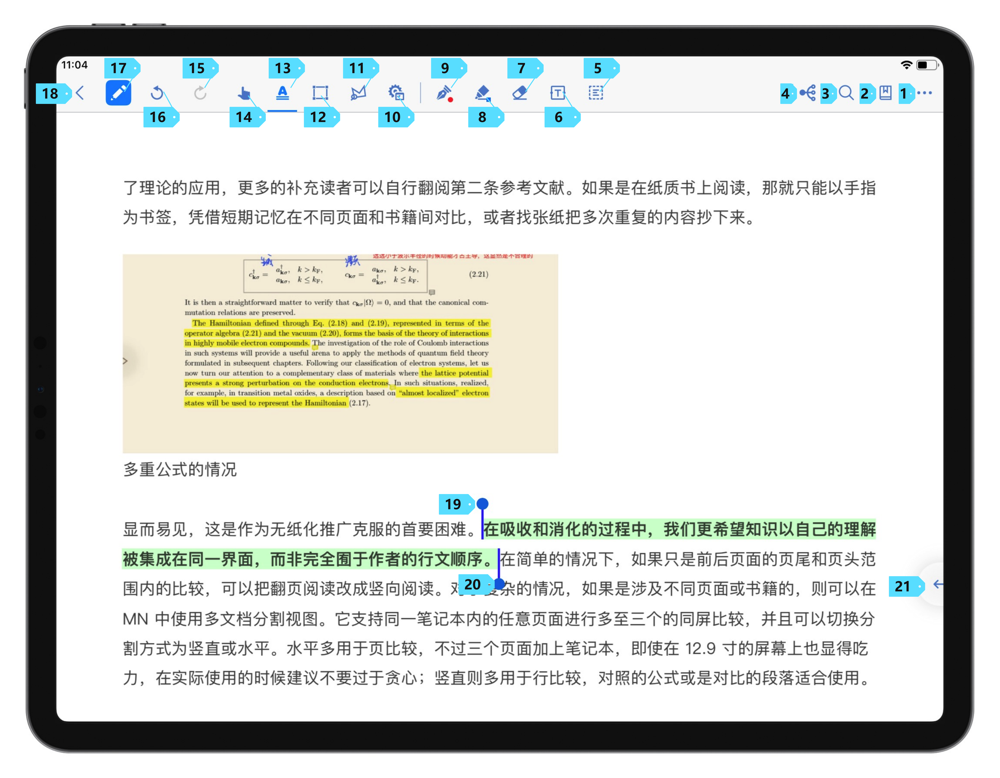 |
| 12 | Rectangular Tool | Tap to use the rectangular tool. After selecting the rectangular tool, drag on the PDF to take a screenshot of the rectangular area and generate a rectangular excerpt. 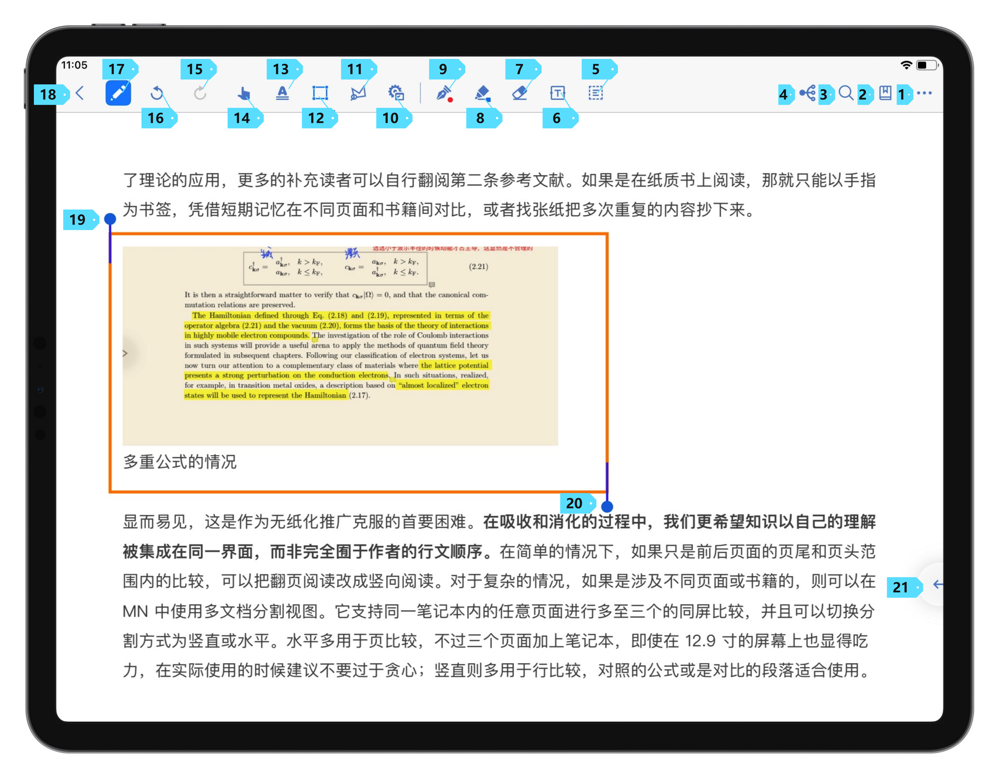 |
| 11 | Lasso Tool | Tap to use the lasso tool. After selecting the lasso tool, tap on PDF to connect corner nodes and create polygonal excerpt. 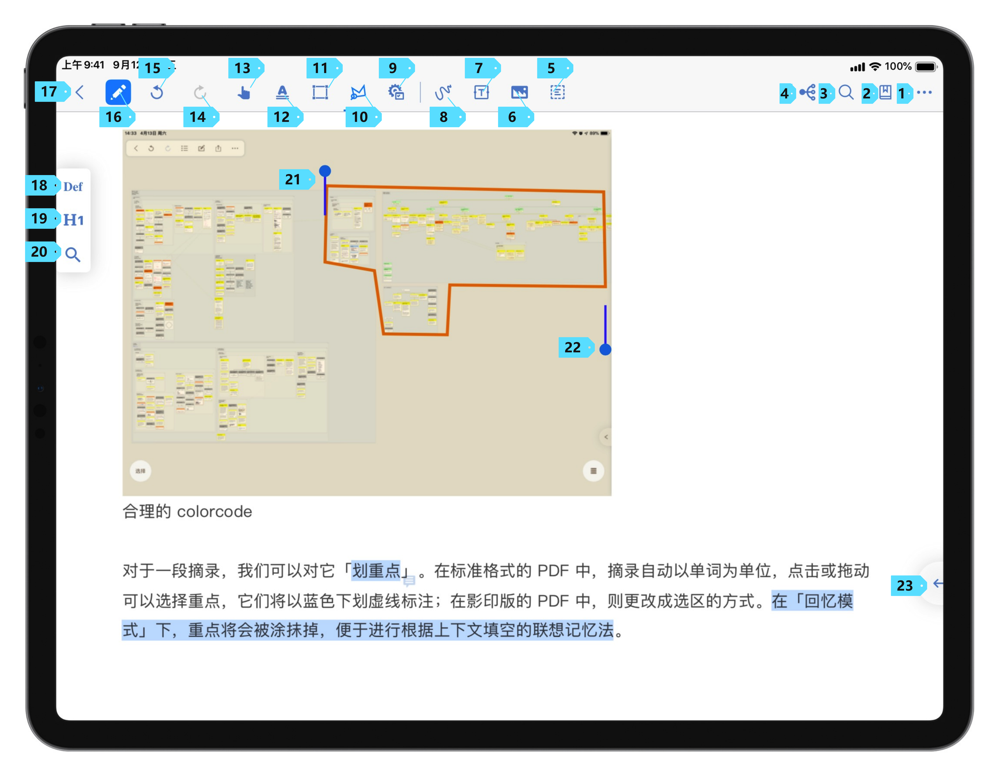 You can circle on the PDF to directly generate lasso excerpts. You can circle on the PDF to directly generate lasso excerpts.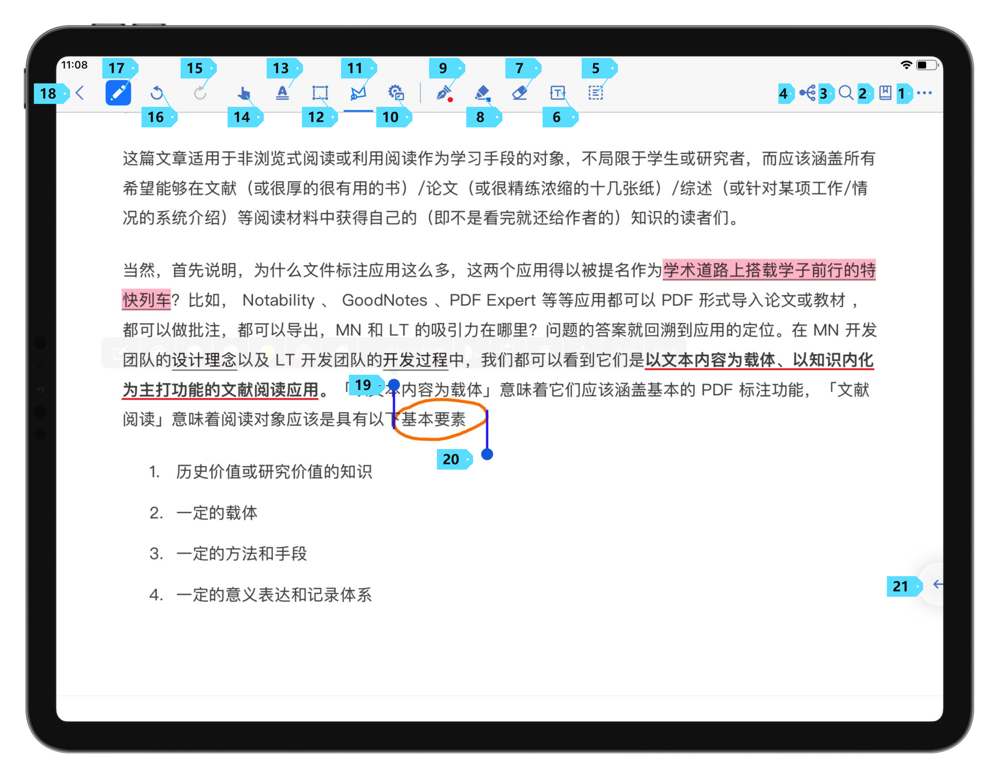 |
| 10 | Excerpt Settings | Tap to open the Excerpt Settings. |
Excerpt Settings
This is the Excerpt Settings page.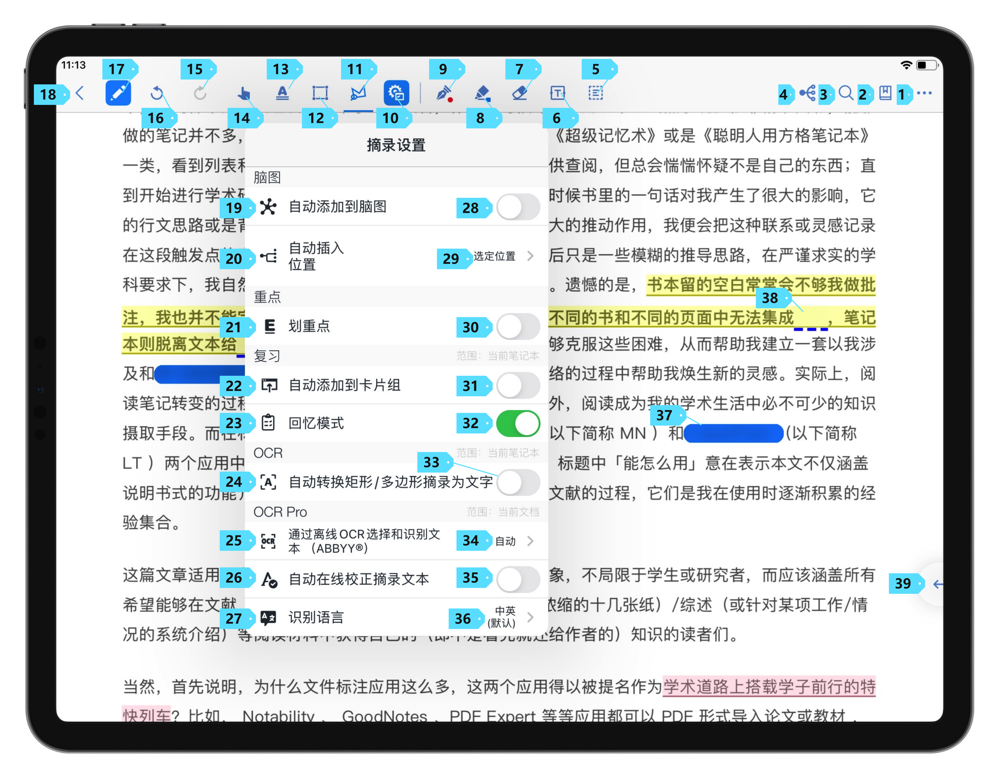
| No. | Name | Function |
|---|---|---|
| 19 | Auto Add to MindMap[17] | When enabled, your excerpts will be automatically added to the mind map in your MindMap Notebook. |
| 20 | Auto Insertion Position[18] | The settings include 3 options: · Grouped (By Table of Contents) · Grouped (By Document) · Selected Position |
| 21 | Emphasize | When enabled, MarginNote 3 enters Emphasize mode. In this mode, the excerpt you tapped will be emphasized. |
| 22 | Auto Add to Card Deck | Once enabled, a window will pop up to ask if you want to bind your excerpts to a card deck. Once bound, the contents you have excerpted will be automatically added to the card deck. |
| 23 | Recall Mode | When enabled, all the emphasized and highlighted content will be converted to occlusion (37)(38). Tap on the occlusion to remove it. |
| 24 | Auto Convert Rect/Polygon Excerpts to Text (opens new window) #3.1 | When enabled, MarginNote 3 automatically converts rectangular and polygonal excerpted images into text via OCR using the Baidu API. |
| 25 | Select Text By Offline OCR(ABBYYⓇ) (opens new window)#3.5 | The settings include 3 options: · OFF · Auto · Always In the OFF case, MarginNote 3 will not use ABBYY's MobileCapture engine for text recognition of PDFs. In the Auto case, MarginNote 3 will use ABBYY's MobileCapture engine for text recognition as appropriate. In the Always case, MarginNote 3 will always use ABBYY's MobileCapture engine for text recognition. |
| 26 | Auto Correct Excerpt Text Online (opens new window)#3.5 | When enabled, MarginNote 3 will first use ABBYY's MobileCapture engine for text recognition and then use Baidu's online API for correction. |
| 27 | Recognition Language (opens new window)#3.5 | This setting is used to manage the language of OCR. The languages supported by OCR include: · Chinese and English (default) · English · Portuguese · French · German · Italian · Spanish · Japanese · Korean |
Annotation Tools
Annotation tools include Writing Tool, Text Insertion Tool, Image Insertion Tool, and Annotation Selection Tool.
Writing Tool

MarginNote 3 has two writing systems. Prior to MarginNote 3.7, you could only use the MarginNote writing engine to annotate text. In MarginNote 3.7 and later versions, you can use either the MarginNote writing engine or Apple's native PencilKit. The latter not only has a better compatibility with the Apple hardware and lower latency, but also supports functions such as mind-map handwriting, excerpt gestures, mind-map gestures, line detection, etc.
The MarginNote writing engine includes pen, highlighter, and eraser tools. After selecting the brush, you can manage the brush settings by tapping it again. You can change the brush color, size, and mode (straight line, equal width, pressure sensitive). You can also clone brushes so you can freely manage brushes in the menu bar. When PencilKit Handwriting is enabled, the curve icon will appear in the toolbar. Tap it to open the PencilKit pen tray[19].
In the PencilKit pen tray, you can tap to switch between tools. If you tap on the selected brush again, you can open the brush settings.
| Name | Function |
|---|---|
| Palette | Tap any color to change the brush color. |
| Size | Tap to change the brush size. |
| Opacity | Drag to adjust the brush opacity. |
| Excerpt Gesture | When enabled, you can use Pencil to excerpt text. |
| Straight Line (opens new window) #3.7.6 | There are three options: "OFF", "Auto", and "Always". If you choose OFF, MarginNote 3 will turn off straight line detection; If you choose Auto, MarginNote 3 will convert strokes that are close to straight lines into straight lines; If you choose Always, MarginNote 3 will convert all strokes into straight lines. |
Text Insertion Tool
With the Text Insertion tool selected, tap anywhere in the document to start typing text. 
Image Insertion Tool (opens new window) #3.6
After selecting the Image Insertion Tool, tap anywhere in the document and the picture selector will pop up. After selecting the picture, you can complete the insertion of the picture. 
Annotation Selection Tool (opens new window) #3.2.3
Using the Annotation Selection Tool, you can select annotations, move the annotations, and resize them. 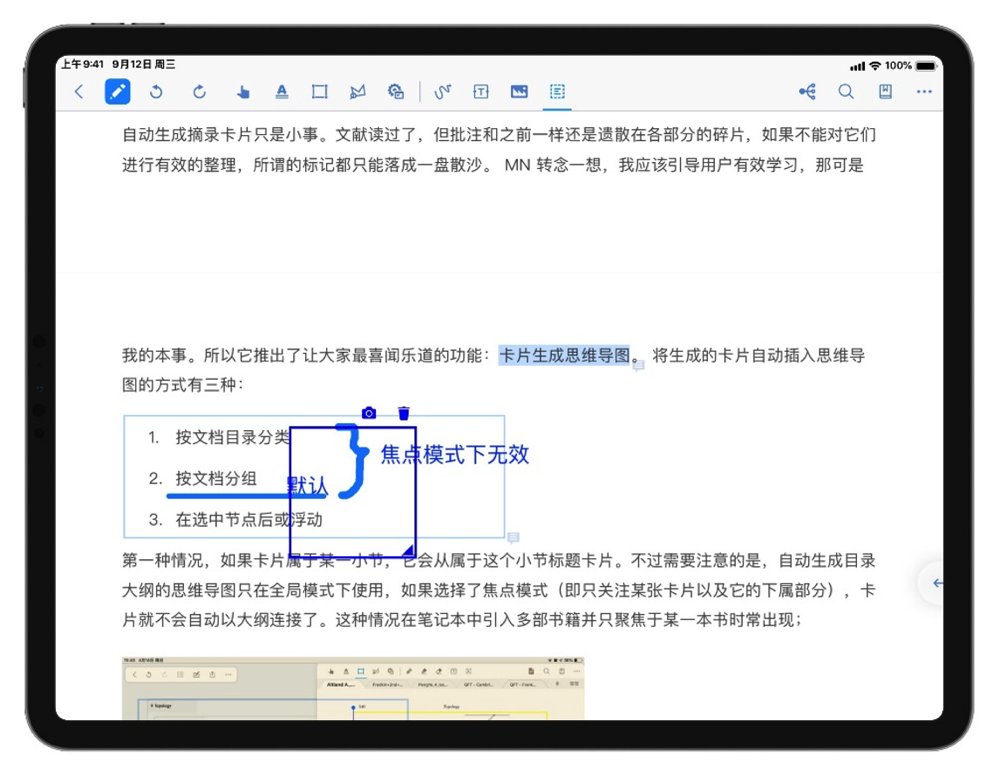
Epub
When reading Epub documents, MarginNote 3 only supports excerpting text. The "Excerpt & Annotation" tool is changed into "Text Excerpt" tool
. Tap to start excerpting text.
Video and Audio (opens new window) #3.3
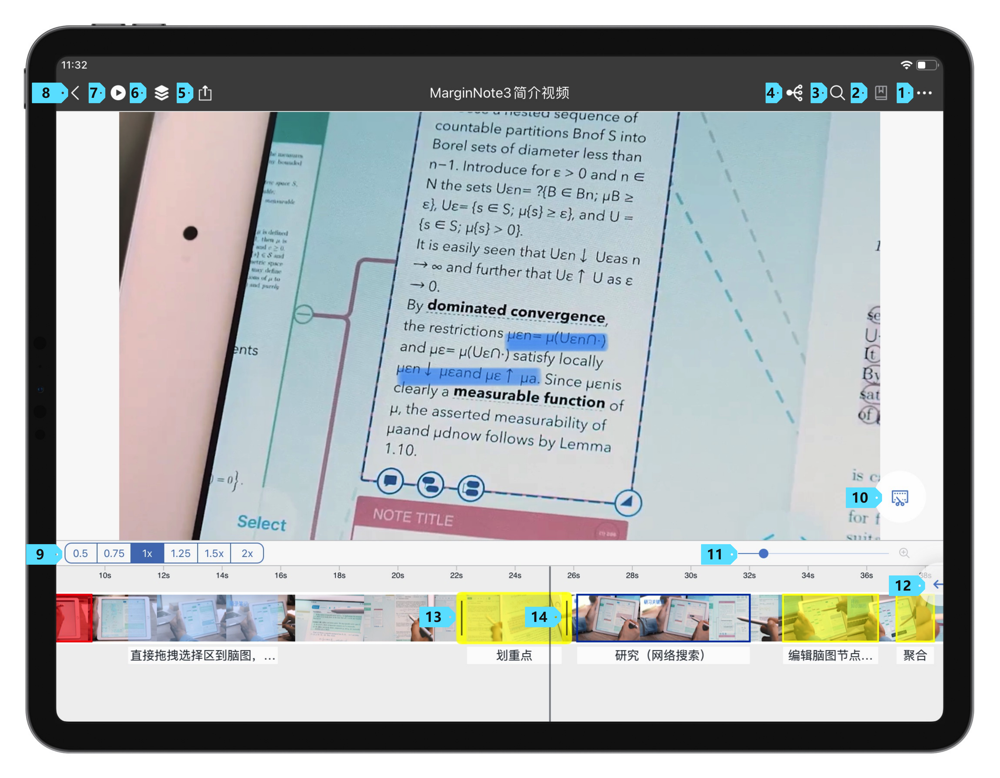
MarginNote 3 supports annotation and excerpts from video and audio.
The video and audio area is divided into three parts: the Toolbar, the Display Area, and the Timeline.
| Name | Function |
|---|---|
| Toolbar | The top toolbar is basically the same as PDF and Epub. The difference is that the "Excerpt & Annotation" button in PDF |
| Display Area | In the video display area, you can browse the content of the video. |
| Timeline | In timeline area, you can adjust the playback speed of the video, adjust the timeline to zoom in or out, tap to change the playback position, or make selections and excerpts. |
Display Area (opens new window) #3.3
Tap the display area of the video, and you can start/stop playing the video. Swipe left or right on the display area allows you to precisely adjust the progress of the video. There is also an excerpt button on the display area . When tapped, it will start playing the video and start excerpting the video clip. If tapped again, it will stop playing the video and generate the excerpt.
Timeline Area (opens new window) #3.3
In the timeline area, you can browse the playback progress and view the thumbnails of the video.
| No. | Name | Function |
|---|---|---|
| 9 | Playback Speed | Tap to switch from the following playback speeds: 0.5x, 0.75x, 1x, 1.25x, 1.5x, 2x |
| 11 | Timeline Zoom In/Out | Drag to adjust the timeline to zoom in/out. |
| 13 | Timeline | In the timeline, you can browse the playback progress of the video. You can zoom in and out on the timeline with two fingers. You can tap the area aside from the thumbnails to select the playback position. You can tap the timeline, drag to select the video clip, and generate an excerpt. |
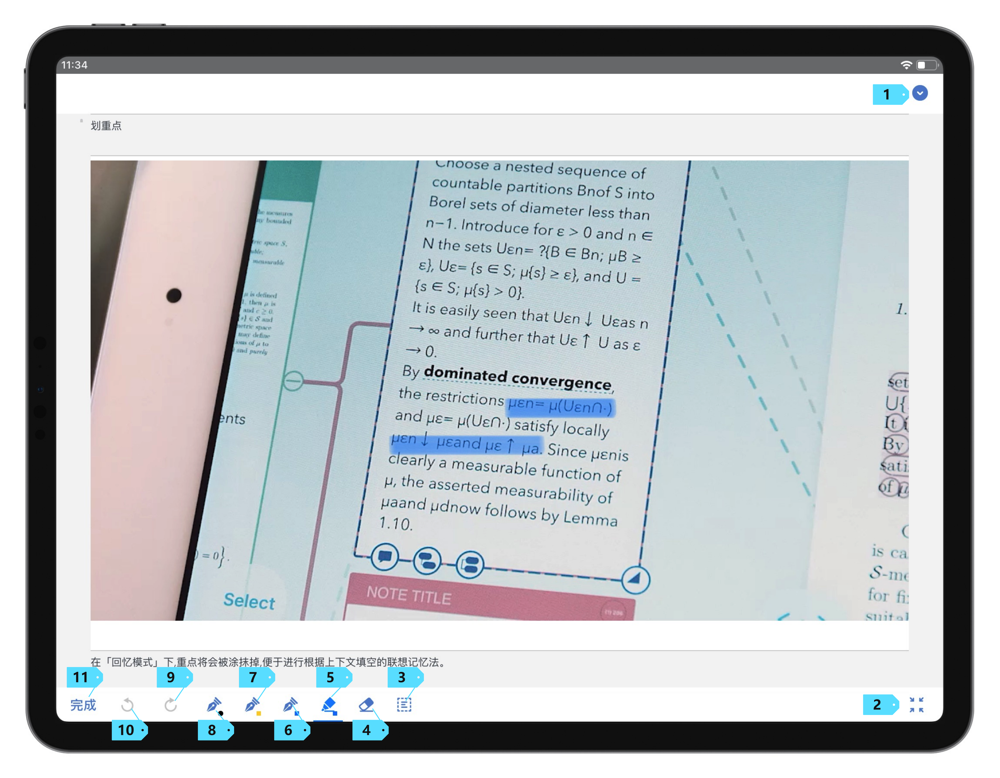
The annotations you made in the excerpts generated from the timeline will be displayed in the video Display Area when playing.
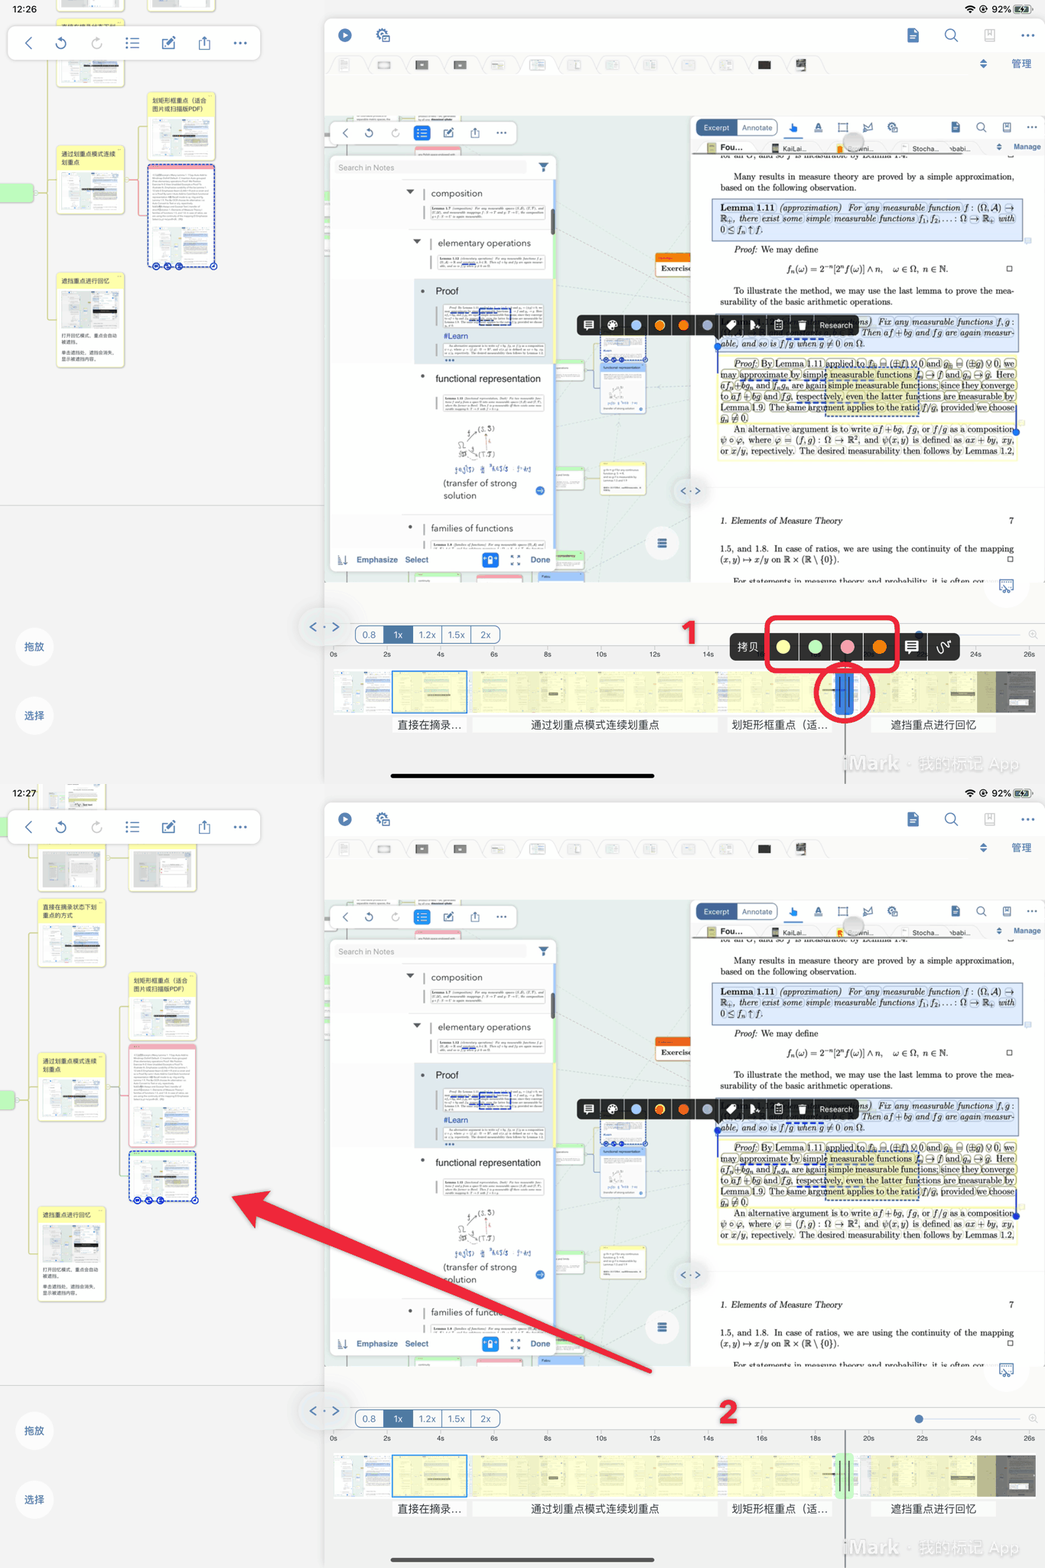
How to take screenshots from the video? (opens new window) #3.3
Option 1:
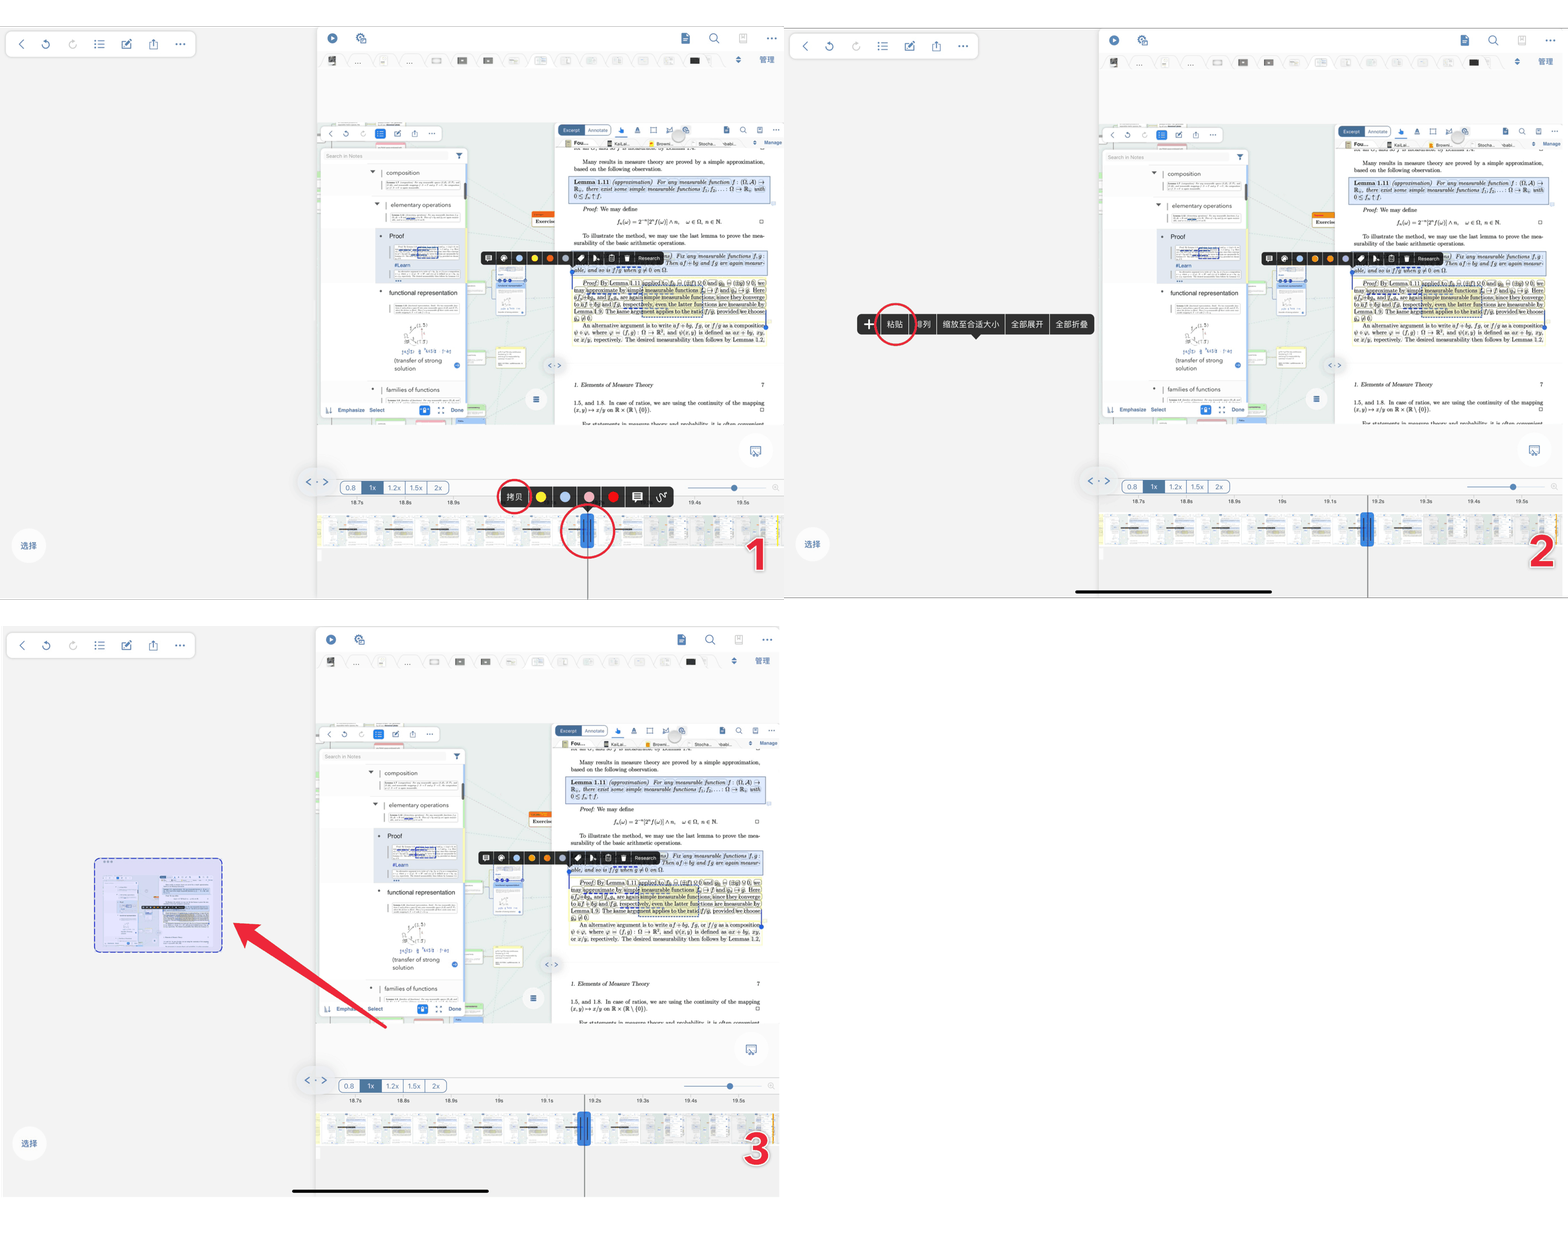
Tap the timeline below the video, choose a color, and generate a screenshot excerpt.
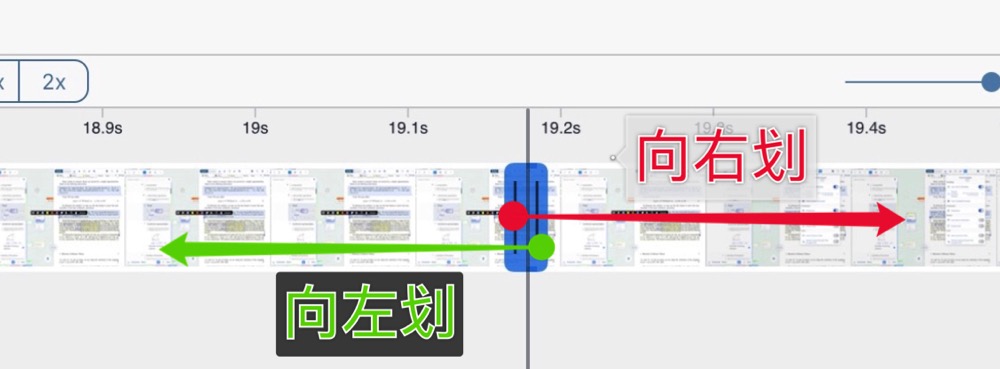
If you want to adjust the playback position of the screenshot excerpt, before choosing the color and generating an excerpt, you can drag the right vertical bar to the left, or drag the left vertical bar to the right, to keep the excerpt in the form of screenshot.
Option 2:
Generate screenshot image from "Copy-Paste". ⚠️Note that this is not an excerpt and cannot be linked back to the video.
Excerpt Tools Pop-up Menu
When you use selection tools to select contents, the text selection menu will pop up. 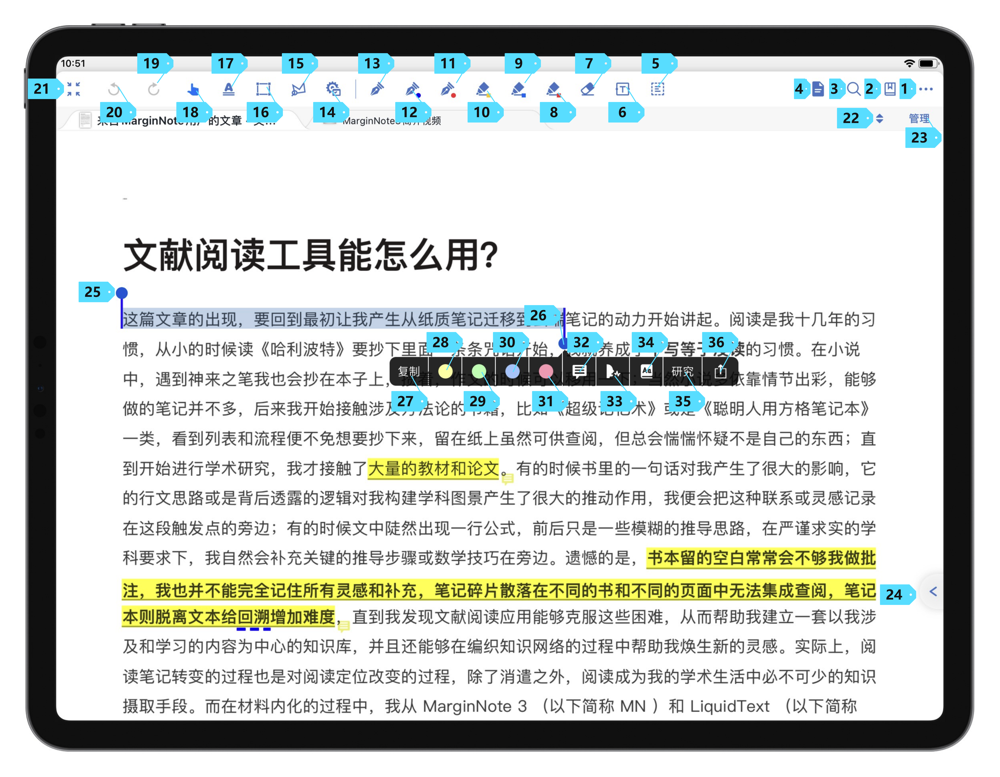
| No. | Name | Function |
|---|---|---|
| 27 | Copy | Tap to copy the selected text. |
| 28~31 | Excerpt Colors | Tap to generate an excerpt of this color. |
| 32 | Note | Tap and MarginNote 3 will generate an excerpt with the default color and open the card editor. In the card editor, you can add "title", "comment", or edit the excerpt content. |
| 33 | Speech (opens new window) #3.1.10 | Tap and MarginNote 3 will read the selected content aloud. |
| 34 | Dictionary | Tap and MarginNote 3 will search the selected content with the Apple default dictionary. |
| 35 | Research | Tap and MarginNote 3 will open the research mode page, and search the selected content with the corresponding search engine. |
| 36 | Share | Tap and MarginNote 3 will open the built-in iOS share menu, and share the selected content. |
If you use excerpt tools to excerpt content, or tap on an excerpt, the excerpt menu will pop up.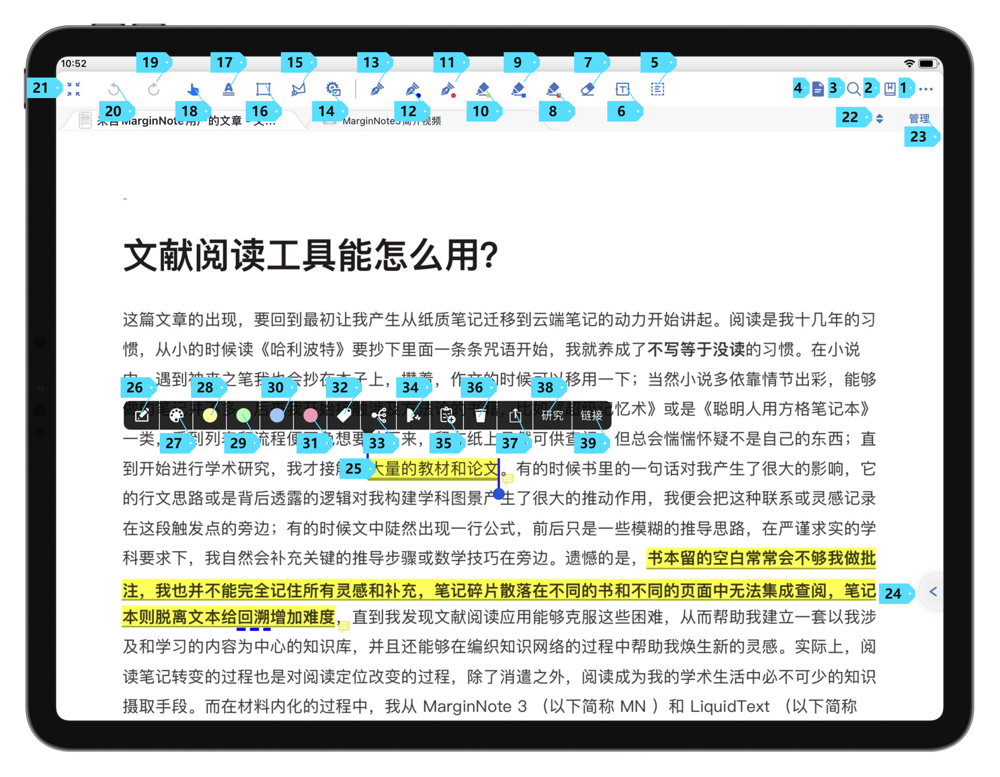
| No. | Name | Function |
|---|---|---|
| 26 | Edit | Tap and MarginNote 3 will open the card editor. In the card editor, you can add "title", "comment", or edit the excerpt content. |
| 27 | Palette | When selected, a palette window will pop up. You can set the excerpt color and the excerpt style.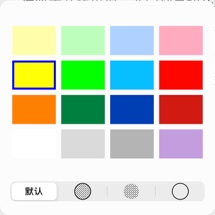 MarginNote 3 supports 16 excerpt colors and 3 excerpt styles (highlight only, highlight + underline, underline only). |
| 28~31 | Color | Tap and change the excerpt color swiftly. |
| 32 | Tag | Tap and enter the tag management page. In this page, you can add tags for the excerpt. You can also manage tags and create new tags. |
| 33 | MindMap[20] | Tap and switch to the Study Mode, and display the current notes in the mind-map space. |
| 34 | Speech (opens new window) #3.1.10 | Tap and MarginNote 3 will read the selected content aloud. |
| 35 | Add to Card Deck | Tap and MarginNote 3 will add the current excerpt to the Card Deck in the Review Mode. |
| 36 | Delete | Tap and MarginNote 3 will delete the current excerpt. |
| 37 | Share | Tap and MarginNote 3 will open the built-in iOS share menu, and share the selected content. |
| 38 | Research | Tap and MarginNote 3 will open the research mode page, and search the selected content with the corresponding serach engine. |
| 39 | Link | Tap and a round link icon will appear. Drag the icon to the excerpt or card, and links can be formed between excerpts. |
Card Editor
In MarginNote 3, notes exist in the form of cards. Cards take different forms in different modes. In the Document Mode, cards are excerpts. In the Study Mode, cards are nodes in a mind map. In the Review Mode, the cards are review flashcards. There are multiple ways to open the Card Editor: double-click on an excerpt; tap on the card in the notes section on the side of the screen; tap "Note" in the text selection pop-up menu; or tap the "Edit" button in the excerpt pop-up menu.
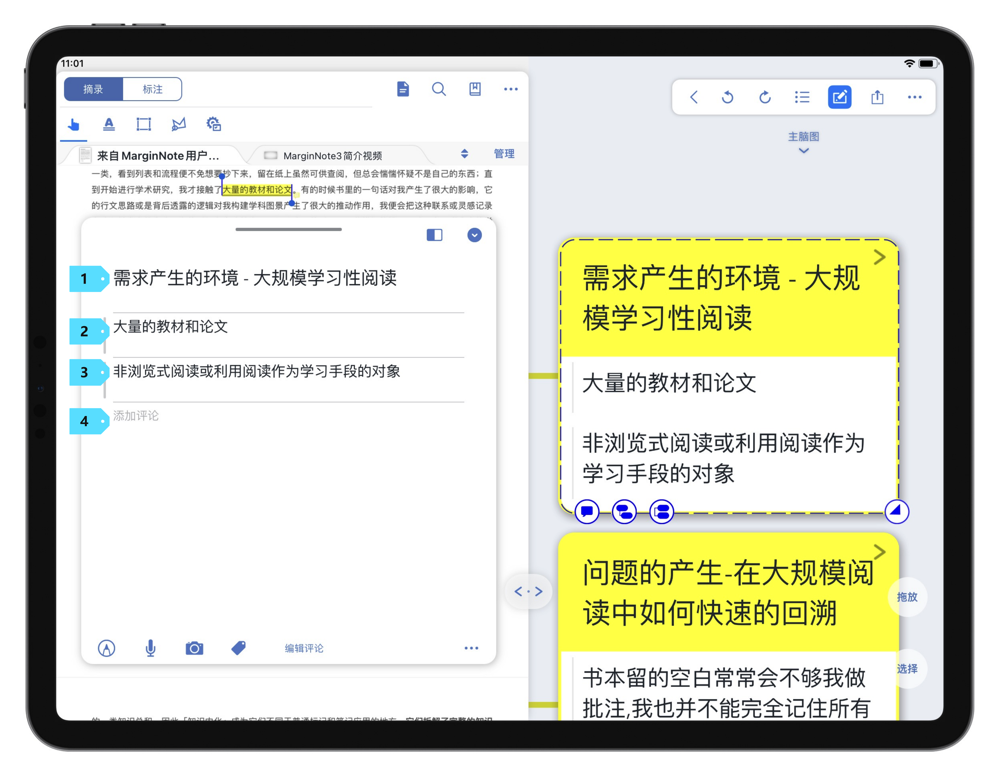
A card in MarginNote is divided into three fields: Title, Excerpt, and Comment.
| No. | Name | Function |
|---|---|---|
| 1 | Title | The titles of MarginNote 3 cards have a larger display space in the mind map. MarginNote 3 titles support the title link feature, which can be used as an index to the dictionary to which the title is linked. The title field is a plain text field, so only plain text can be entered in the title. In addition, the title field has a length limit of 250 characters. |
| 2~3 | Excerpt | The excerpts of MarginNote 3 cards are the text that you have excerpted from the document. |
| 4 | Comment | Comments are notes added by the user. Comments can contain plain text, formatted text, handwriting, images, audio, etc. |
In the card editor, you can add handwriting, comments, tags to the cards with buttons.

| No. | Name | Function |
|---|---|---|
| 23 | Close | Tap to close the card. |
| 31 | More | Tap to view more settings on the card. |
| 32 | Edit comments | Tap to edit the order of comments or delete comments. |
| 33 | Tag | Tap to display the tag management page. Select to add tags. |
| 34 | Photo | Tap to display the menu. You can choose to take a photo with camera, or add an image directly from the photo library. |
| 35 | Recording | Tap to start recording. |
| 36 | Handwriting | Tap to write on the card. You can annotate on the comment area or the image excerpt area. |
After tapping the More button in the bottom right corner of the card editor, you can perform more operations on the card.
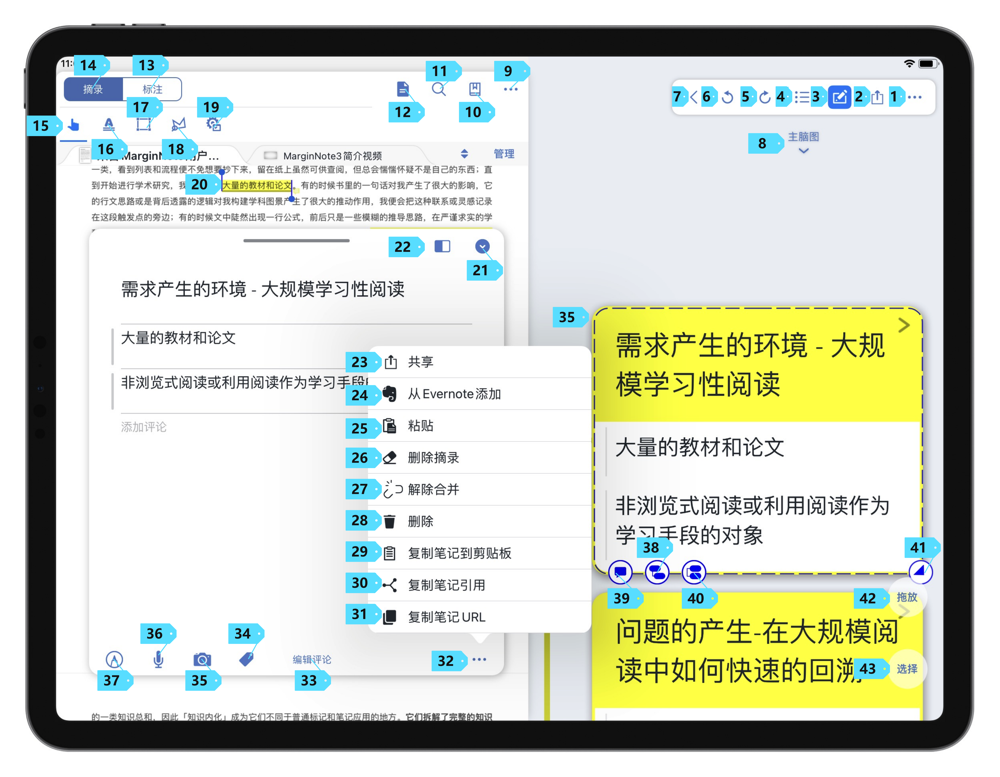
| No. | Name | Function |
|---|---|---|
| 23 | Share | Tap and MarginNote 3 will open the built-in iOS share menu, and share the selected content in plain text. |
| 24 | Add Evernote | Tap to view the menu bar of Evernote, and then you can add the contents in Evernote to the card. If you have not logged in to Evernote, MarginNote 3 will notify you to log in and then add notes. |
| 25 | Paste[21] | Tap and you can paste the content in the clipboard into the card as a comment. |
| 26 | Remove excerpt | Tap to delete the excerpt of the card. |
| 27 | Unmerge[22] | If the card is merged from multiple cards, tap to unmerge the cards. |
| 28 | Delete | Tap to delete the card. |
| 29 | Copy note to clipboard | Tap to copy the notes to the clipboard as plain text. |
| 30 | Copy note reference (opens new window)#3.6.12 | When tapped, a reference card for this card will be copied. You can then paste the card into a mind map or outline. The contents of the reference card will be changed at the same time with the original card. |
| 31 | Copy note URL (opens new window) #3.1 | Tap to copy the URL of the card, and you can jump to related notes paragraphs in real time through this hyperlink in PDF. |
Operations among Excerpts
In MarginNote 3, after tapping an excerpt, you will enter the selection state for that excerpt. In the selection state, you can perform operations among excerpts.
When an excerpt A is selected, if you select another text B, then the selection pop-up menu of B will have options such as "As title," "Add to comments," and "Merge".
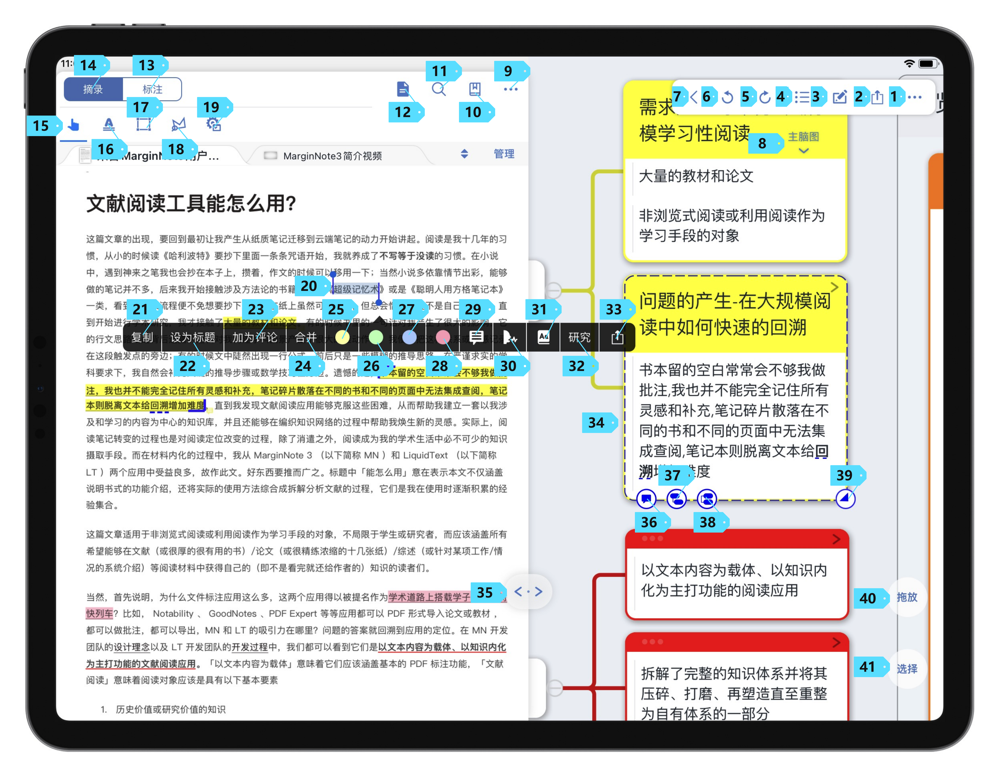
If the selected text B is part of excerpt A, then the pop-up menu will also have the "Emphasize" option.
| No. | Name | Function |
|---|---|---|
| 22 | As title (opens new window) #3.0.5 | When tapped, the selected text B will serve as the title for excerpt A. |
| 23 | Add to comments (opens new window)#3.0.5 | When tapped, the selected text B will serve as the comment for excerpt A. |
| 24 | Merge (opens new window) #3.1 | When tapped, the selected text B will be merged with excerpt A. After the merge, the new card will have two excerpt text fields. |
| Emphasize | When tapped, the selected text B in excerpt A will be emphasized. |
Document Mode Sidebar
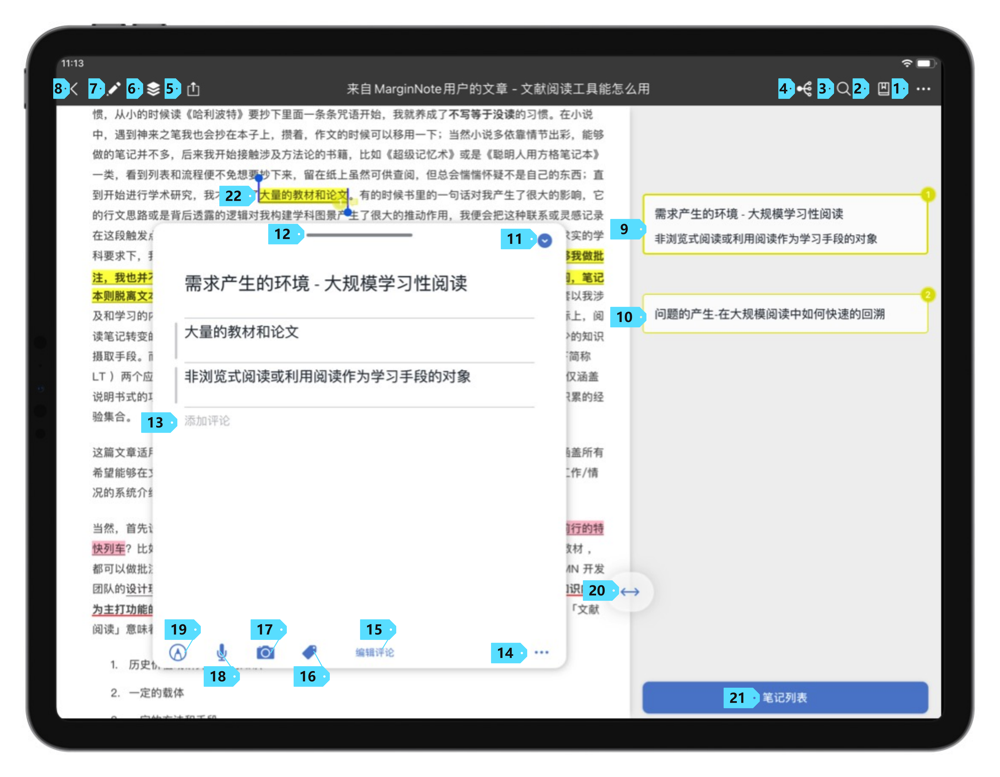
Tap the Document Mode Sidebar button [23] on the right side of the screen to open the Document Mode Sidebar. In the sidebar, your notes will hover in the Document Mode Sidebar corresponding to their positions in the document.


Tap a note to display the card editor, and you can enter note content in the card editor. [24]
OCR Pro (opens new window) #3.5
OCR Pro is an additional subscription feature for MarginNote 3.
The OCR Pro feature uses ABBYY's Mobile Capture engine to allow users to excerpt content directly from scanned PDFs. You can manage the settings of OCR Pro in the Excerpt Settings.
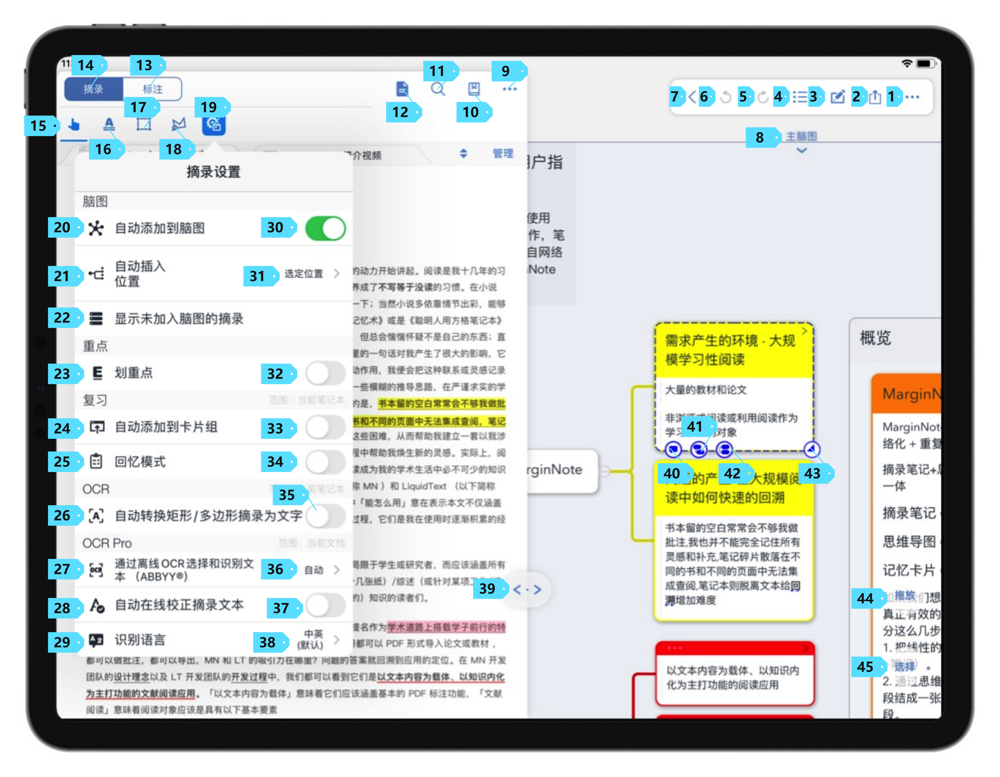
| No. | Name | Function |
|---|---|---|
| 27 | Select Text By Offline OCR(ABBYYⓇ) | The settings include 3 options: · OFF · Auto · Always In the OFF case, MarginNote 3 will not use ABBYY's MobileCapture engine for text recognition of PDFs. In the Auto case, MarginNote 3 will use ABBYY's MobileCapture engine for text recognition as appropriate. In the Always case, MarginNote 3 will always use ABBYY's MobileCapture engine for text recognition. |
| 28 | Auto Correct Excerpt Text Online | When enabled, MarginNote 3 will first use ABBYY's MobileCapture engine for text recognition and then use Baidu's online API for correction. |
| 29 | Recognition Language (opens new window)#3.5 | This setting is used to manage the language of OCR. The languages supported by OCR include: · Chinese and English (default) · English · Portuguese · French · German · Italian · Spanish · Japanese · Korean |
On Mac, the name of this feature is "Add Documents (PDF, EPUB, MOV, MP3, MP4, M4V, M4A) from File Explorer", which plays the same role as that on iOS/iPadOS. ↩︎
This feature is only available in the iOS/iPadOS version of MarginNote 3. ↩︎
This feature is only available in the iOS/iPadOS version of MarginNote 3. ↩︎
The button only appears when viewing Epub documents, but not in viewing PDF, video, or audio. ↩︎
The button only appears when viewing PDF documents, but not in viewing Epub, video, or audio. ↩︎
The button only appears when viewing Epub documents, but not in viewing PDF, video, or audio. ↩︎
The button only appears when viewing video and audio, but not in viewing PDF and Epub. ↩︎
This feature is not compatible with videos. ↩︎
The button only appears when viewing PDF documents, but not in viewing Epub, video, or audio. ↩︎
The button only appears when viewing Epub documents, but not in viewing PDF, video, or audio. ↩︎
The button only appears when viewing video and audio, but not in viewing PDF and Epub. ↩︎
This button will only appear on the right side of the document notebook. It will not appear on the right side of the mind-map notebook. ↩︎
This button will only appear on the right side of the mind-map notebook. It will not appear on the right side of the document notebook. ↩︎
This setting appears only in editing mode (after tapping the Excerpt & Annotation button). ↩︎
This setting appears only in editing mode (after tapping the Excerpt & Annotation button). ↩︎
MarginNote handwriting engine does not support PencilKit. ↩︎
This feature needs to be used in a mind map. In the Document Mode, MarginNote 3 will ask if you want to upgrade to MindMap Notebook if this setting is enabled. ↩︎
This feature needs to be used in a mind map. In the Document Mode, MarginNote 3 will ask if you want to upgrade to MindMap Notebook if this setting is enabled. ↩︎
After MarginNote 3.7.6, MarginNote use the MarginNote custom PencilKit pen tray by default. This pen tray is simpler than the Apple PencilKit pen tray and supports pen cloning. ↩︎
This button is only available in the menu under Document Mode. It is not available in the excerpt menu bar in the Study Mode. ↩︎
This option appears only if there is content in the clipboard. ↩︎
This option appears only if the card is merged from multiple cards. ↩︎
Tap icon "4" in the image ↩︎
Tap the cards of number "9" or "10" in the image, and the card editor will appear. ↩︎