Study Mode
In MarginNote 3, the Study Mode serve to organize your knowledge. You can use the Study Mode to build mind maps and create your own knowledge base.
Study Mode Page
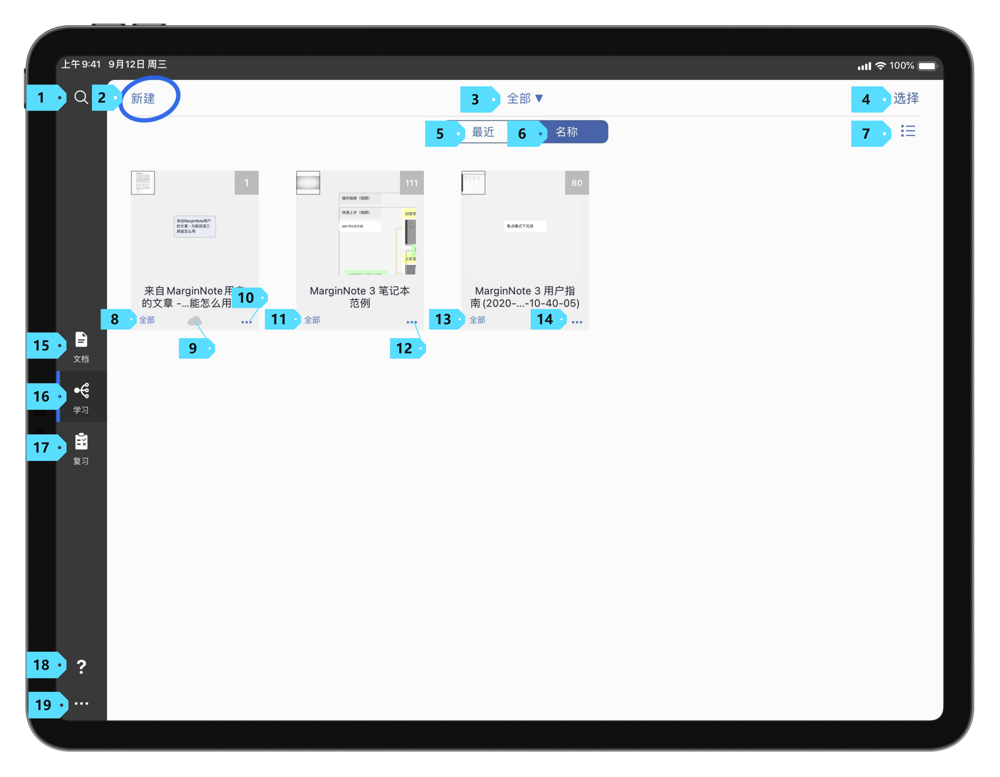
Similar to the Document Mode, you can manage your notebooks. You can also tap to open your notebook and start organizing your knowledge.
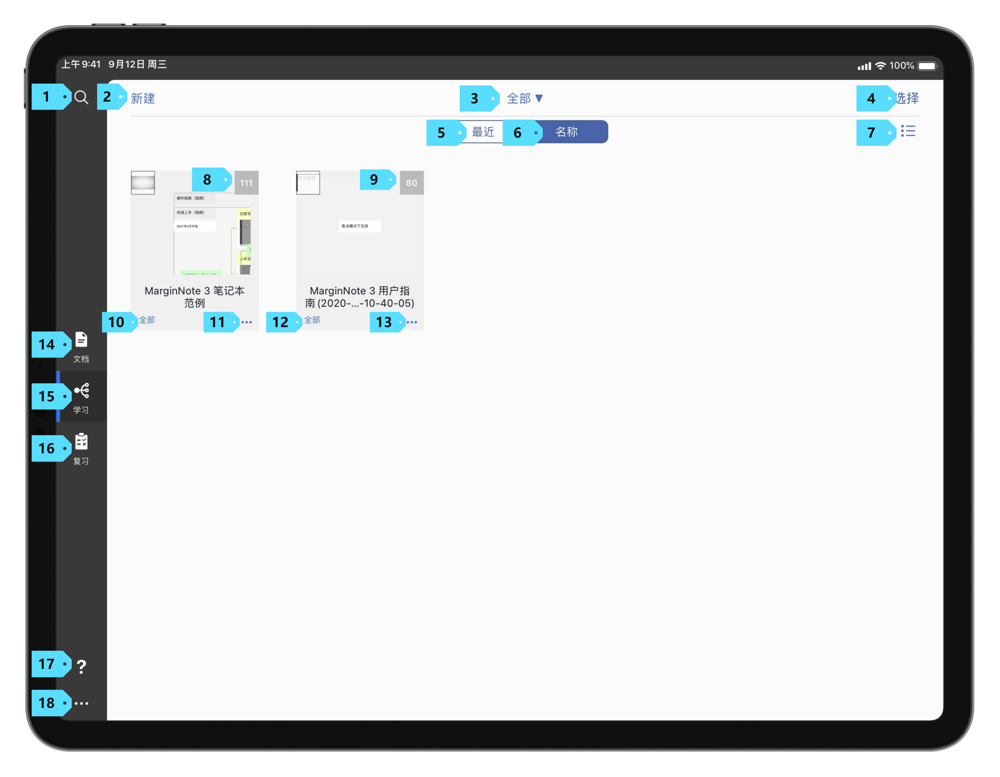
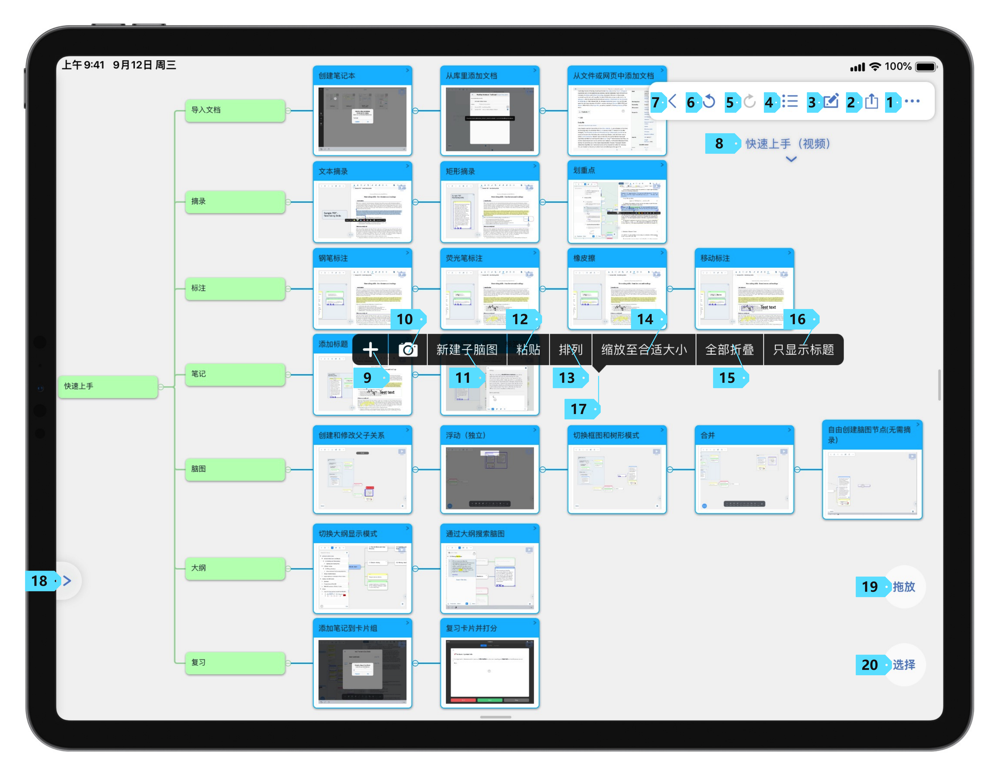
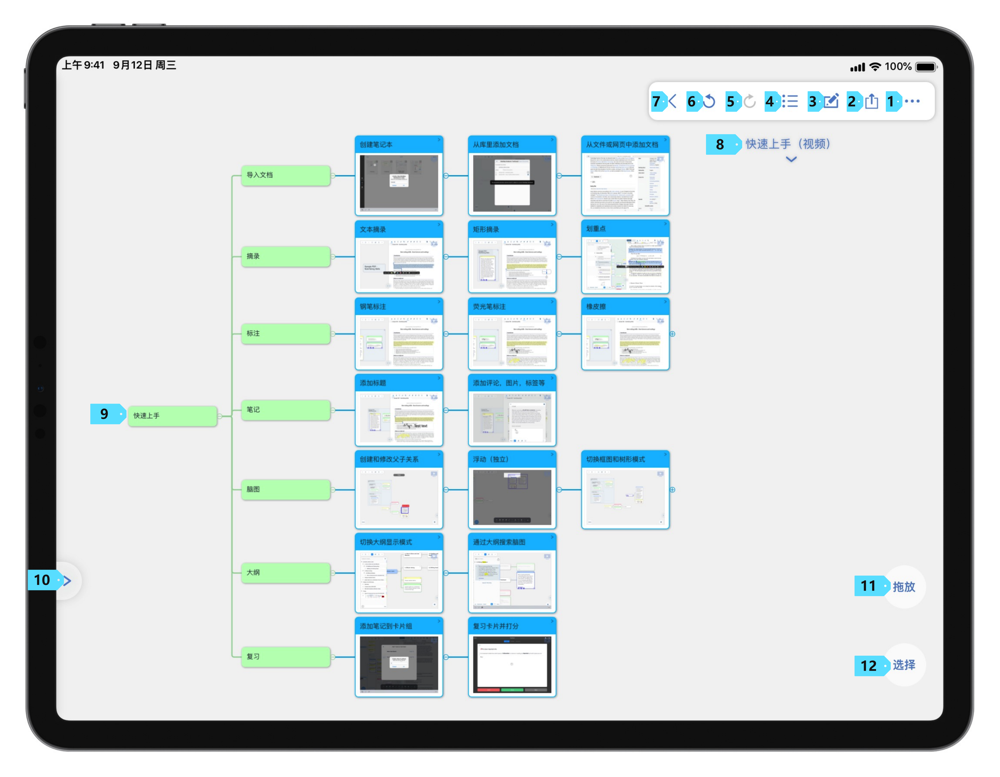
The top menu bar of the Study Mode Page include 3 buttons: "New", "Categories List", and "Select".
| No. | Name | Function |
|---|---|---|
| 2 | New | Tap to create a new MindMap Notebook and associate it with documents. |
| 3 | Categories List (opens new window)#3.0.3 | Tap to open the Categories List. The functions of the Categories List is similar to the category part of the Categories & Folders List in the Document Mode. |
| 4 | Select | Tap to enter the batch editing mode. |
Categories List
Tap the button in the middle of the screen to open the Categories List.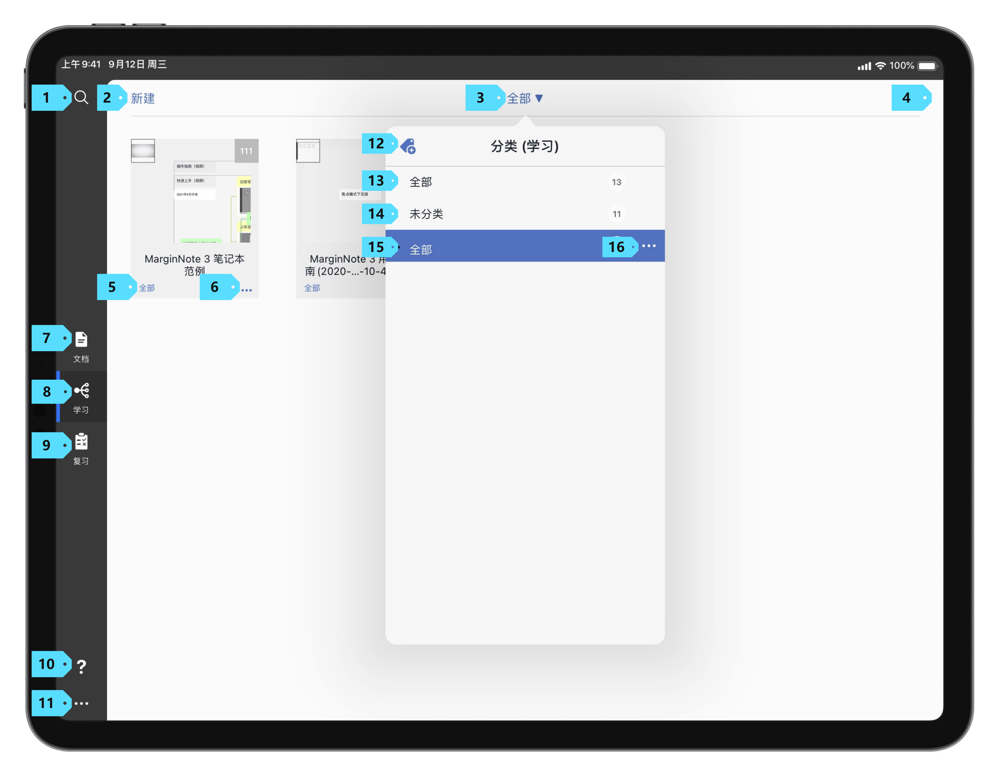
As in the Document Mode, you can create a new category, edit categories, or manage the categories list.
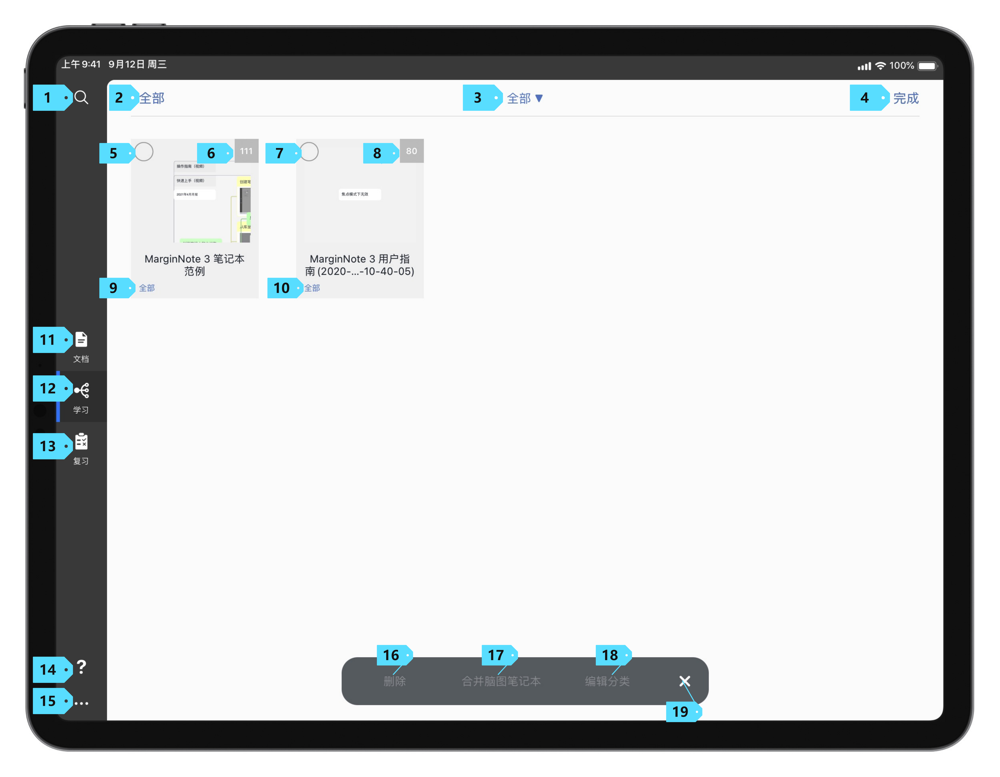
Selection and Batch Operation
Tap the "Select" button on the top right corner, and you can select and manage multiple MindMap Notebooks.
| No. | Name | Function |
|---|---|---|
| 16 | Delete | Tap to batch delete MindMap Notebooks |
| 17 | Merge MindMap Notebooks | After selecting multiple notebooks, you can tap this button to merge them. |
| 18 | Edit Category | Tap to batch edit the categories of notebooks. |
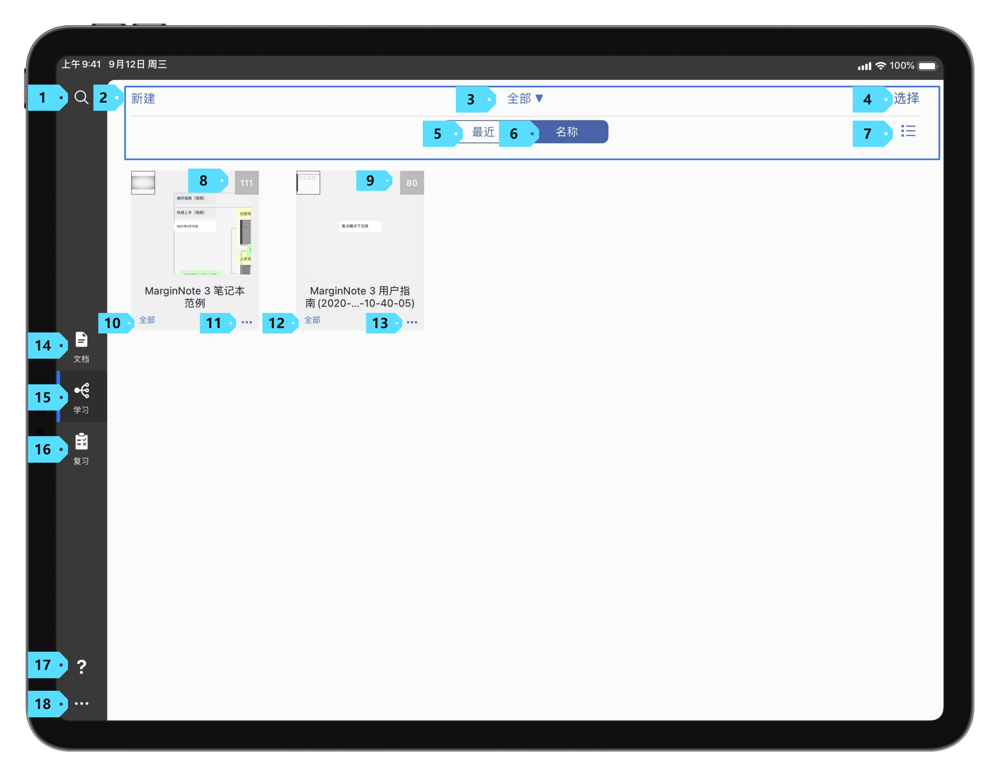
Study Mode Secondary Menu Bar
In the Study Mode Secondary Menu Bar, you can adjust the order and presentation of your MindMap Notebooks.
| No. | Name | Function |
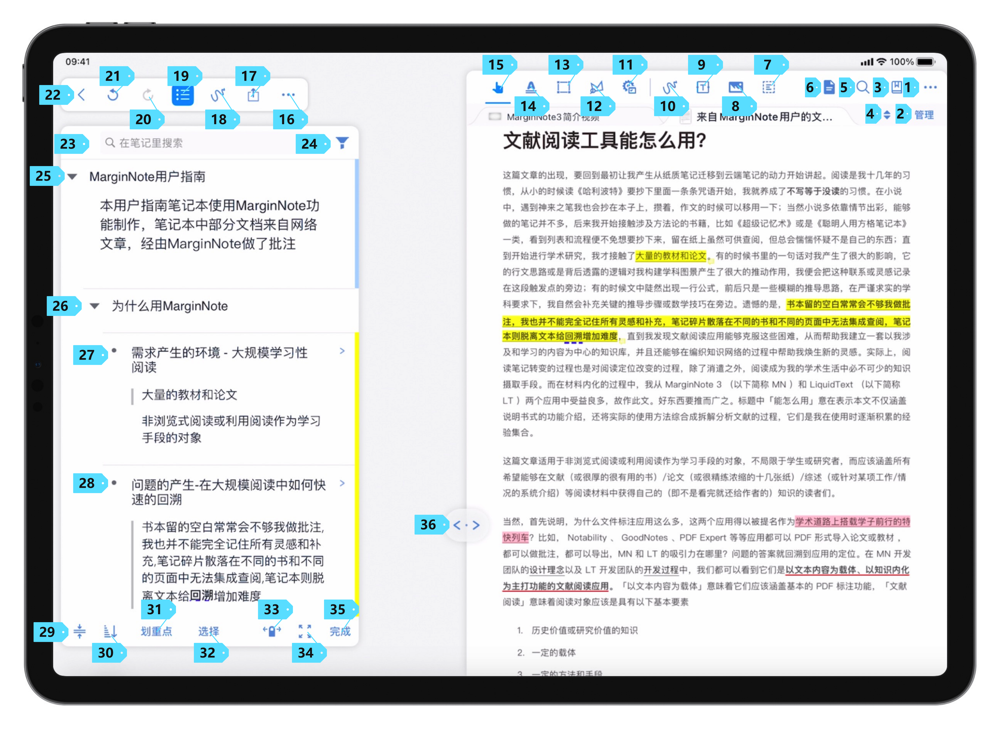
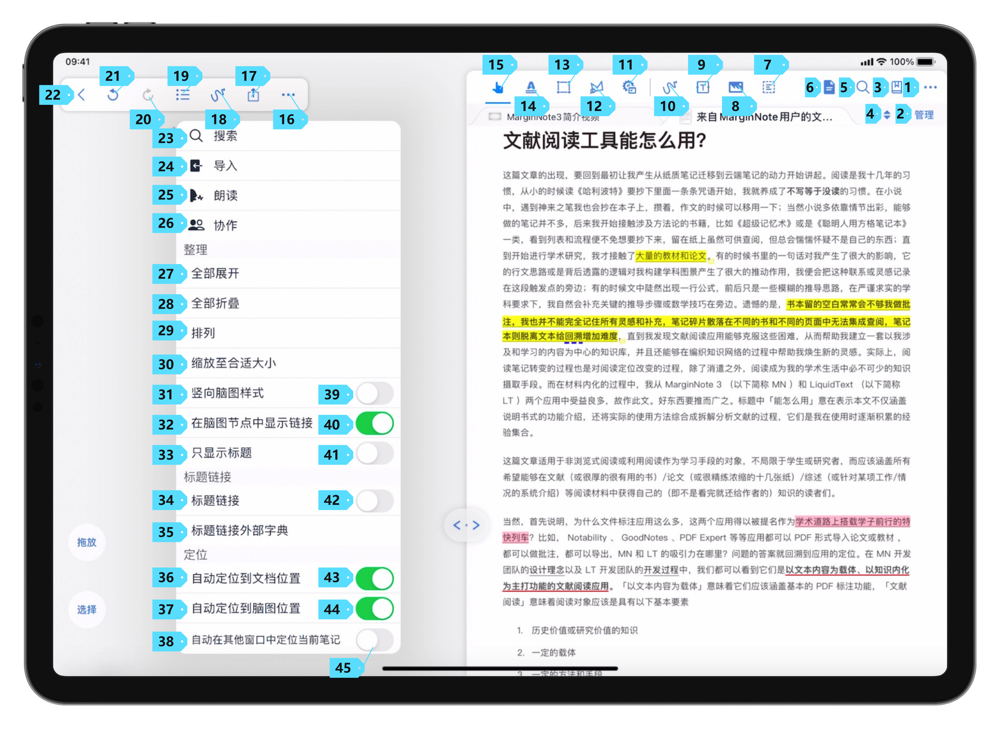
|---|---|---|
| 5, 6 | Display Order | If you select "Recent", then the notebooks will be ordered according to the time being viewed. If you select "Name", then the notebooks will be in alphabetic order. |
| 7 | List (opens new window) #3.0.3 | When selected, the notebooks will be displayed in the form of a list. 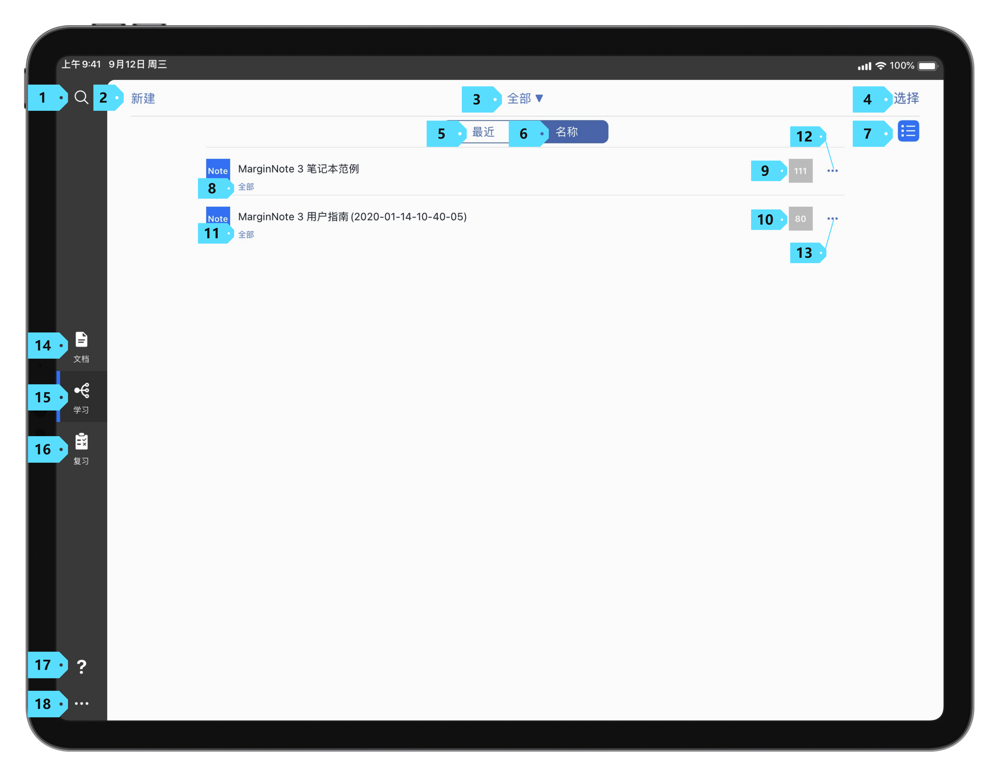 When deselected, the notebooks will be displayed in the regular mode. When deselected, the notebooks will be displayed in the regular mode.  |
Create a MindMap Notebook
There are two ways to create a MindMap Notebook: upgrading a document notebook to a MindMap Notebook (not recommended), or creating a MindMap Notebook directly.
It should be noted that there is a certain risk of losing data during the process of upgrading a document notebook to a MindMap Notebook due to the difference in data structures. Therefore, we do not recommend this method. If possible, please try to create a MindMap Notebook directly. It is also a good idea to prepare a backup of your notebook before the upgrade. If you have already created a document notebook, you can upgrade your document notebook to a MindMap Notebook by tapping the "MindMap" button in the upper right corner of the document page.
During the upgrade, MarginNote 3 will ask you to input the topic for the MindMap Notebook.
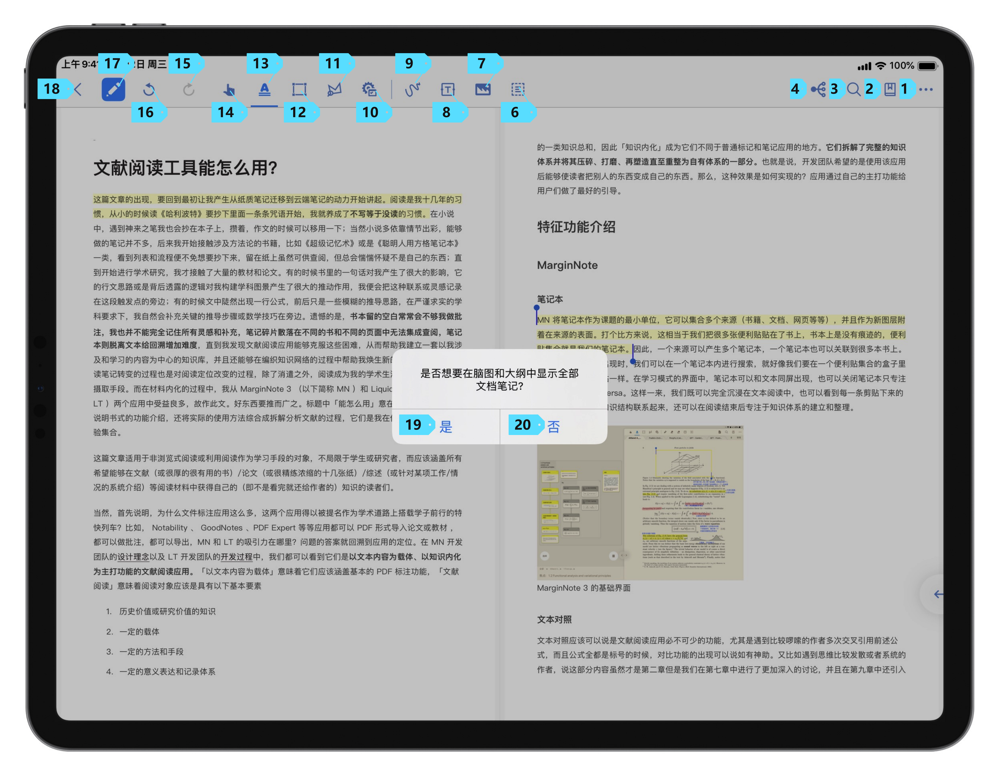
Meanwhile, if the document notebook contain notes, MarginNote 3 will ask if you want to "display all notes of the document in the MindMap & Outline". If you choose "yes", then your notes will be displayed in the MindMap and outline.
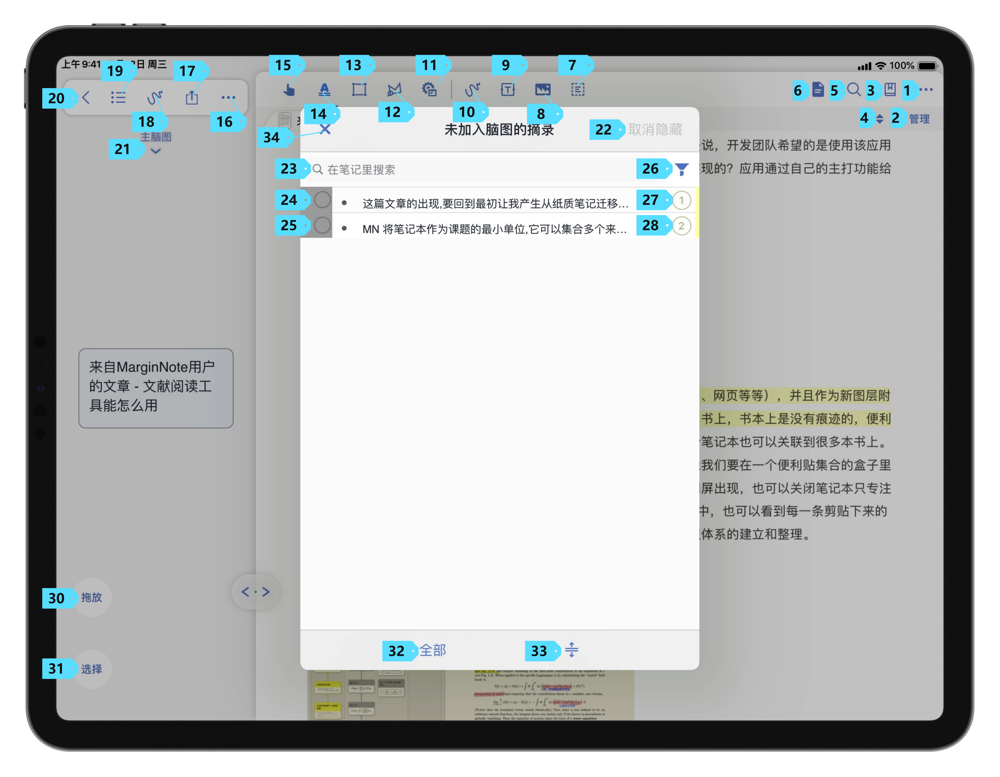
If you choose "no", you notes will not be automatically added to the MindMap or outline. If you want to view the notes that haven't been added to the MindMap, tap "Excerpt Settings" in the Study Mode, and then tap "View Excerpts Not in MindMap (opens new window)"#3.7. In the pop-up excerpt browser, you can search and add excerpts to the MindMap.
Directly Create a MindMap Notebook
 In the Study Mode page, you can directly create a MindMap Notebook. Tap the "New" button on the top left corner, enter the name for the notebook, and you have created a new MindMap Notebook.
 After creating the notebook, a pop-up window will notify you to associate the notebook to documents.
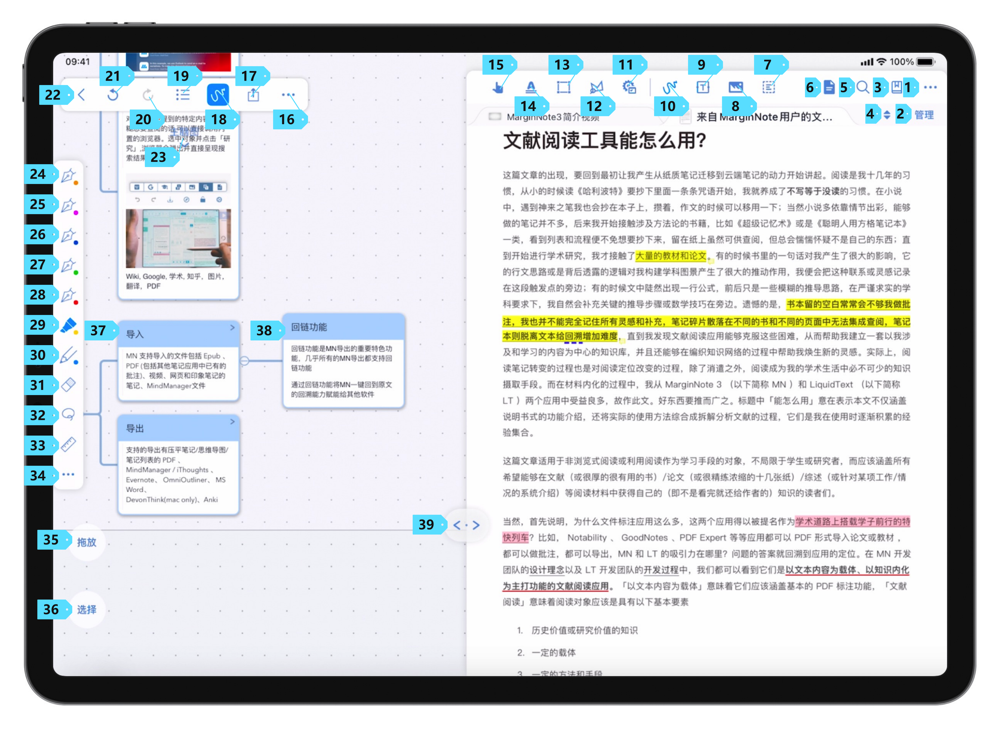
Study Mode Workspace
From left to right, the learning mode consists of the Outline Workspace, the MindMap Workspace, and the Document Workspace.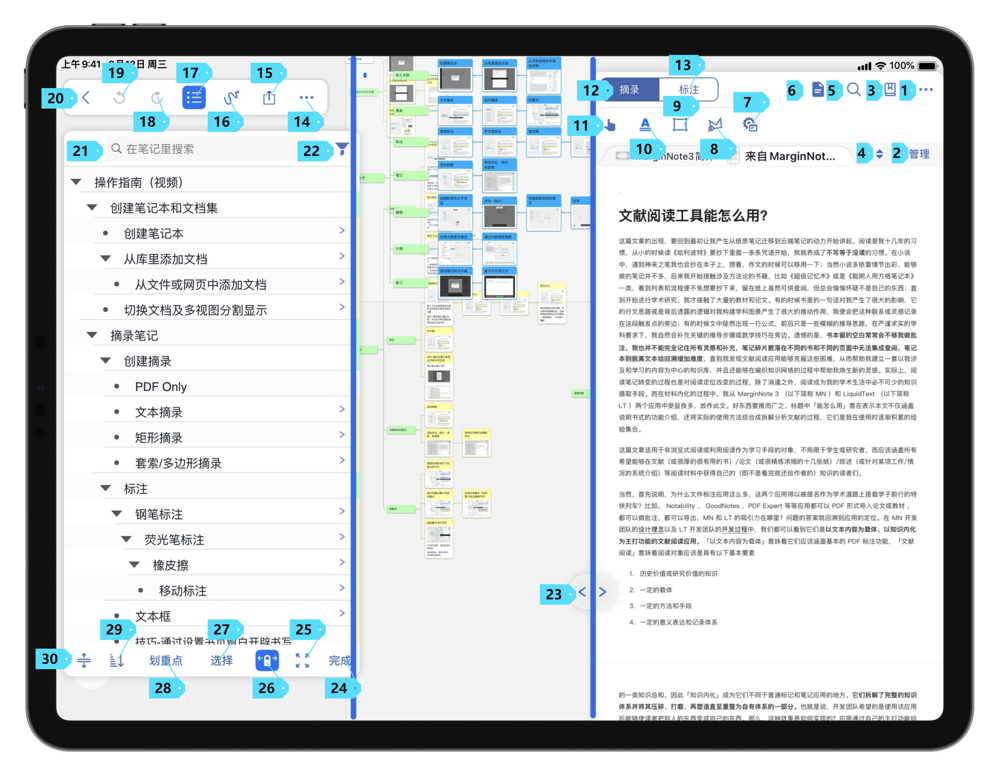
Document Workspace
The Document Workspace basically inherits the functions from the Document Mode, where you can complete the read and annotate the PDF.
The difference is that the Document Workspace in the Study Mode has notebook management functions. It also includes multiple tabs and relevant settings on MindMap.
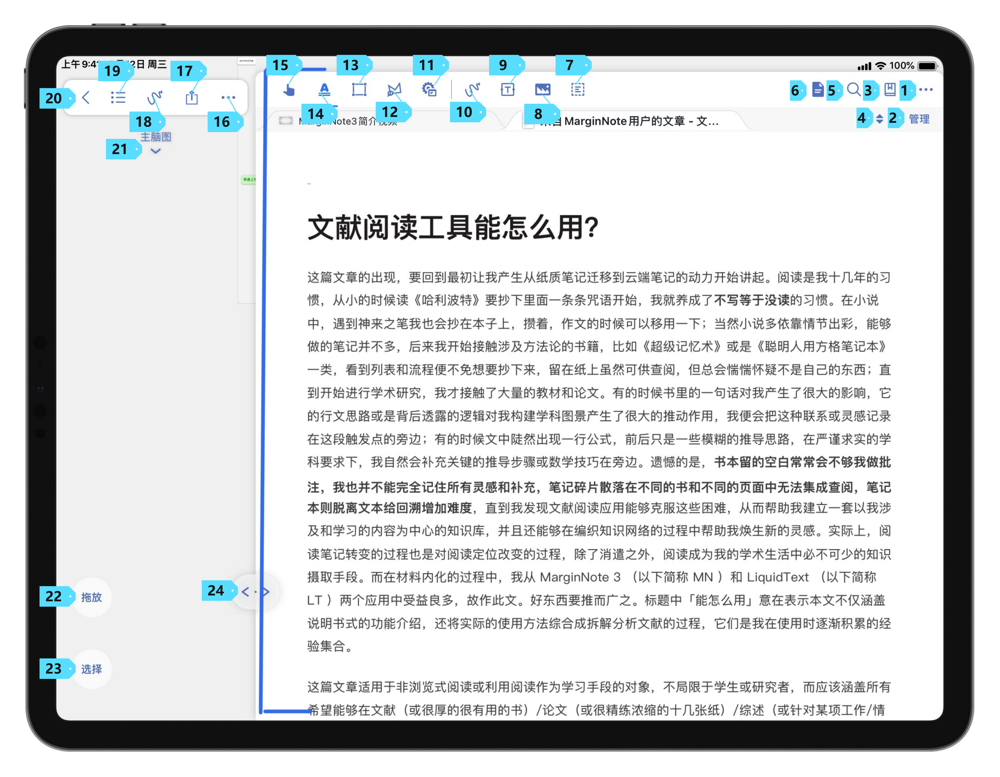
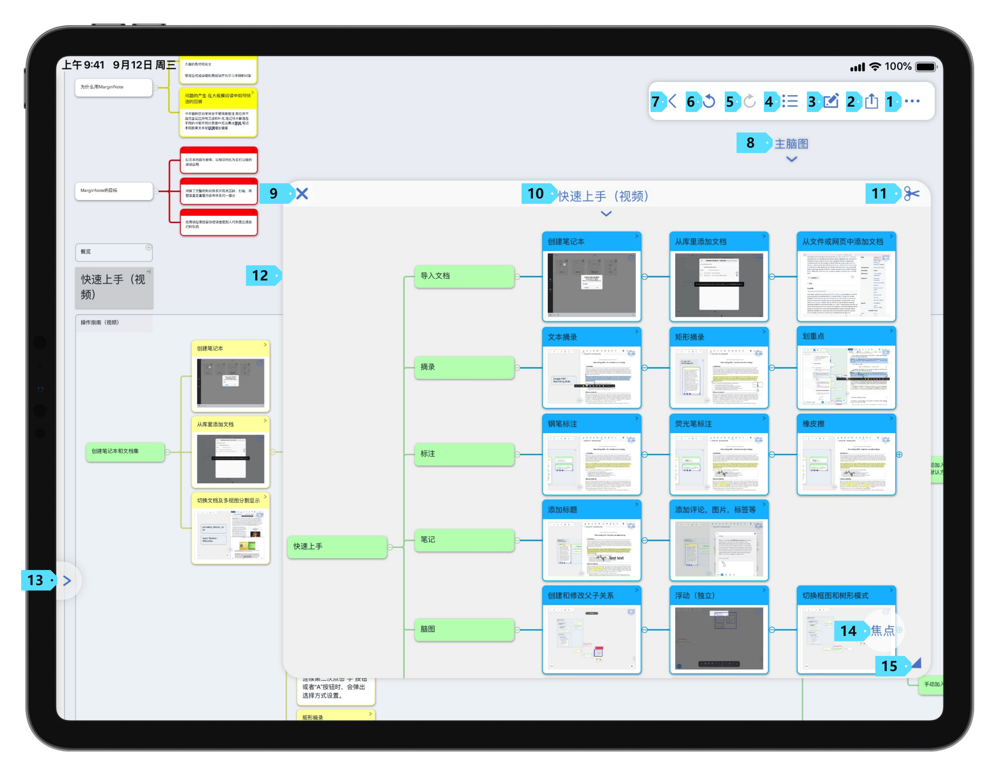
Multiple Tabs
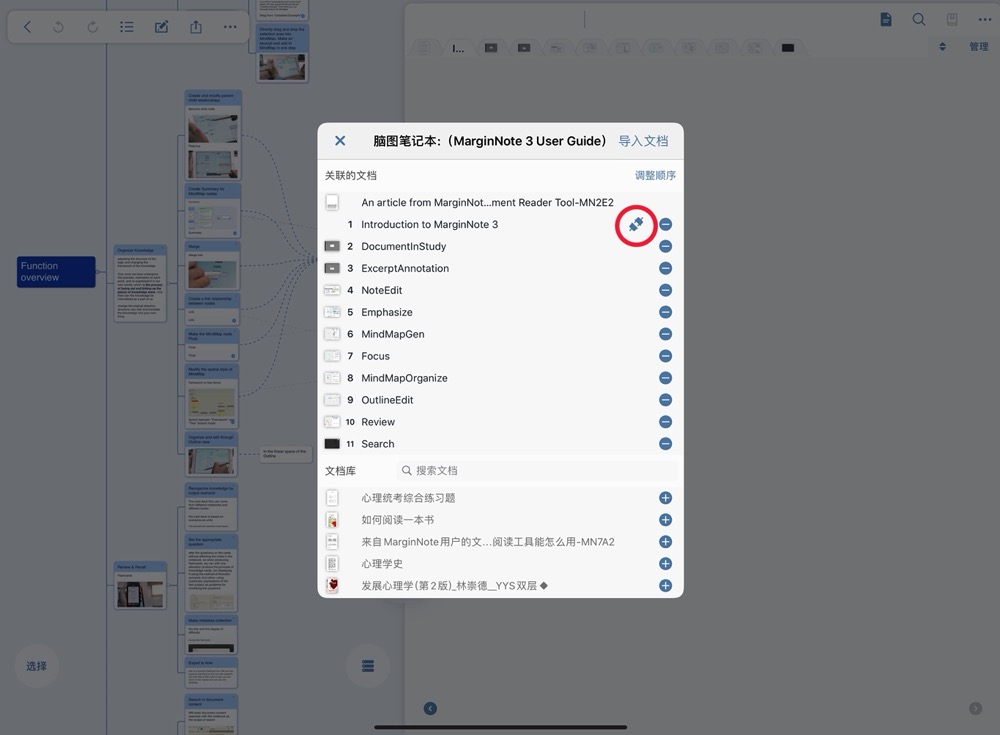
In the Document Mode, a document notebook is associated with only one document, and vice versa. In the Study Mode, a MindMap notebook can be associated with multiple documents, and vice versa.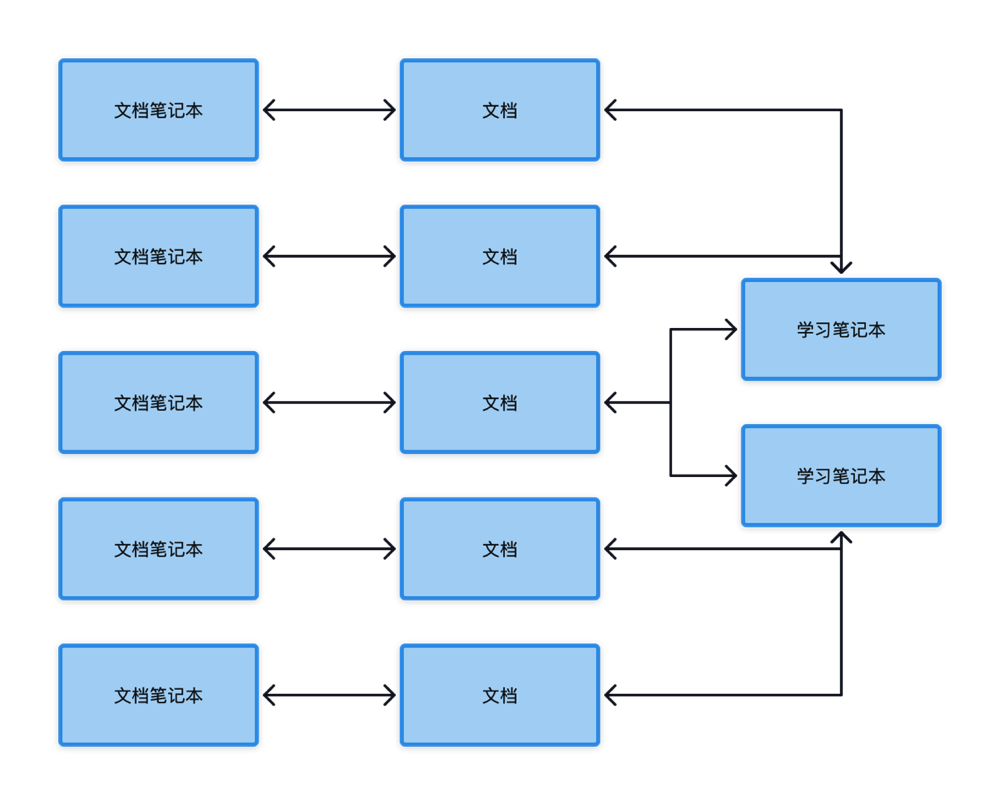
Since a Study Notebook can be associated with multiple documents, the Study Mode has a new Multiple Tabs feature compared to the Document Mode, so you can switch between documents by tapping the tabs.
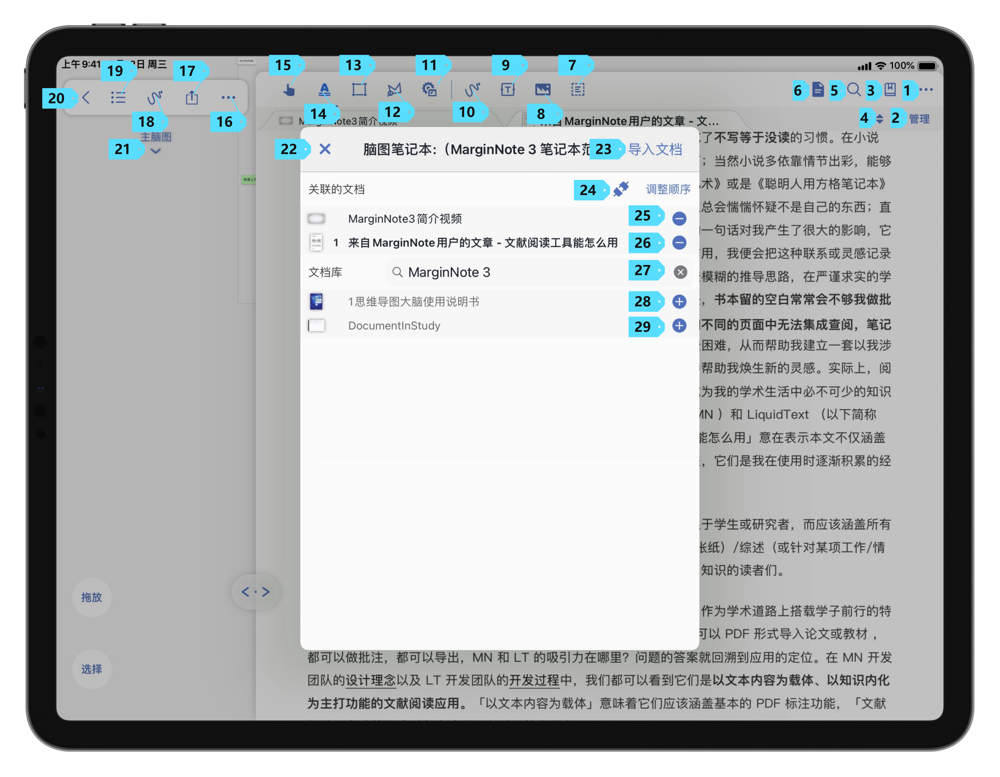
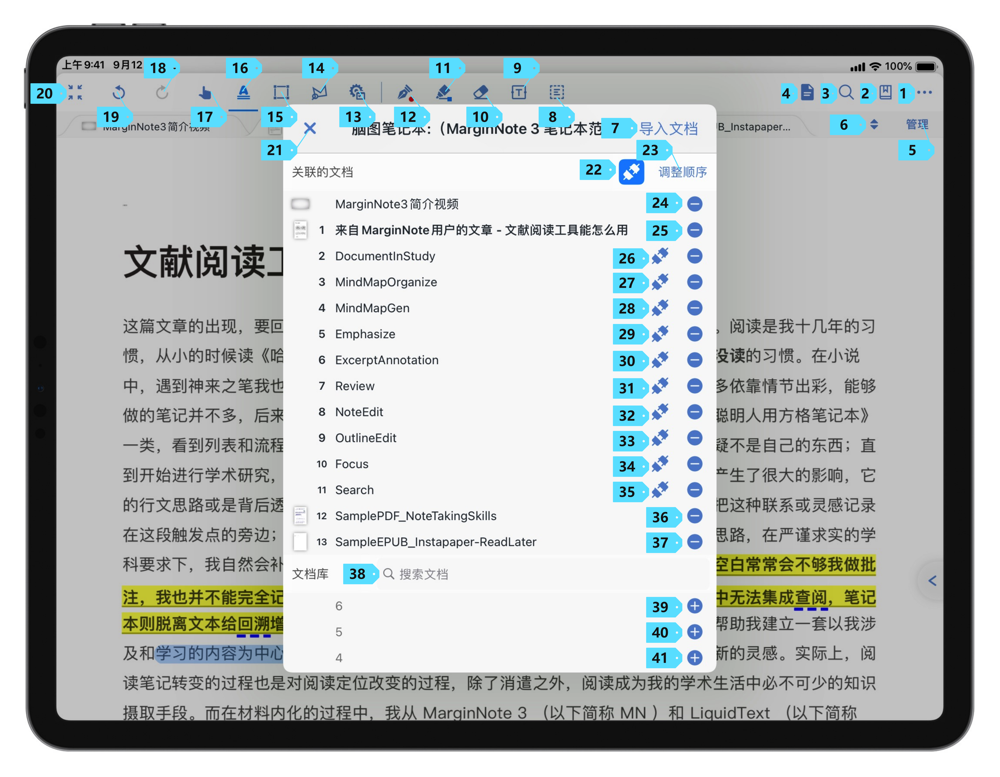
In the Document Workspace of the Study Mode, you can also manage documents. Tap "Manage" to open the document management page. In this page, you can choose to associate new documents, associate missing documents, or reorder associated documents.
How to replace associated documents without losing note data?/How to recover lost/unintentionally deleted documents in MarginNote 3? (opens new window)#3.6.4
How remove a document without deleting the notes?
⚠️Please save a copy of the original document, in case the new document can not replace the removed associated document.
⚠️If there is only document notebook, please create a MindMap Notebook first and delete the document afterwards.
⚠️Import a new document with the same resolution, size, number of pages, and file name. Otherwise there will be misplaced excerpts (due to different resolutions, sizes, numbers of pages), or lost associations (due to the mismatched file name).
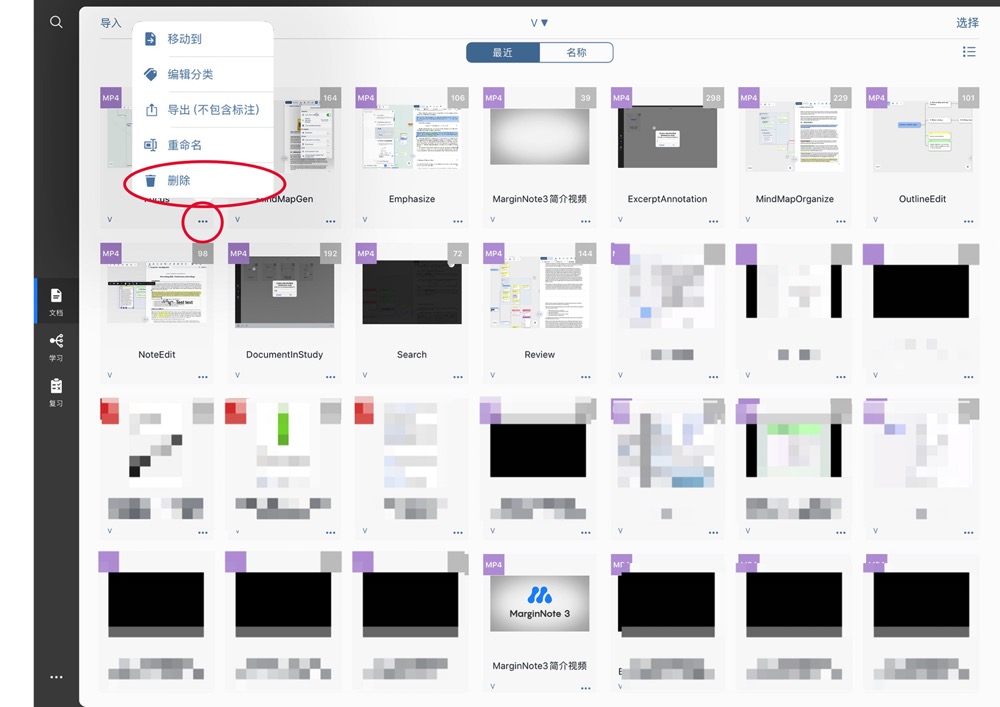
Under the document module → Tap the "..." icon in the lower right corner of the document
→ Select "Delete" in the pop-up menu
After entering a MindMap Notebook, the Document Workspace is blank and there is no cover icon in the document tab.
Instructions for restoring associated documents:
If the file name is different, you need to manually associate the document.
If you have changed the pages of the document in MarginNote 3, you need to add or delete pages in the PDF editing software and then import it into MarginNote 3, so that the excerpts can be displayed in the correct place.
Automatic association
Automatically restore association after importing new documents with the same resolution, size and name
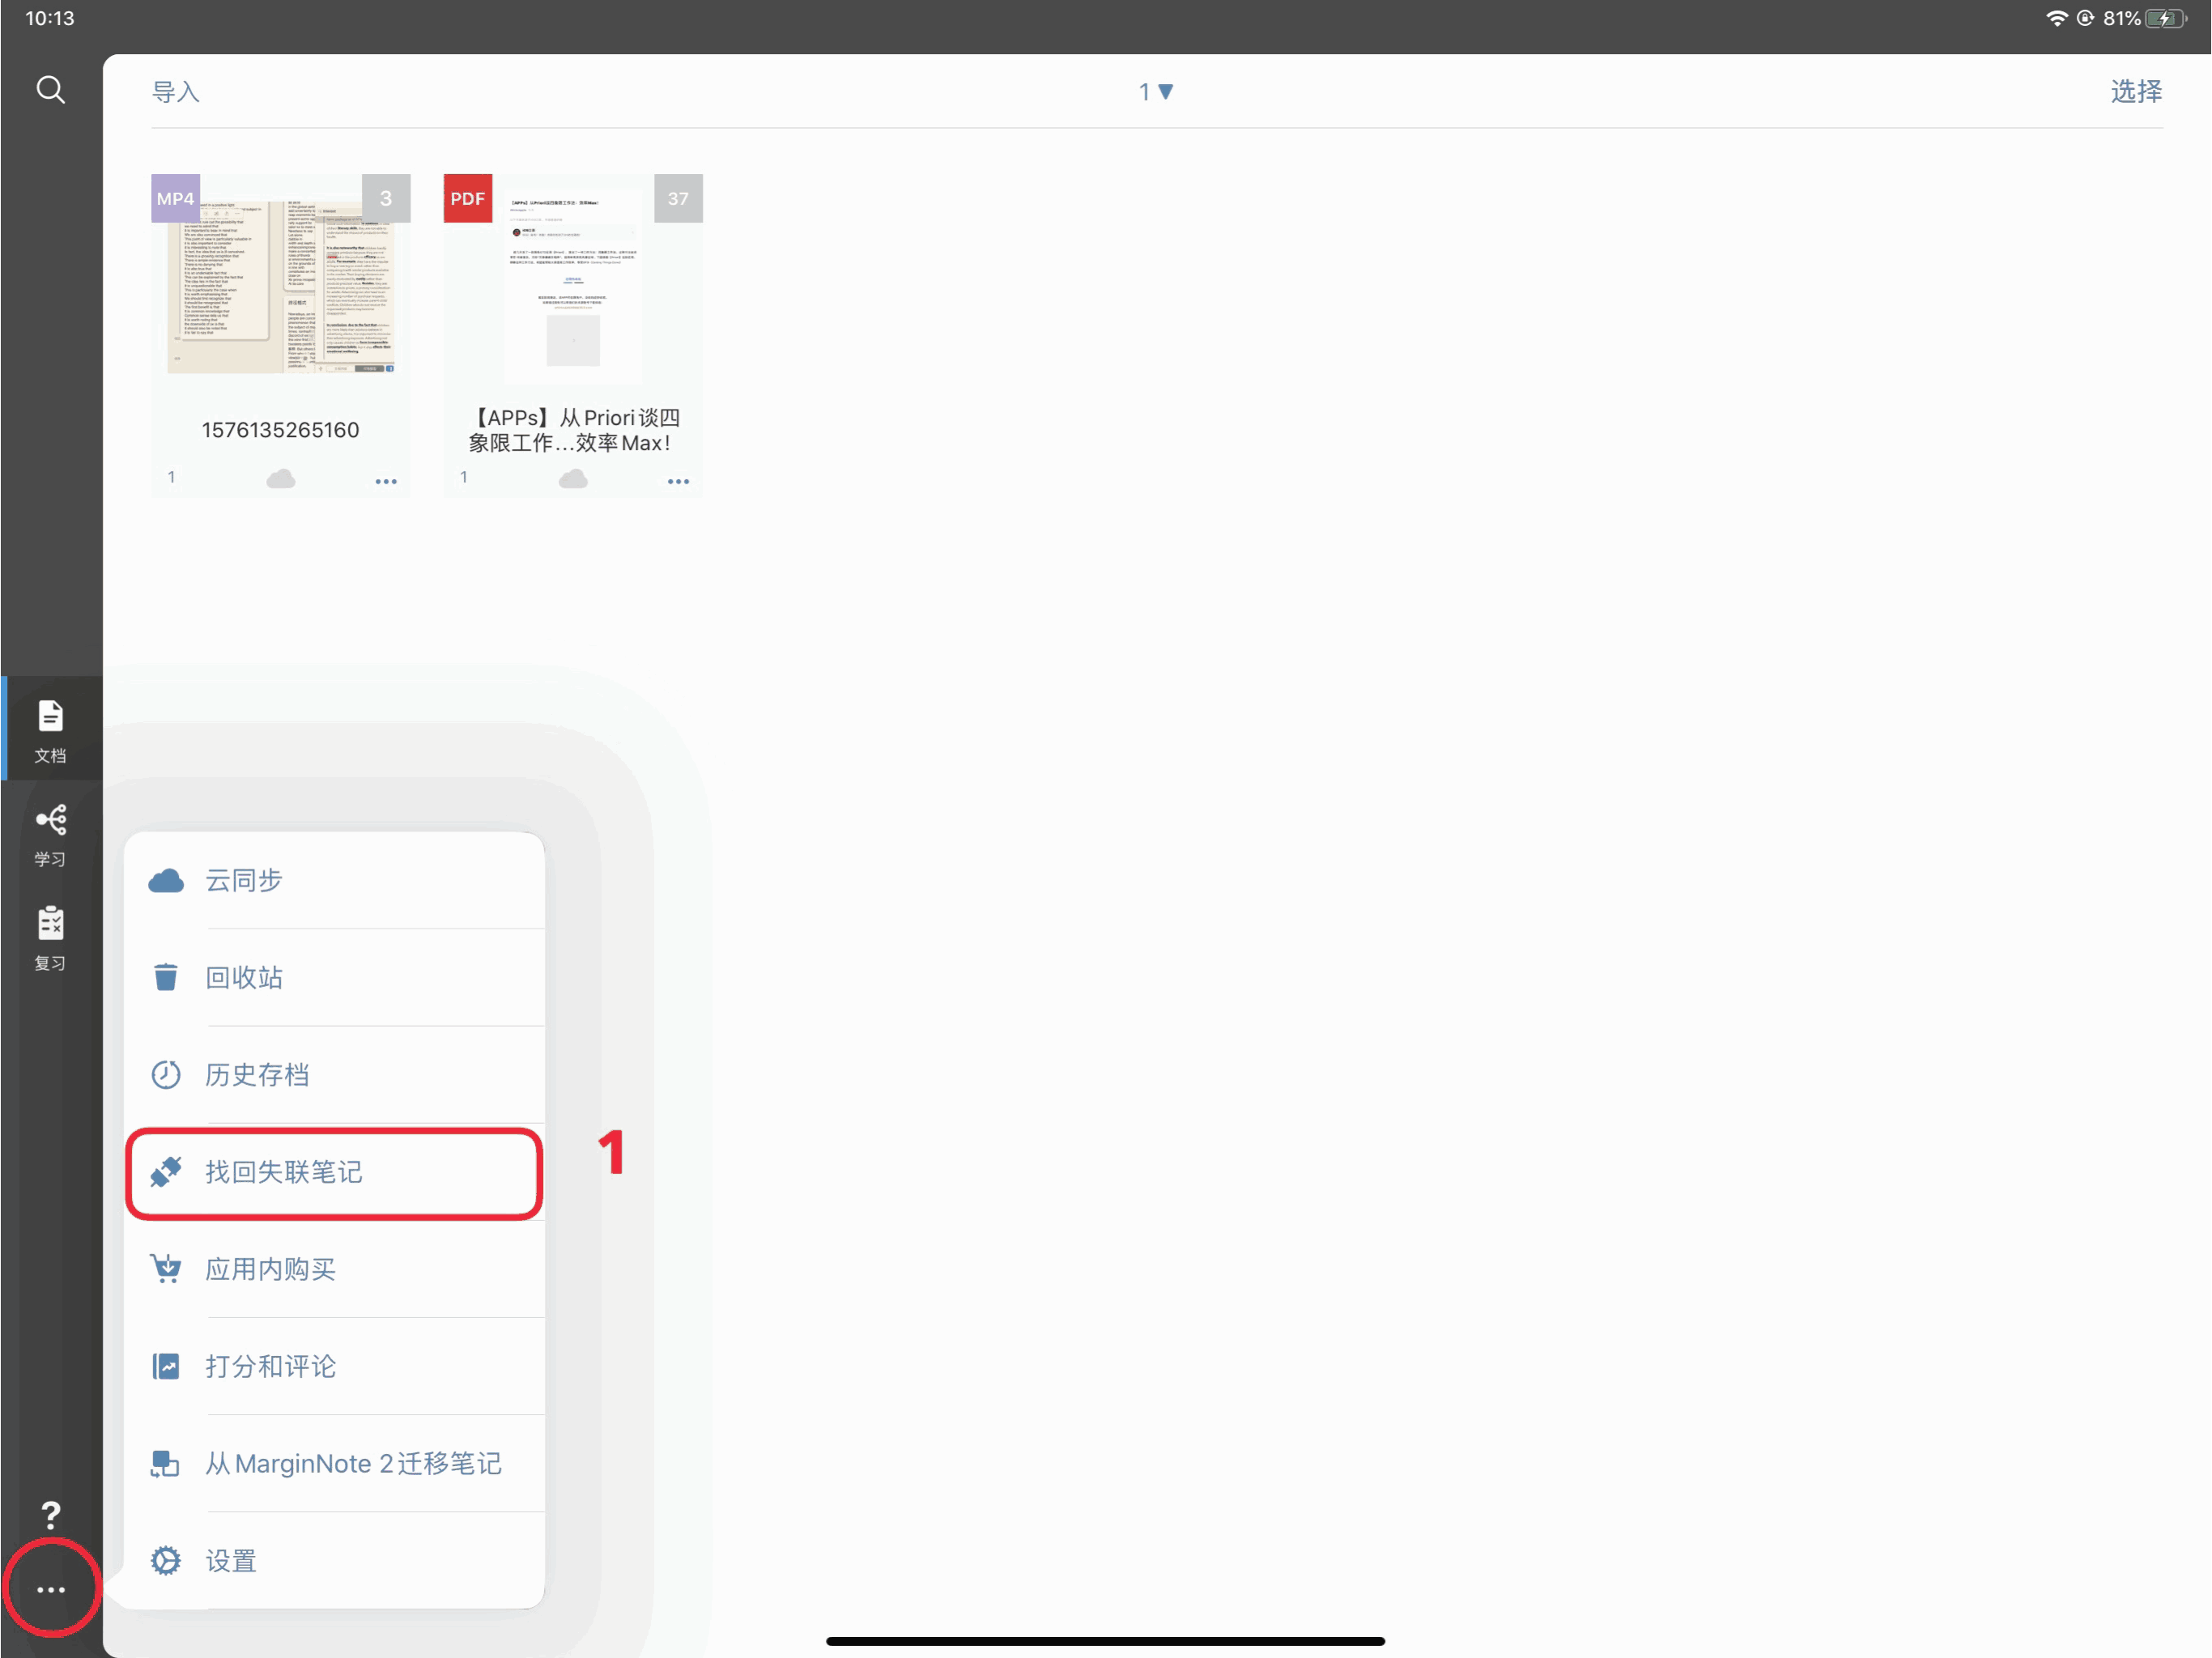
Use the "Find Lost Notes" feature
In the home page, select "Find Lost Notes" from the "..." in the lower left corner
→ Click the link icon on the right side of the note to which you want to rebind the document link.
→ Select a document from the document library to replace the missing document.
→ Click "Yes" on the pop-up screen to restore the associated document.
Associating Documents in the Study Mode
Study Mode → Tap a MindMap Notebook.
→ Tap "Manage" on the right side of the tab bar of the Document Workspace.
→ Tap the link icon on the right side of the document to which you want to rebind the document link.
→ Select a document from the document library and replace the missing one.
→ Click "Yes" on the pop-up screen to restore the associated document.
Multi-Document Split View
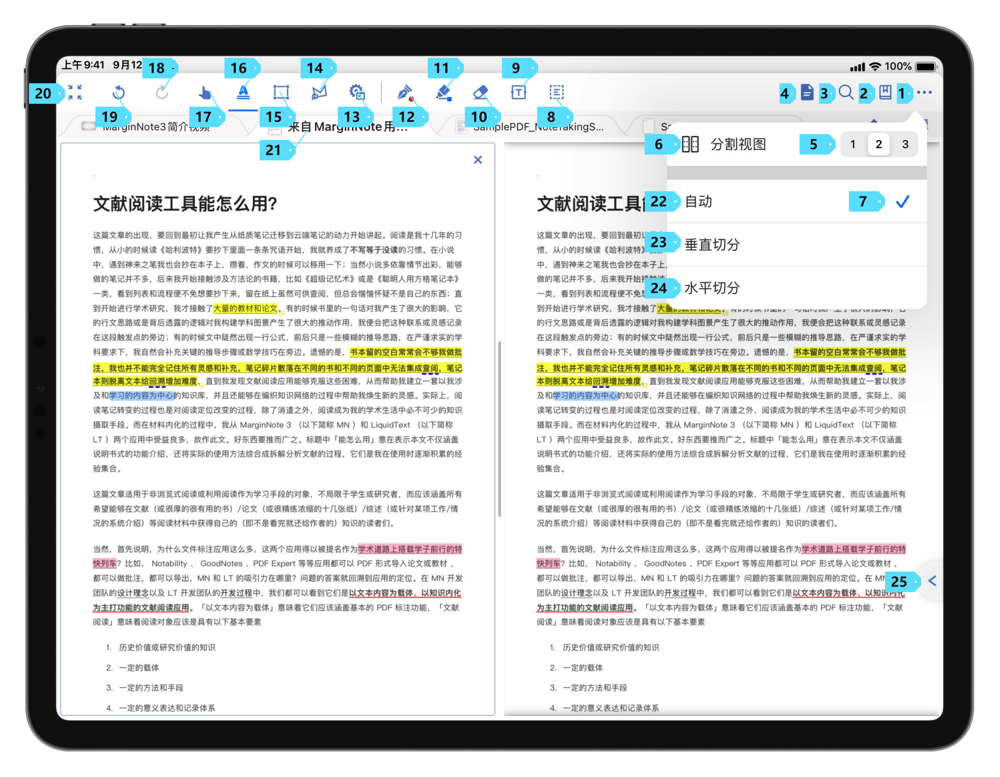
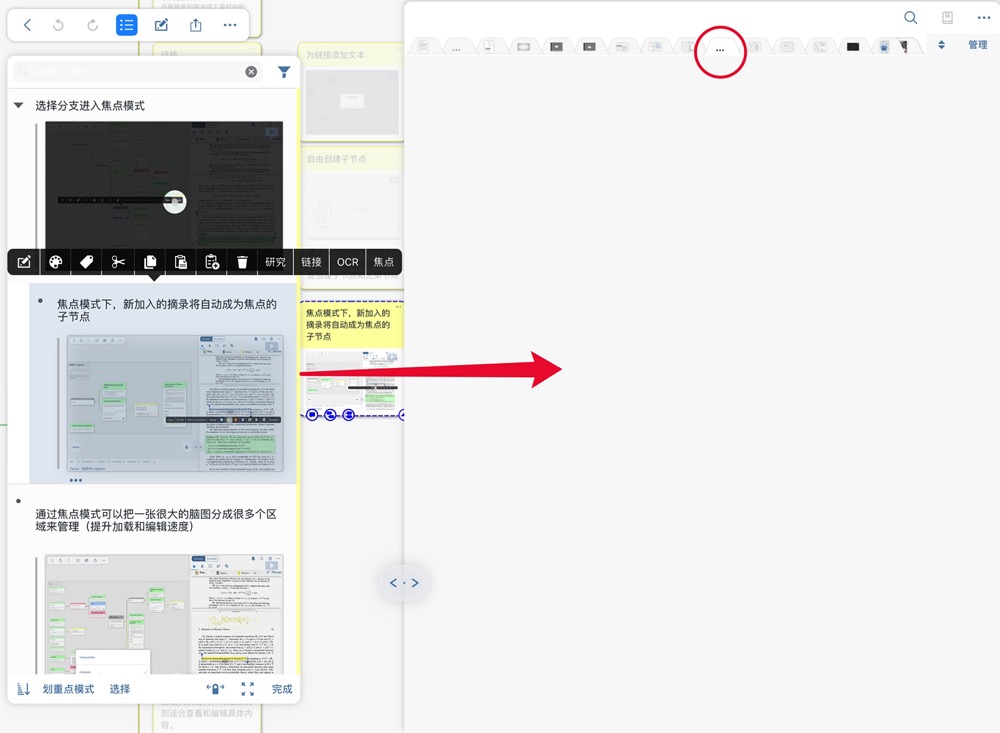
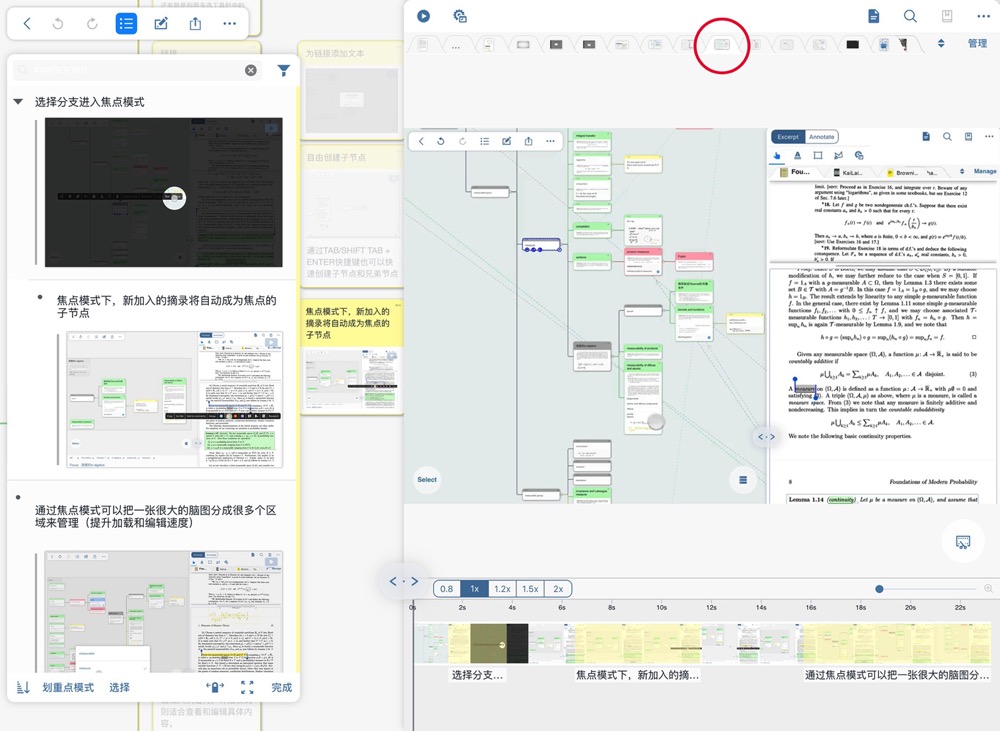
Since one Study Notebook can be associated with multiple documents in association, you can set up the Multi-Document Split View in the Study Mode. Tap the Multi-Document Split View button on the left side of "Manage" to see the pop-up menu.
In the pop-up menu, if you select "1 view", the Document Workspace in the Study Mode will display only one view. If you select "2 views", the Document Workspace will be split into 2 views. If you select "3 views", the Document Workspace will be split into 3 views.
By default, the multiple views will display the same document. If you need to switch the documents displayed in a view, select the view first and then tap the tab you would like to see. For detailed settings of the Multi-Document Split View, you can tap the "More" button in the upper right corner of the screen and select "the Multi-Document Split View" to adjust the splitting style.
| No. | Name | Function |
|---|---|---|
| 22 | Auto | MarginNote 3 will automatically split multiple documents. |
| 23 | Vertical split | MarginNote 3 will split the Document Workspace vertically. |
| 24 | Horizontal split | MarginNote 3 will split the Document Workspace horizontally. |
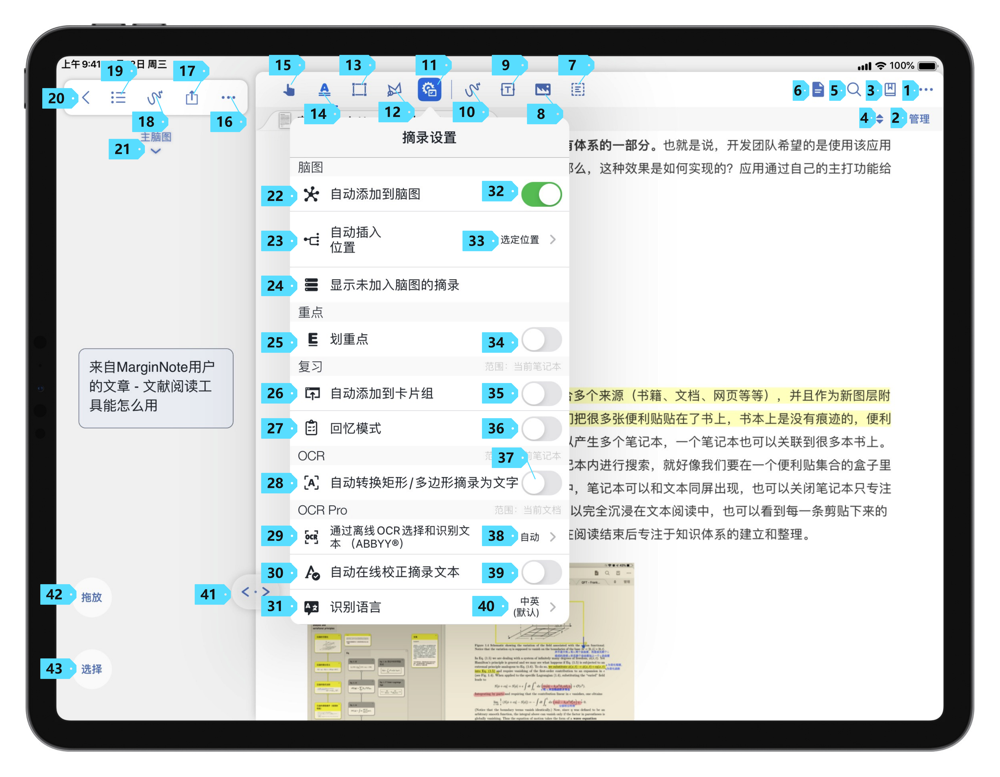
Auto Add to MindMap
Compared to the Document Mode, you can also manage the settings on adding notes to MindMaps in the Study Mode.
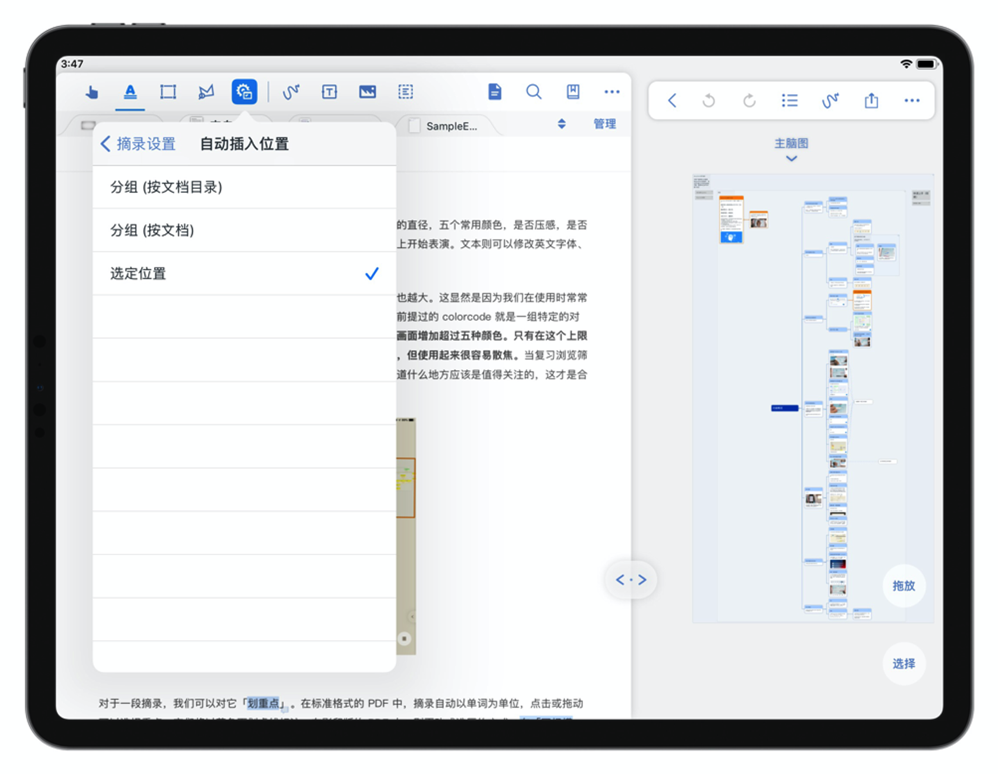
In the Excerpt Settings, you can turn on "Auto Add to MindMap". When enabled, your excerpts will be automatically added to the MindMap. You can also manage the Auto Insertion Position in the Excerpt Settings.
| Name | Function |
|---|---|
| Grouped (By Table of Contents) | When selected, your excerpt will be automatically added under the frame node created according to the document outline. |
| Grouped (By Document) | When selected, your excerpt will be automatically added under the frame node created according to the document name. |
| Selected Position | When selected, your excerpt will be automatically added under the node that you selected. |
MindMap Workspace
In the MarginNote 3 MindMap Workspace, you can organize of the structure of your notes.
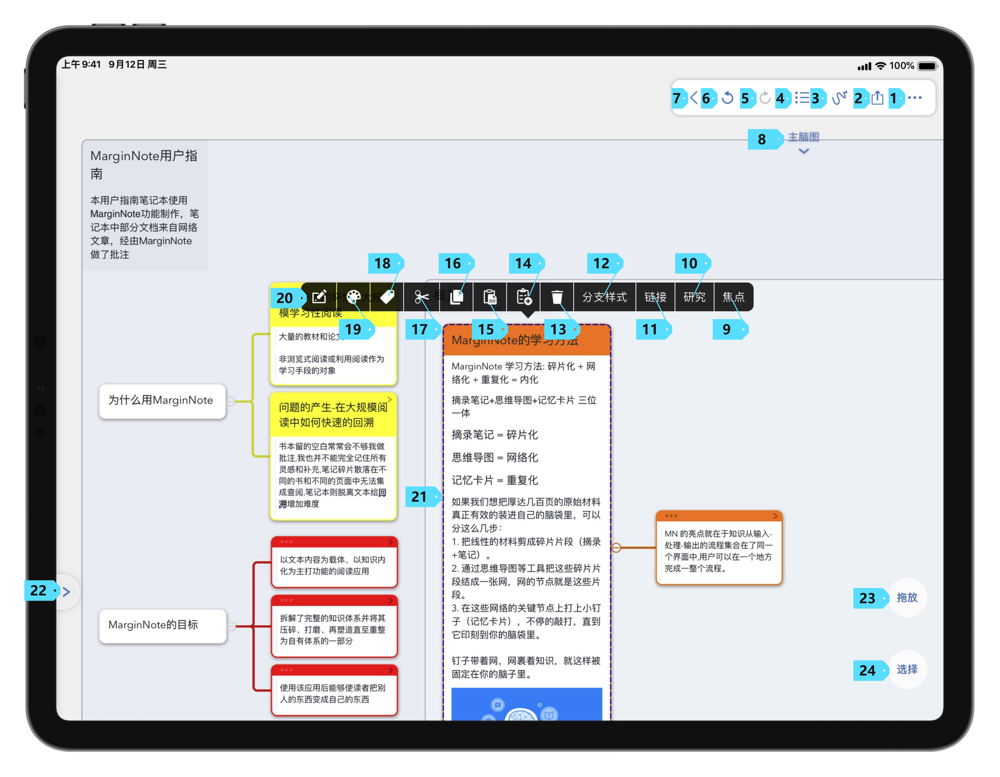
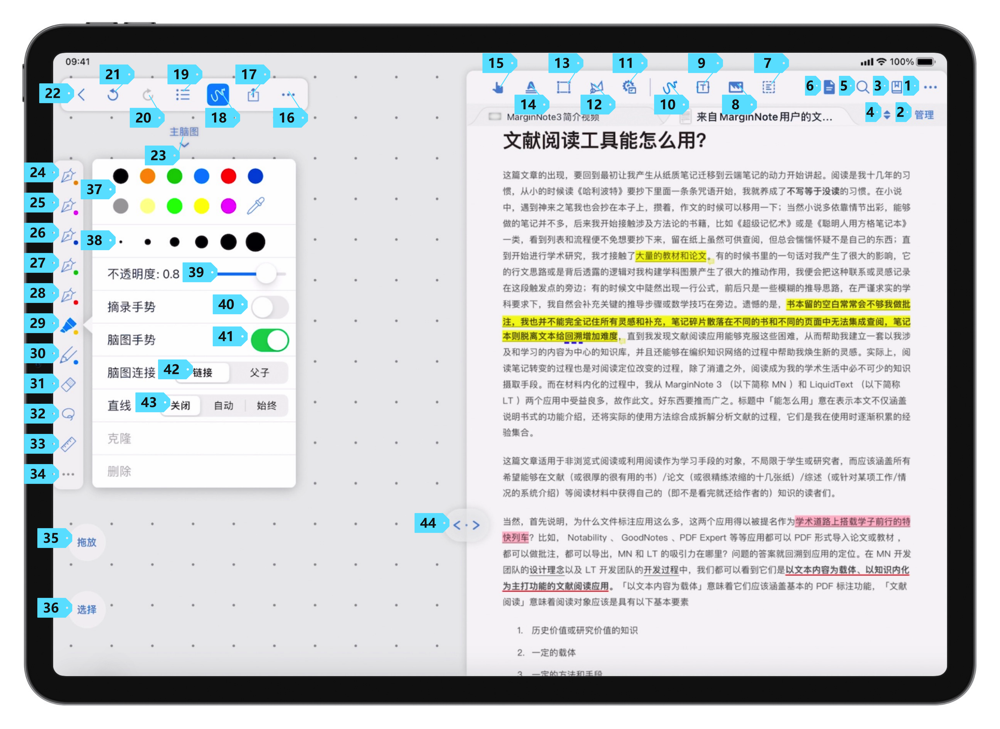
Card Editing
| No. | Function |
|---|---|
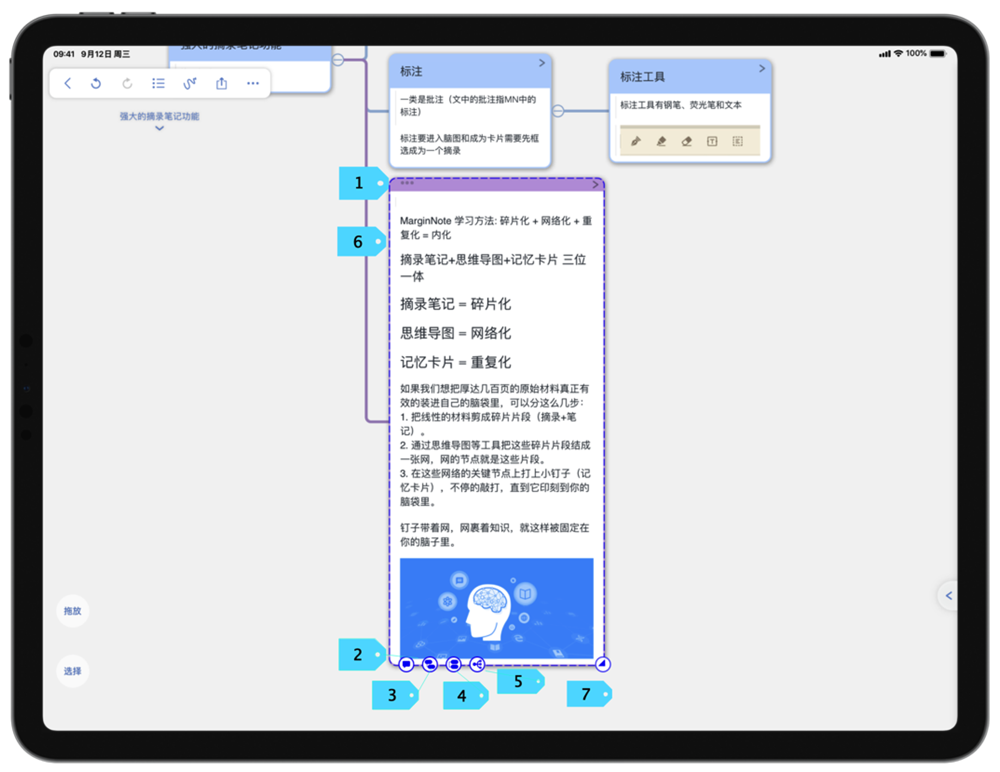
| 1 | Tap to edit the card title.  |
| 2 | Tap to add comments and explanations for the card content. |
| 3 | Tap to add a child node.  |
| 4 | Tap to add a sibling node.  |
| 5 | Tap to directly add Child MindMap (opens new window) to the card. #3.7.7  |
| 6 | Tap the text to enter the editing mode.  |
| 7 | Hold and drag to adjust card/font size.  |
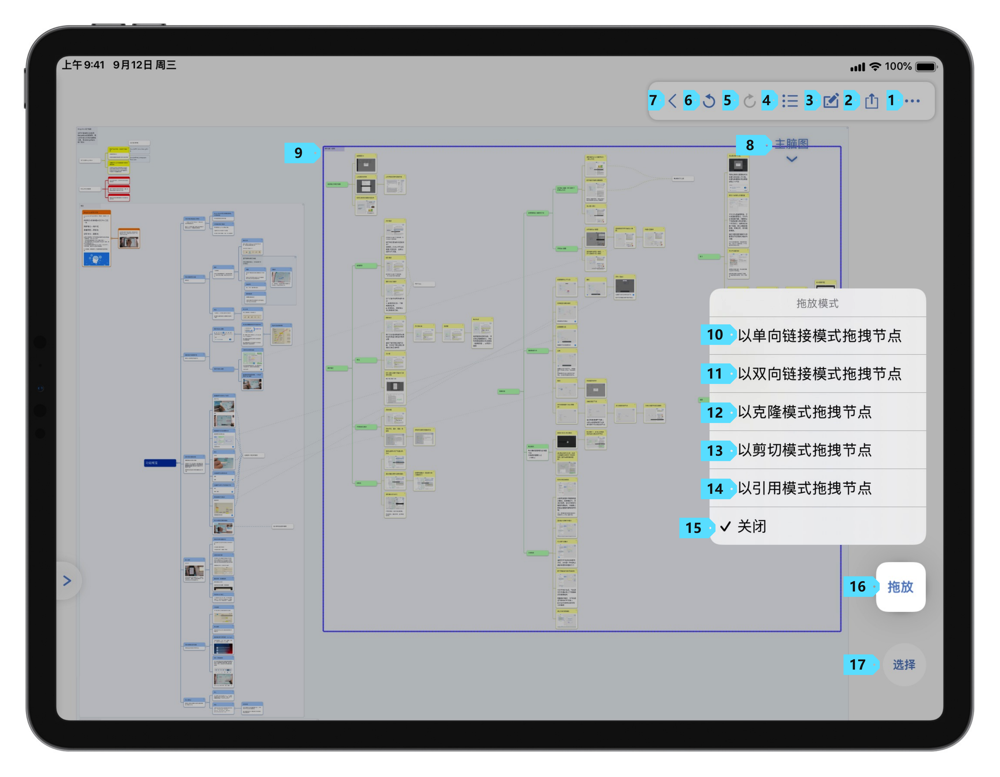
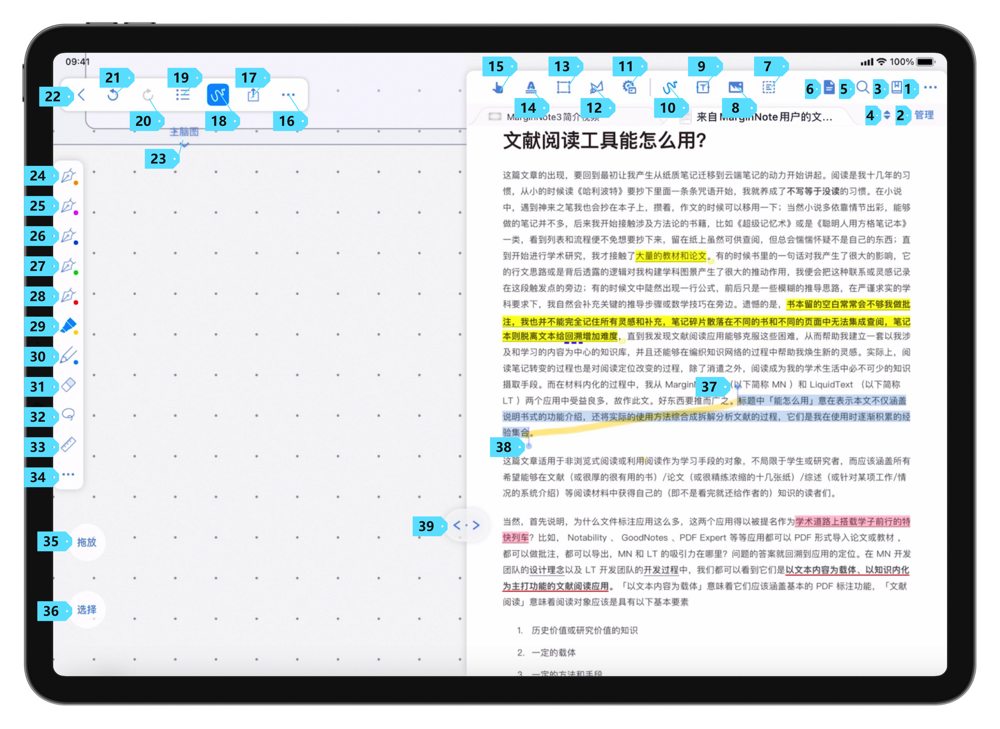
Drag-and-drop Operation (opens new window) #3.5
By default, if you drag a card A onto another card B, card A will become a child node of card B. If you drag it again, card A will be merged into card B.

Tap the "Drag" button in the bottom left corner for advanced drag-and-drop operations.
| No. | Name | Function |
|---|---|---|
| 10 | Drag nodes as ONE-way LINK | When selected, if you drag node A onto node B, a one-way link from B to A will be generated. |
| 11 | Drag nodes as TWO-way LINK | When selected, if you drag node A onto node B, a two-way link between A and B will be generated. |
| 12 | Drag nodes as CLONE | When selected, if you drag node A onto node B, a clone node of A will be generated after node B. |
| 13 | Drag nodes as CUT | When selected, if you drag node A onto node B, node A will become a child node of node B |
| 14 | Drag nodes as Reference (opens new window)#3.6.12 | When selected, if you drag node A onto node B, a reference node of A will be generated after node B. |
Clone Node VS Reference Node (opens new window) #3.6.12
A Clone node is a copy of a node card. If card B is cloned from card A, the content of card B will be identical to the content of card A. If card A is modified, card B will not synchronize with card A. A Reference node is a mirror of a node. If card B is a Reference node from card A, the content of card B will be identical to the content of card A. If card A is modified, card B will synchronize with card A, and will be modified as well.
Expand and Collapse
In the MindMap Workspace, tap the "minus"[1]^ icon on the right of a parent node to collapse the card.
 After collapsing, the "minus"^[9]^ icon on the right of a parent node will become a "plus" icon. Tap the "plus" icon to expand the card again.
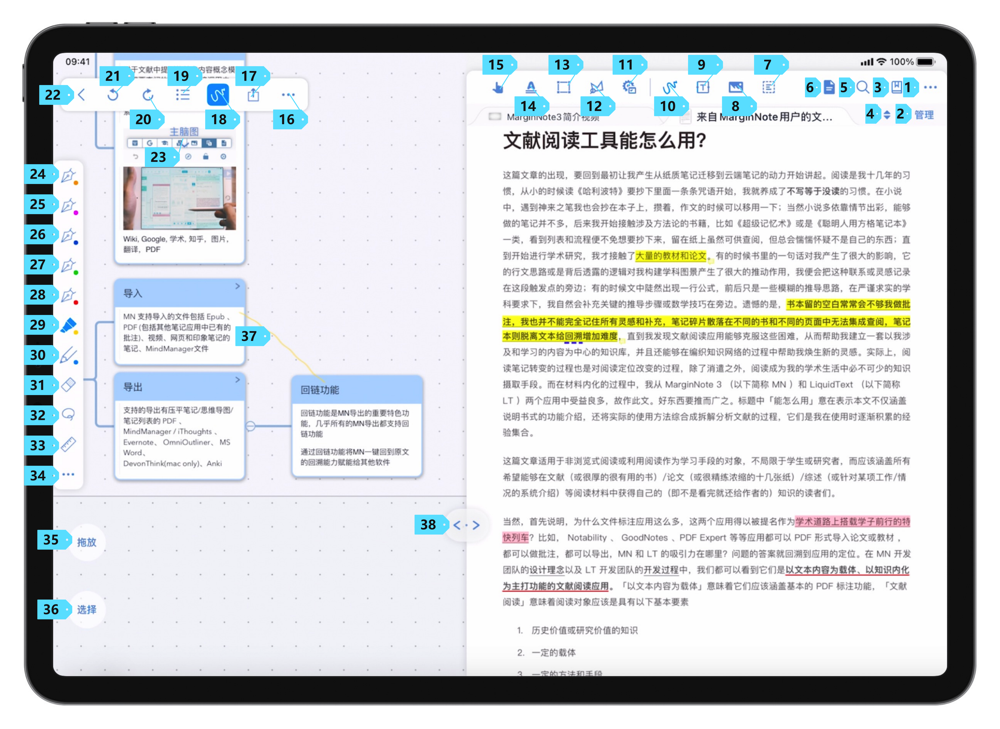
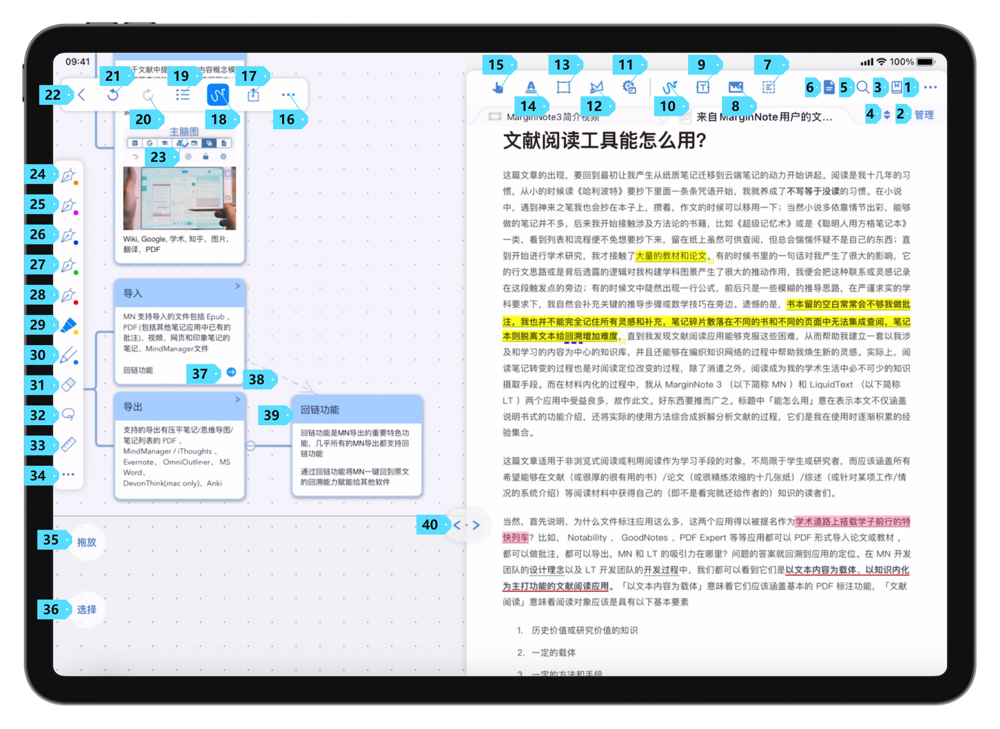
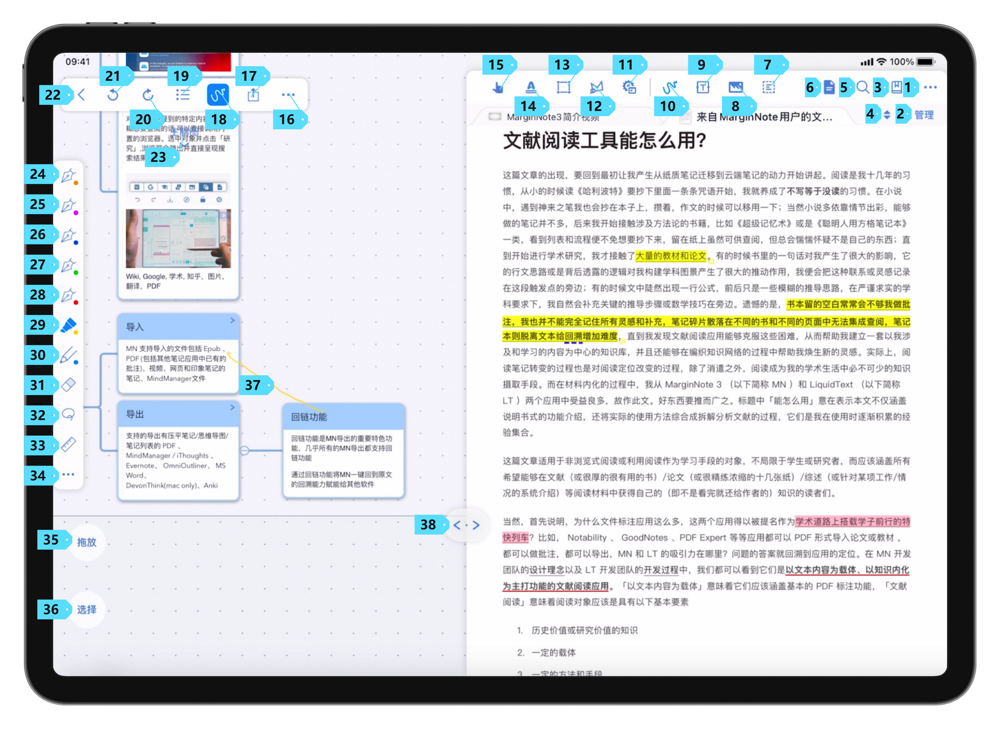
Child MindMap and Focus (opens new window) #3.7
In MarginNote 3, Child MindMap makes the MindMap Workspace neater and provides a new way to organize and manage your notes. The Focus Mode makes it easier to focus on the content of the current note as you take it.
There are three ways to create a Child MindMap:
- Tap a blank space in the Child MindMap and select: "Create Child MindMap" from the pop-up menu (11).
- Select a parent node. Tap "Branch Style" -> "Collapse to Child MindMap" in the pop-up menu.
- Tap the MindMap Layers button at the bottom of the menu bar in the MindMap Workspace to expand the MindMap Layers. Tap the "+" button in the upper left corner of the list to create a new Child MindMap.
Open Child MindMap (opens new window) #3.7
After creating a Child MindMap, you can tap on it to open the Child MindMap float view.
In this page, tap "Focus" to enter the Child MindMap focus mode. In this mode, the Child MindMap will take up the entire MindMap Workspace.
You can also open a Child MindMap in the MindMap Layers list. Tap the MindMap Layers button, and you can tap to switch between Child MindMaps.
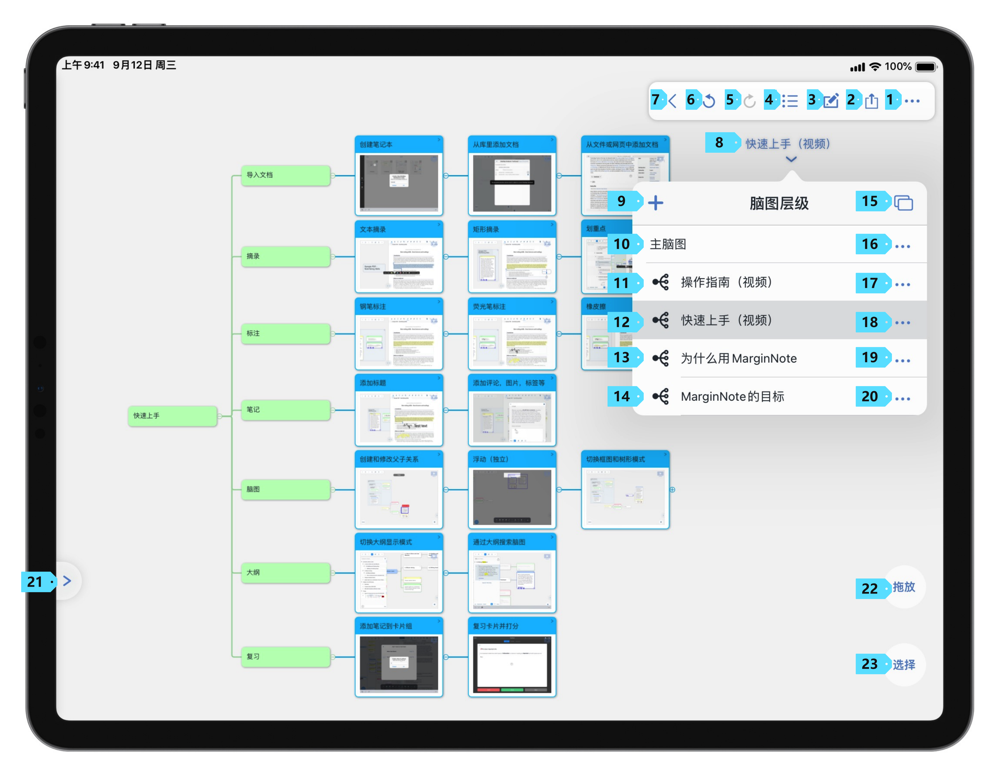
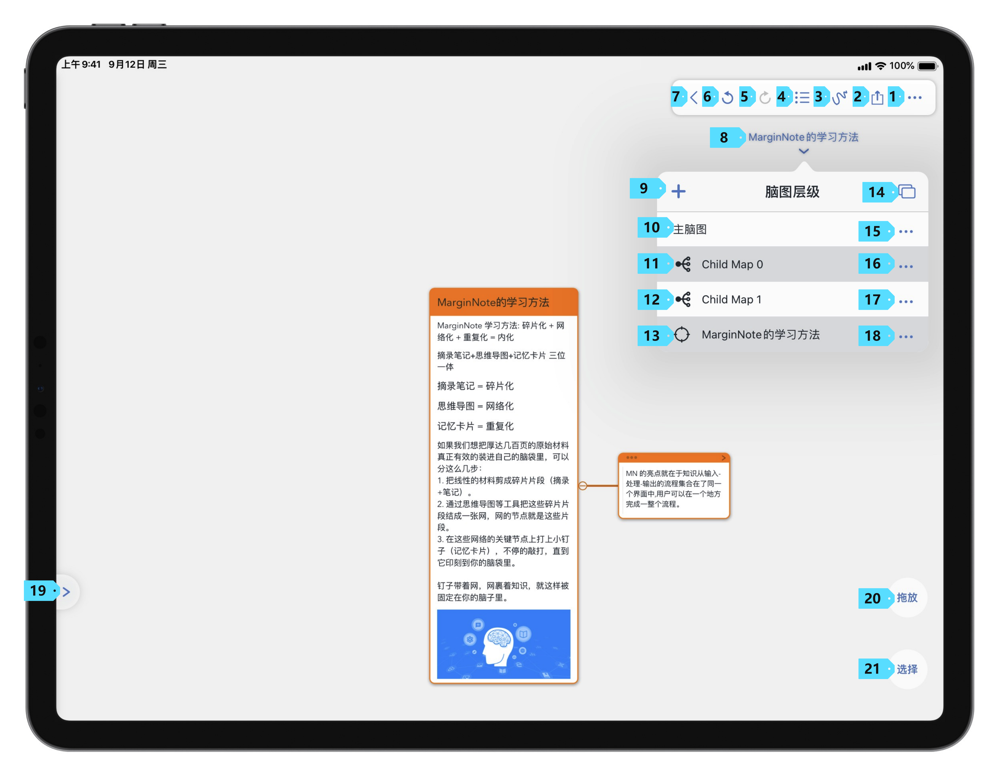
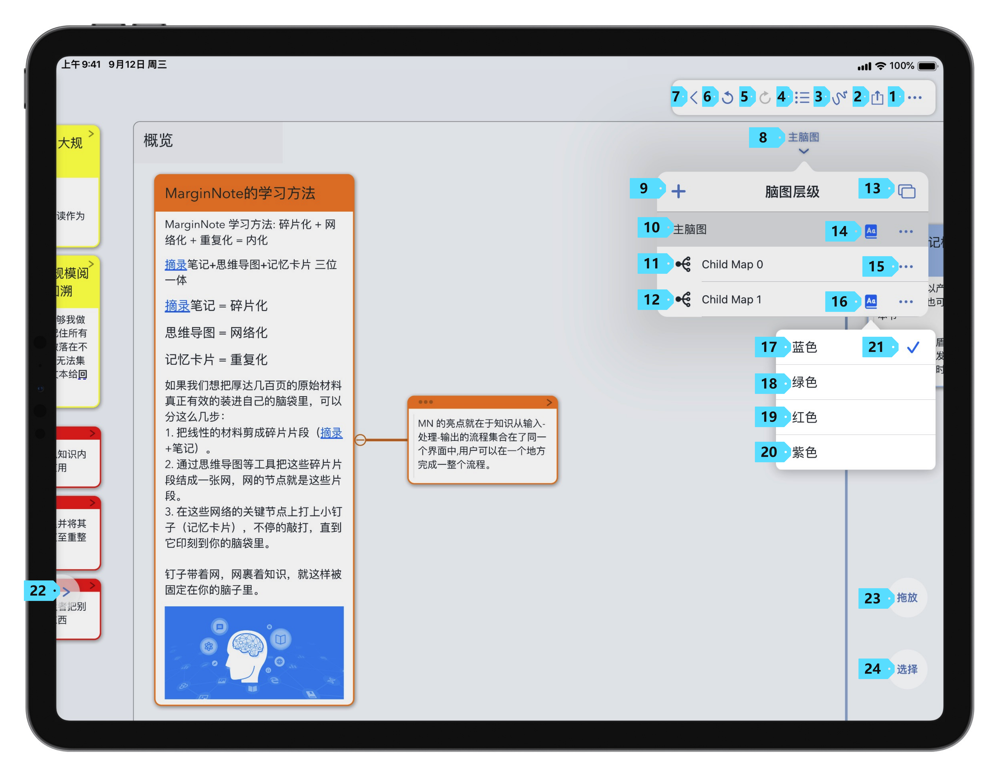
MindMap Layers (opens new window) #3.7
The MindMap Layers list is a tool to easily view, search and edit Child MindMaps. Tap the MindMap Layers button at the bottom of the menu bar in the MindMap Workspace to expand the MindMap Layers.
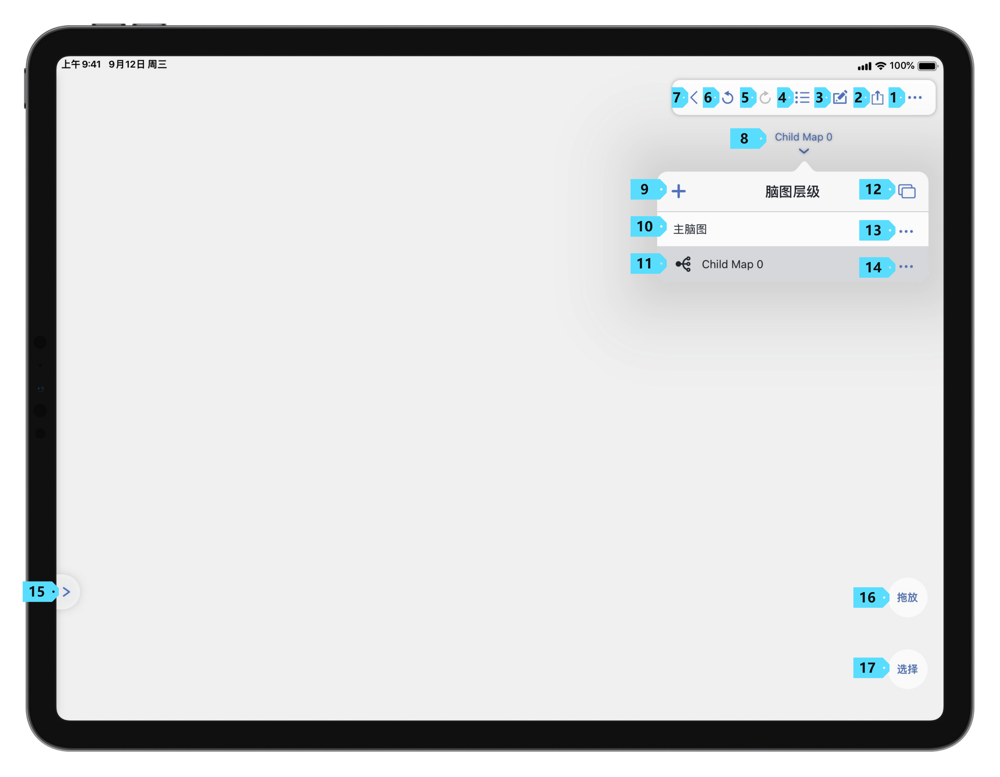
| No. | Name | Function |
|---|---|---|
| 9 | Create Child MindMap | Tap to create a new Child MindMap. |
| 12 | Open the Child MindMap float view | Tap to open the Child MindMap float view. |
| 13 | More | Tap to view more settings on Child MindMap. |
In "More", you can view more settings on Child MindMap.
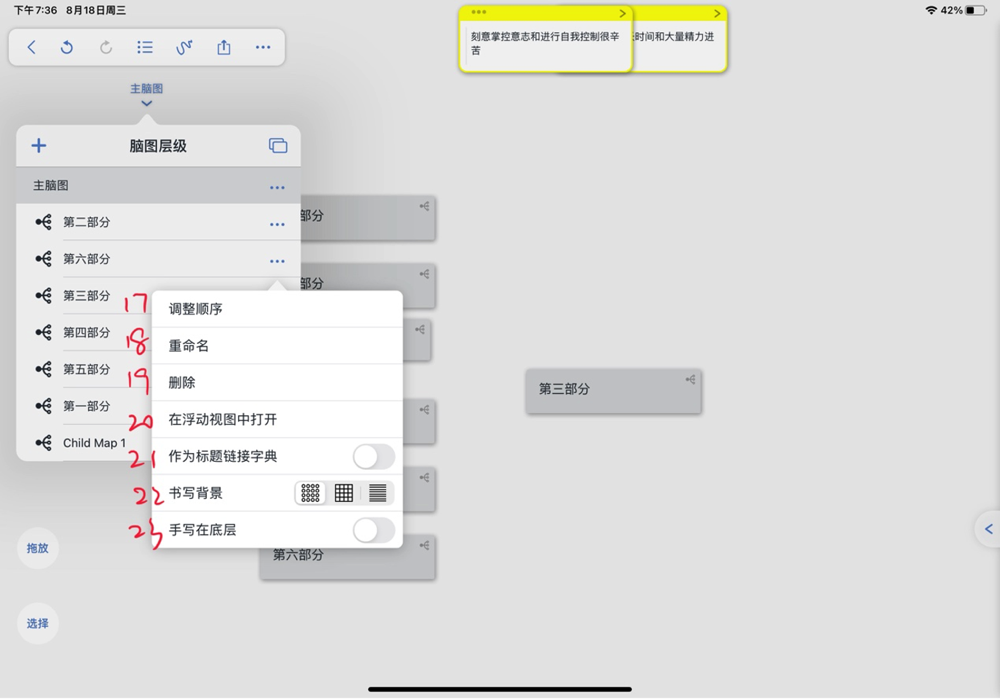
| No. | Name | Function |
|---|---|---|
| 17 | Reorder (opens new window) #3.7.7 | Tap to reorder the Child MindMaps. |
| 18 | Rename | Tap to rename a Child MindMap. |
| 19 | Delete | Tap to delete Child MindMap. |
| 20 | Open in float view | Tap to open a Child MindMap in float view. |
| 21 | As Dictionary (Title Link) (opens new window) #3.6.4 | When enabled, the Child MindMap can be used as a title link dictionary. Once it becomes a title link dictionary, MarginNote 3 will automatically match text in PDFs and note cards with the card title text in the Child MindMap, and if there is a match, it will highlight or underline the matched content. |
| 22 | Writing Background | The Writing Background has 3 options: 1. Dot paper: when selected, the background will be dot paper when you start to write.  2. Grid paper: when selected, the background will be grid paper when you start to write. 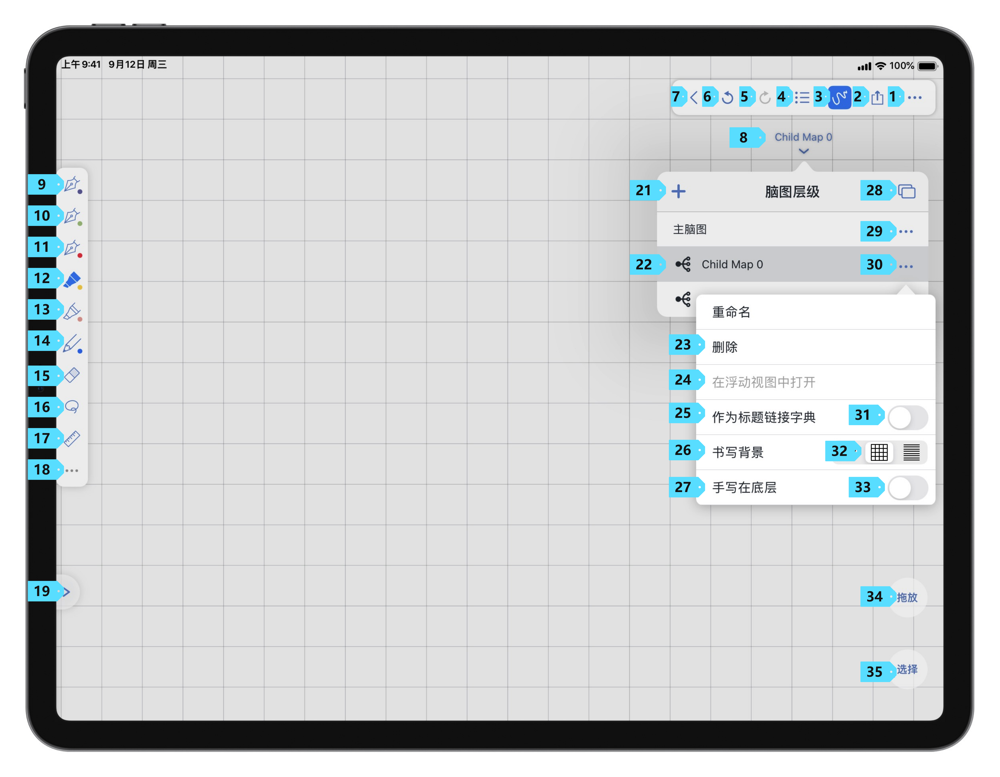 3. Lined paper: when selected, the background will be lined paper when you start to write.  |
| 23 | Handwriting at the bottom (opens new window)#3.7.3 | By default, handwriting will float on top of MindMap. If "Handwriting at the bottom" is enabled, handwriting will be below the MindMap. |
Enter Focus Mode
Focus Mode is a way to focus. When a node is being focused on, it become the main node of the Focus Mode.
You can enter Focus Mode by tapping "Focus" [2] in the pop-up menu after selecting a node.
Exit Focus Mode/Remember the Focus (opens new window) #3.7
If you want to exit Focus Mode, you can select other Child MindMap in the MindMap Layers.
By default, you will not be able to continue to see the focus in the MindMap Layers list if you exit the Focus Mode. If you want to keep the focus in the MindMap Layers list, you can tap the "More" button to the right of the focus in the MindMap Layers list and select "Add to Layers", and the focus will be kept in the MindMap Layers list.
Title Link (opens new window) #3.6.4
Title Link is one of the core advanced features in MarginNote 3.
Title Link uses the title of the card in the Title Link notebook as the search field. If enabled, MarginNote 3 will automatically match the title field with text fields of all cards in the document and highlight them. If a text field match the content of the title field, it will be underlined. In excerpt comments, the color of the text field will be modified to match the notebook color.
Tap the highlighted title link, and all cards corresponding to the title will be displayed.
You can distinguish different matching fields by semicolons (";"、";") in the title of a card. In this way, a card can match many different fields.
Enable Title Link (opens new window) #3.6.4
MarginNote 3 supports multiple title links.
Tap the "More" button in the MindMap Workspace. When enabled, all cards in the Child MindMap will be added to the title link dictionary.
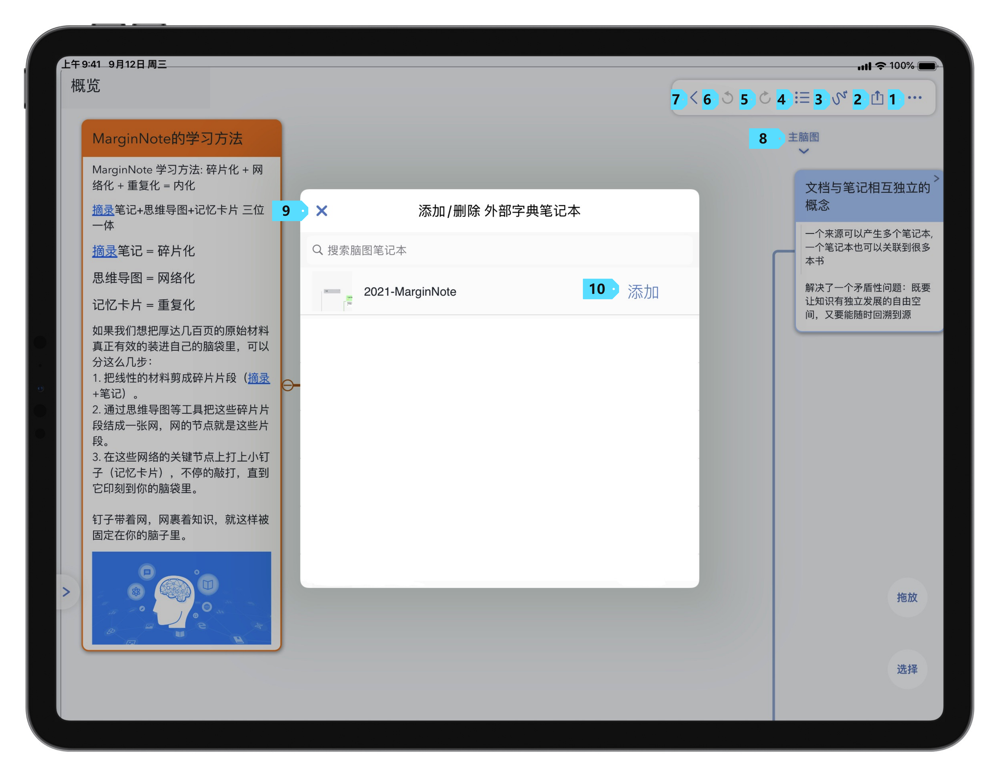
Tap "External Dictionaries for Title Link", and you can choose other MindMap Notebooks as the title link dictionary, and index other notebooks in this MindMap.
In the MindMap Layers list, you can enable title link for a single Child MindMap. Tap "More" on the right of a Child MindMap, and enable "As Dictionary (Title Link)".
After the title link of Child MindMap is enabled, a dictionary icon will appear on the Child MindMap. Tap the dictionary icon to adjust the color of title links.
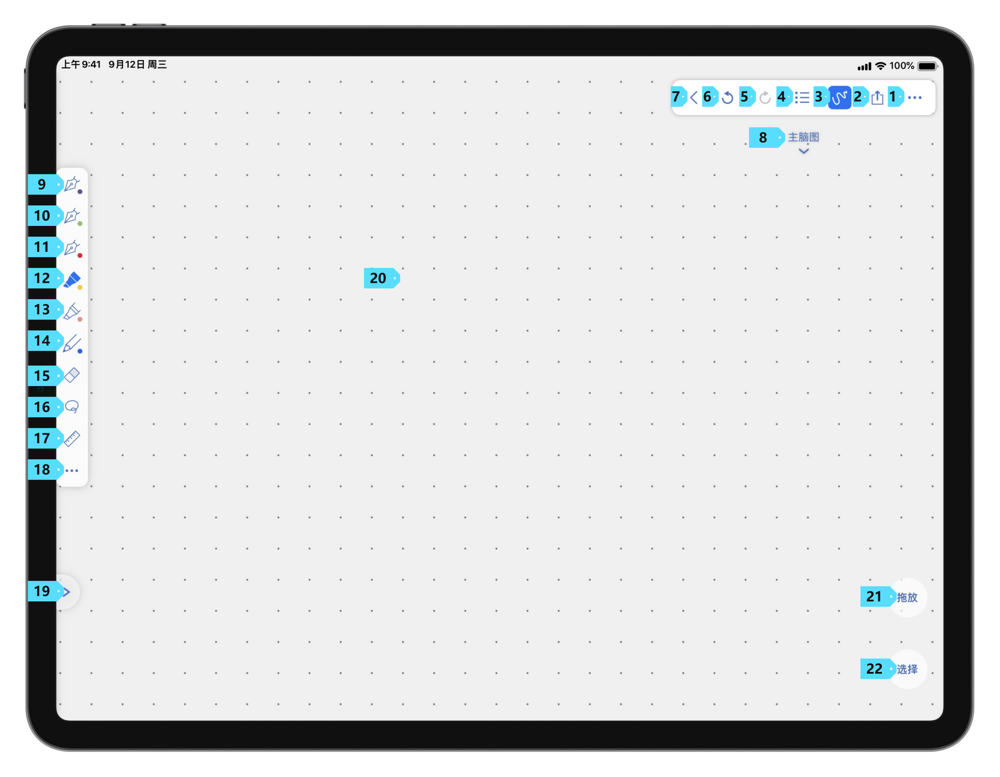
MindMap Handwriting (opens new window) #3.7.6
Tap the Annotate button on the MindMap workspace menu to open the pen tray. The operations related to the pen tray are mentioned in the [Annotation Tool](https://manual.marginnote.cn/en/docu/##### Annotation Tools) section.
Handwriting Node (opens new window) #3.7.6
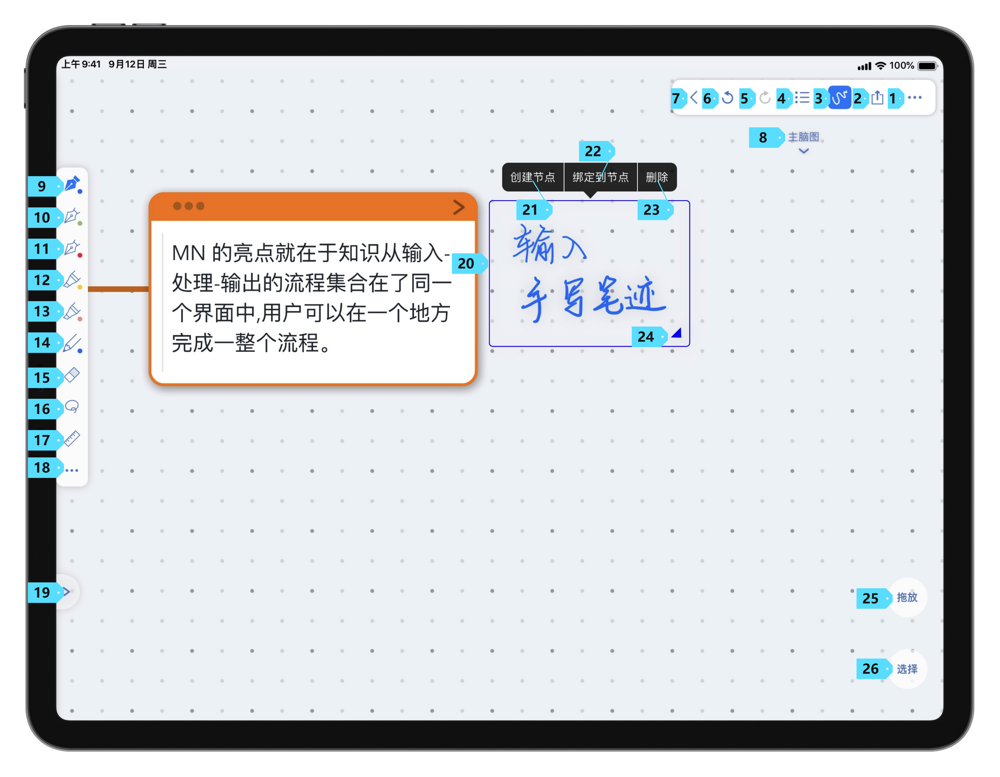
After annotating in the MindMap, if you want to create a node out of the handwriting, you can long press and drag on the MindMap to select the content. Select "Create Node" in the pop-up menu, and you can add the handwriting content to the MindMap.
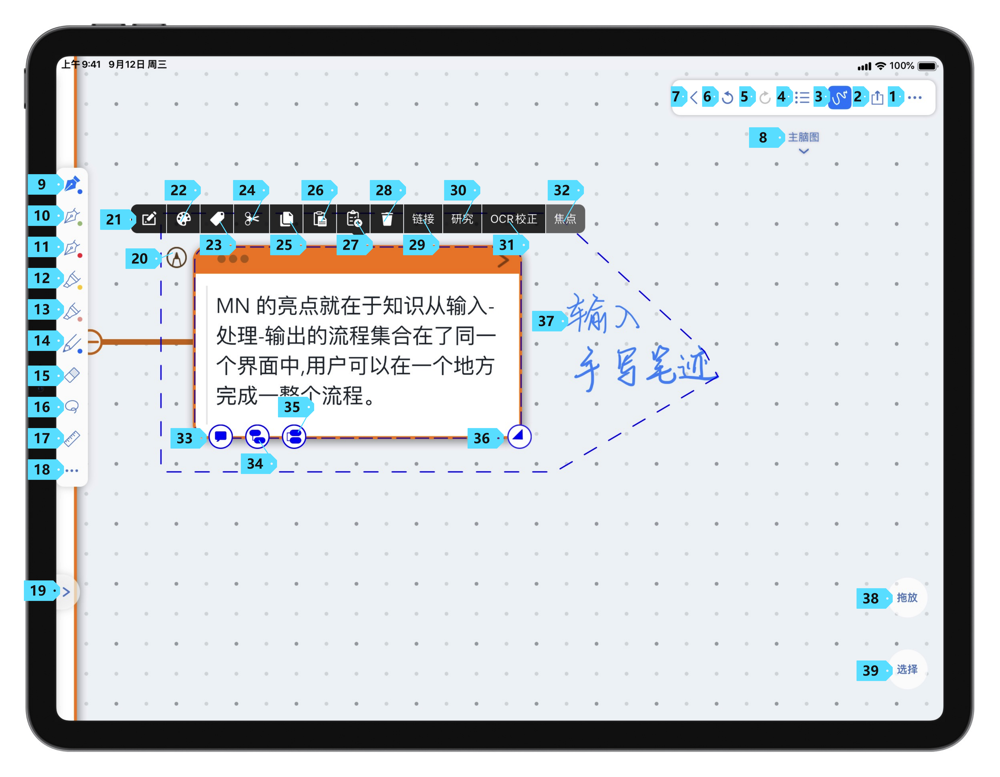
Bind Handwriting to Card (opens new window) #3.7.6
During the writing process, sometimes you need to bind the handwriting to a card so that the handwriting moves with the card. To do so, you can long press and drag, select the node, tap "Bind to Node" in the pop-up menu, and drag the Clip icon onto the node to be bound to.
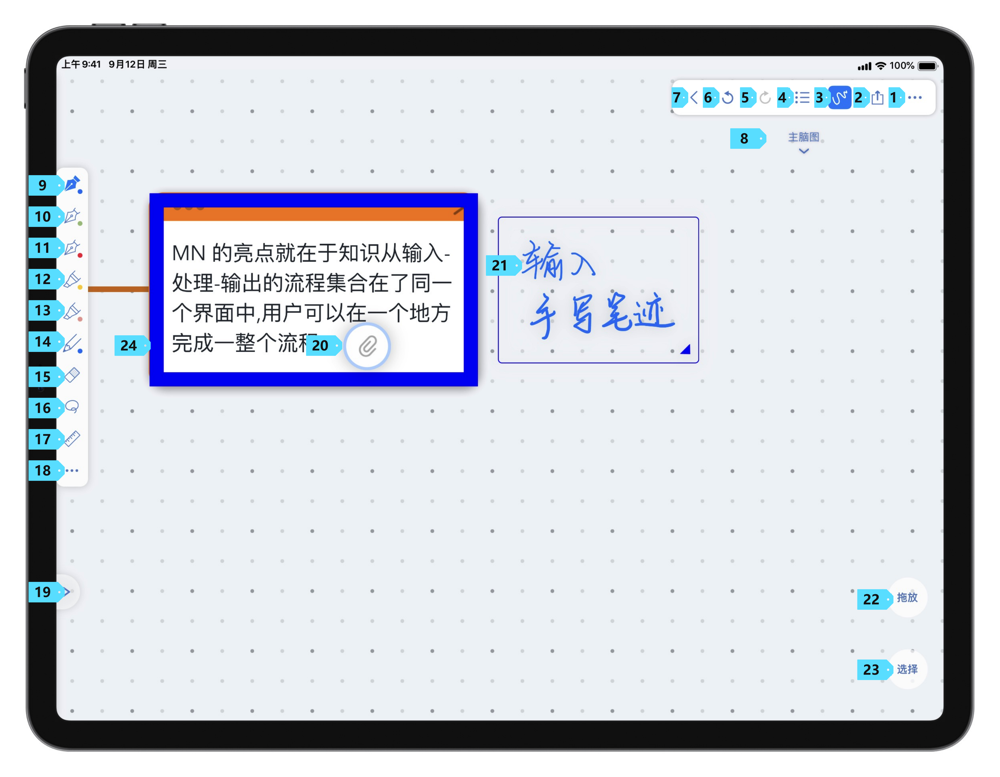
After the binding, the node will have a Pencil icon to its left [3]. Tap the Pencil icon to view the settings on handwriting.
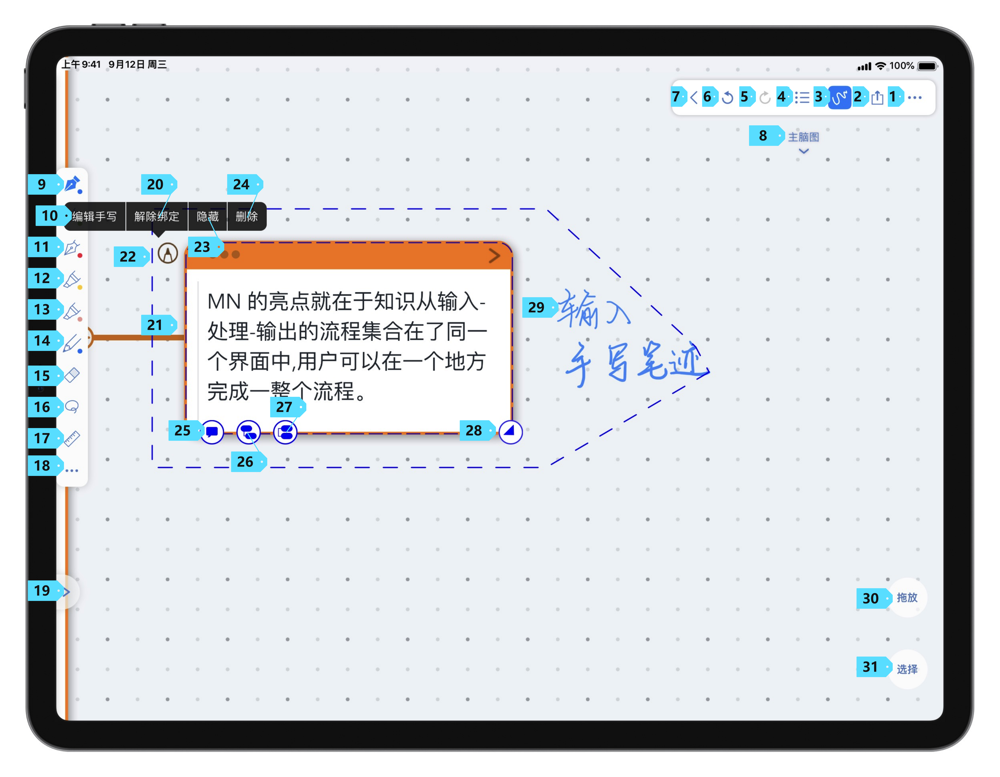
| No. | Name | Function |
|---|---|---|
| 10 | Edit Sketch | Tap to enter the focus mode of the card. In focus mode, you can edit the handwriting for the node. |
| 20 | Unbind | Tap to unbind the card and the handwriting. |
| 23 | Hide | After tapped, the handwriting will be hidden when the node is not selected. If the node is selected, the handwriting is displayed in a lighter color. If the node is selected, the handwriting is displayed in a lighter color. |
| 24 | Delete | Tap to delete the handwriting. |
Apart from direct binding, you can select a card, tap "Focus" in the pop-up menu, and take notes in the focus mode. All handwriting in the focus mode will be bound to the card.

Additionally, you can tap "More" icon in the pen tray, and enable "Double tap the node to enter the focus handwriting space". When enabled, you can double tap a node to enter the focus mode, and start annotating.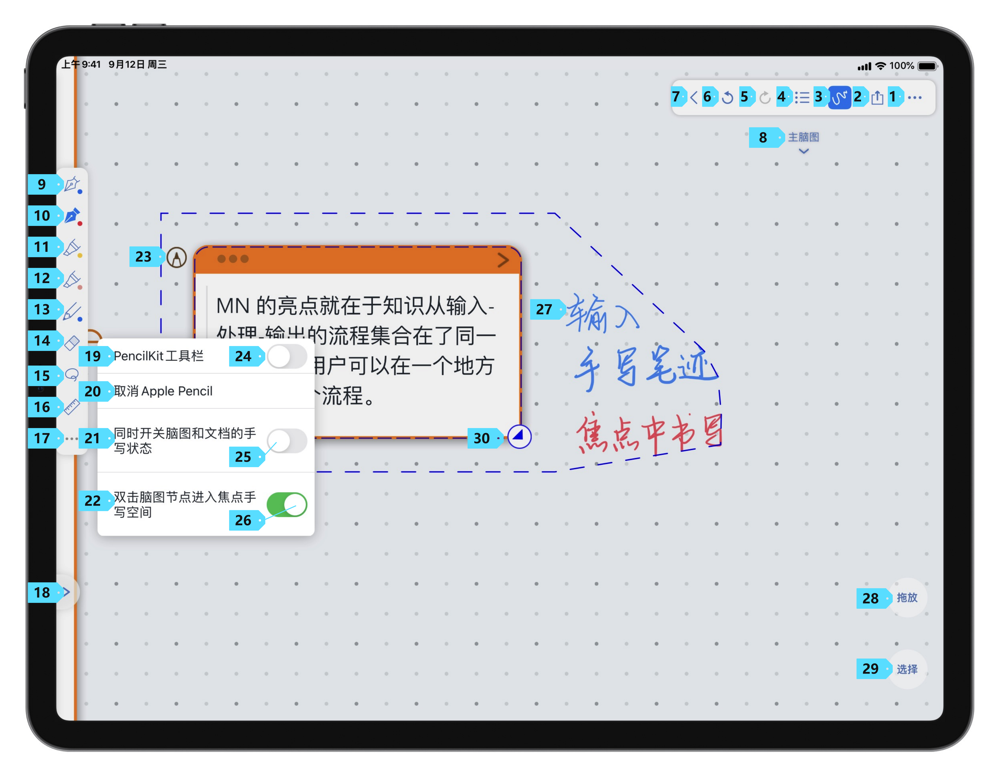
Excerpt and MindMap Gesture (opens new window) #3.7.6
In iPadOS 14 and above, MarginNote 3.7 and above, you can organize excerpts and MindMaps more quickly with Excerpt Gestures and MindMap Gestures.
Excerpt Gesture
In the Document Workspace, you can use Excerpt Gesture to quickly generate excerpts from text. Tap a brush in the pen tray. Tap again to open the brush settings. In the brush settings, you can enable "Excerpt Gesture".
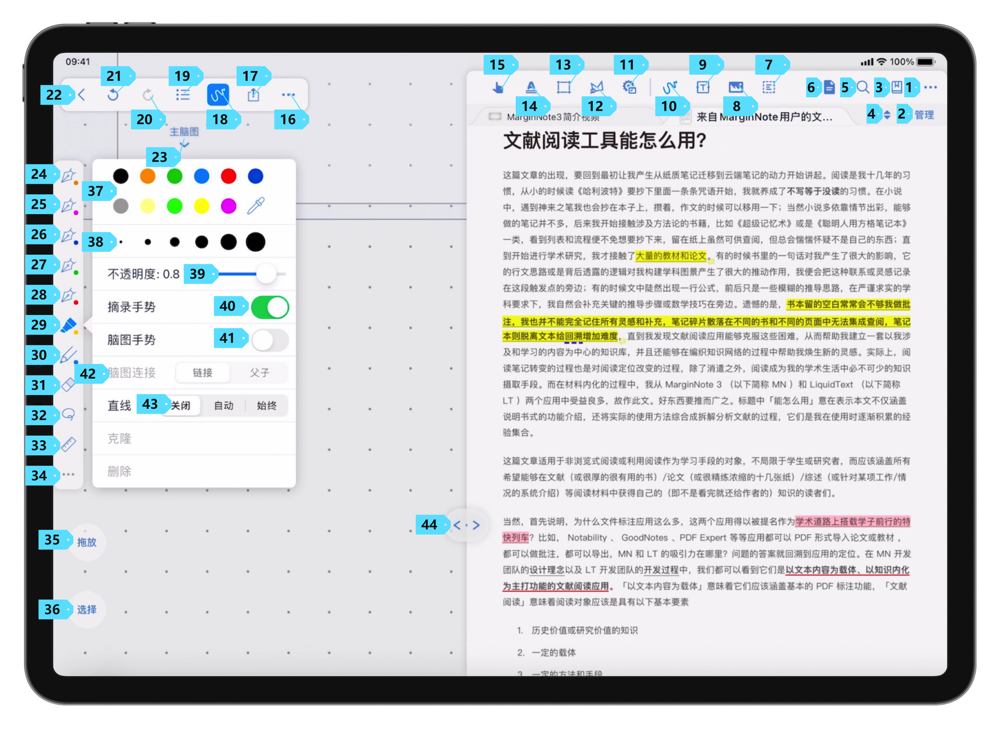
- Single line excerpt: Select a single line of text by drawing a line on it. Tap the brush again to generate an excerpt from the single line of text.
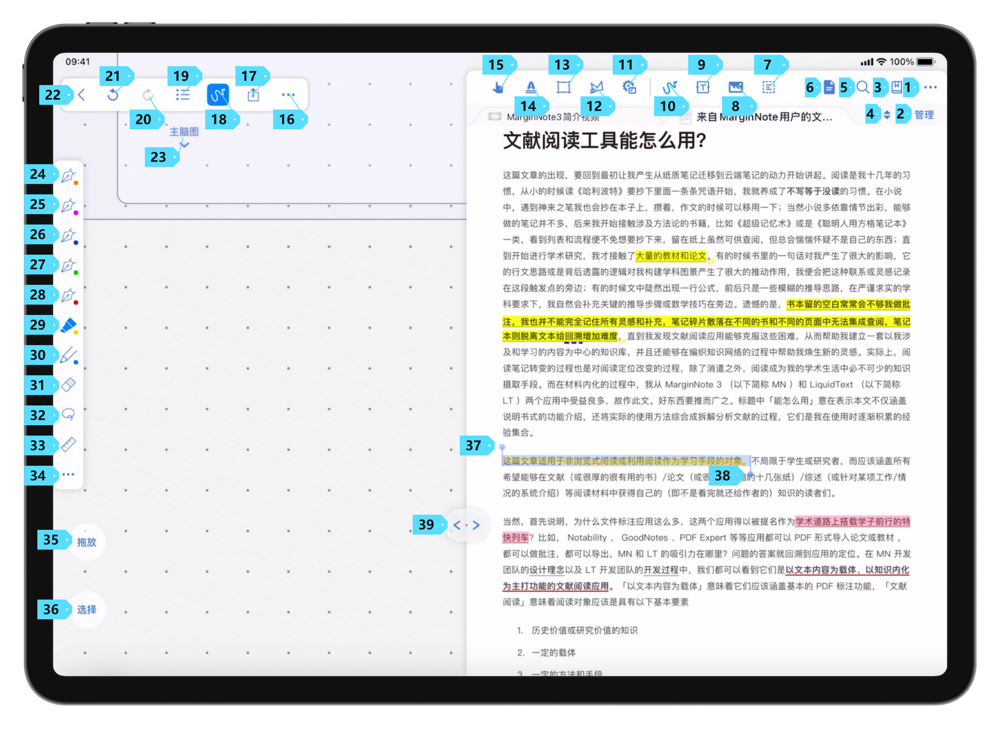
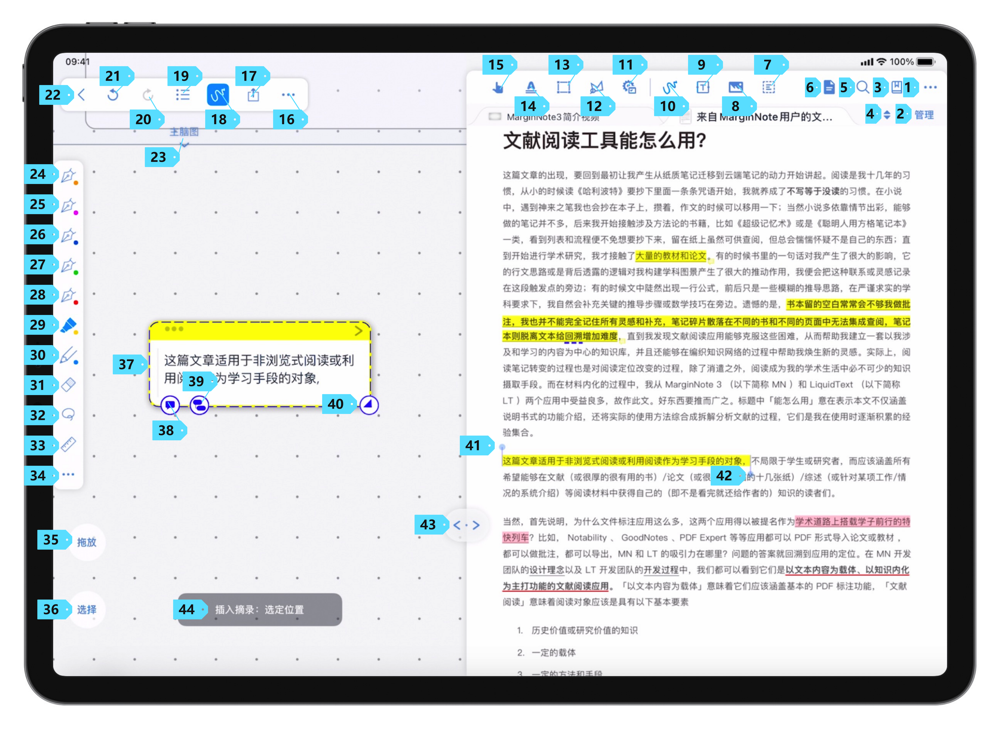
- Multiple lines excerpt: Connect the beginning and end of text to select multiple lines of text. Tap again to generate an excerpt from the multiple lines of text.
- Rectangular and lasso excerpt: Circle out the content needs to be excerpted. Tap "Lasso" in the pop-up menu to generate a lasso excerpt. Tap "Rect" in the pop-up menu to generate a rectangular excerpt.
- Delete excerpt: Draw a wavy line (〰️) on the excerpt or stroke you want to delete, and select "Delete" in the pop-up menu to delete the excerpt.
MindMap Gesture (opens new window) #3.7.6
Tap a brush in the pen tray. Tap again to open the brush settings. In the brush settings, you can enable "MindMap Gesture". You can set the "Connect in MindMap" to be "Link" or "Child".
If the "Connect in MindMap" is set to "Link", use a brush will MindMap Gesture enabled to draw a line from A to B will create a link pointing from A to B.
If the "Connect in MindMap" is set to "Child", use a brush will MindMap Gesture enabled to draw a line from A to B will make A a child node of B.

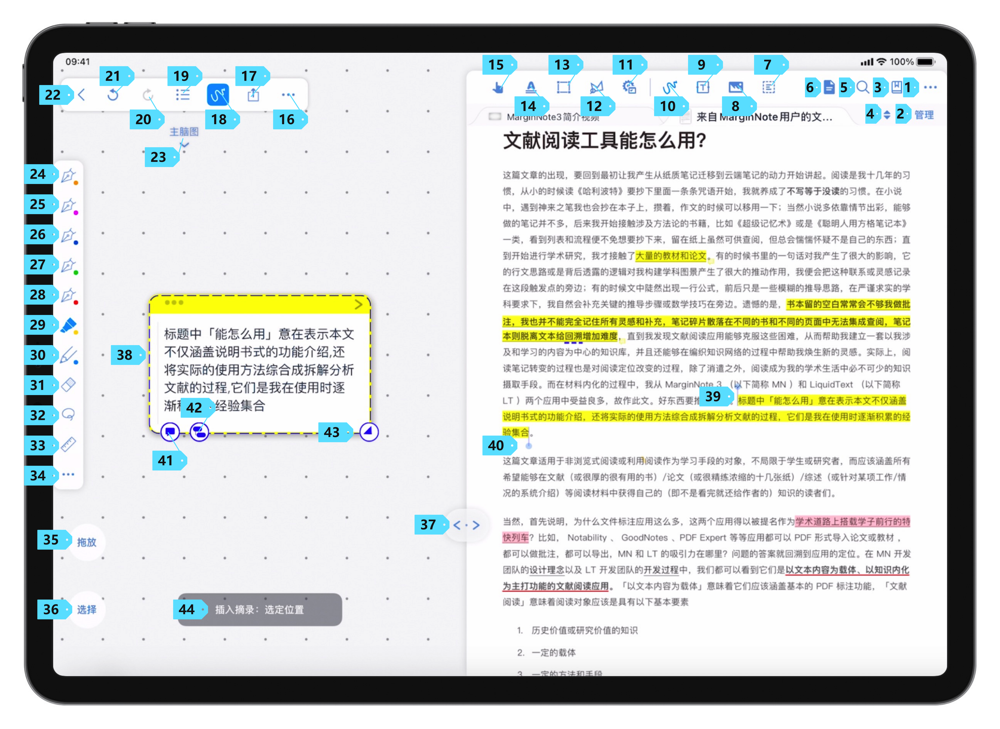
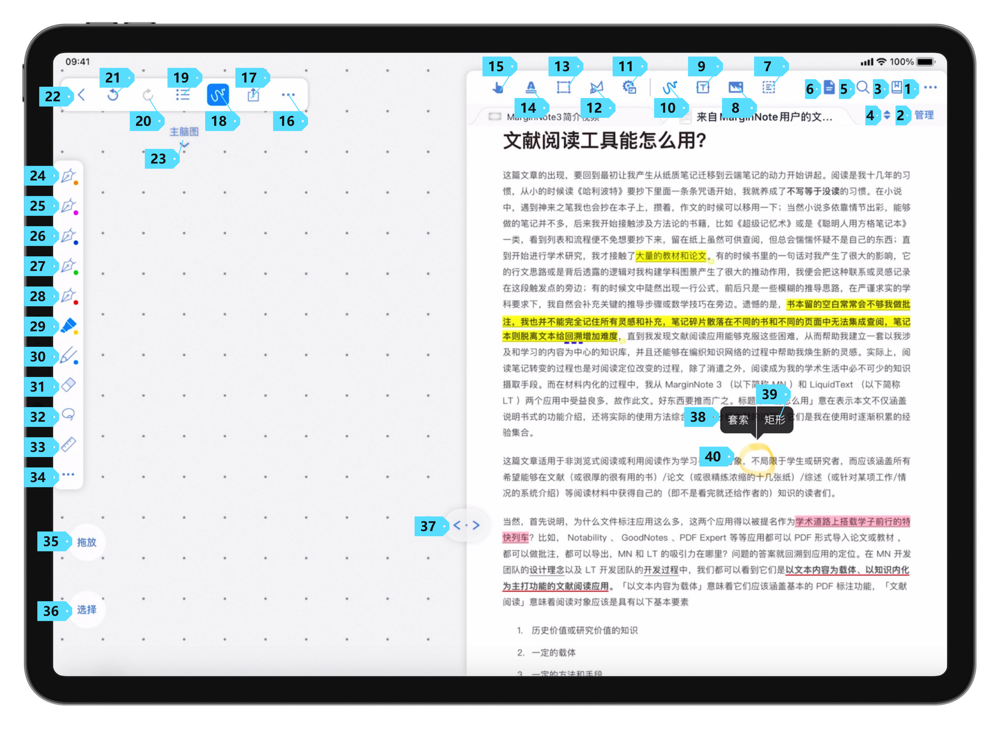
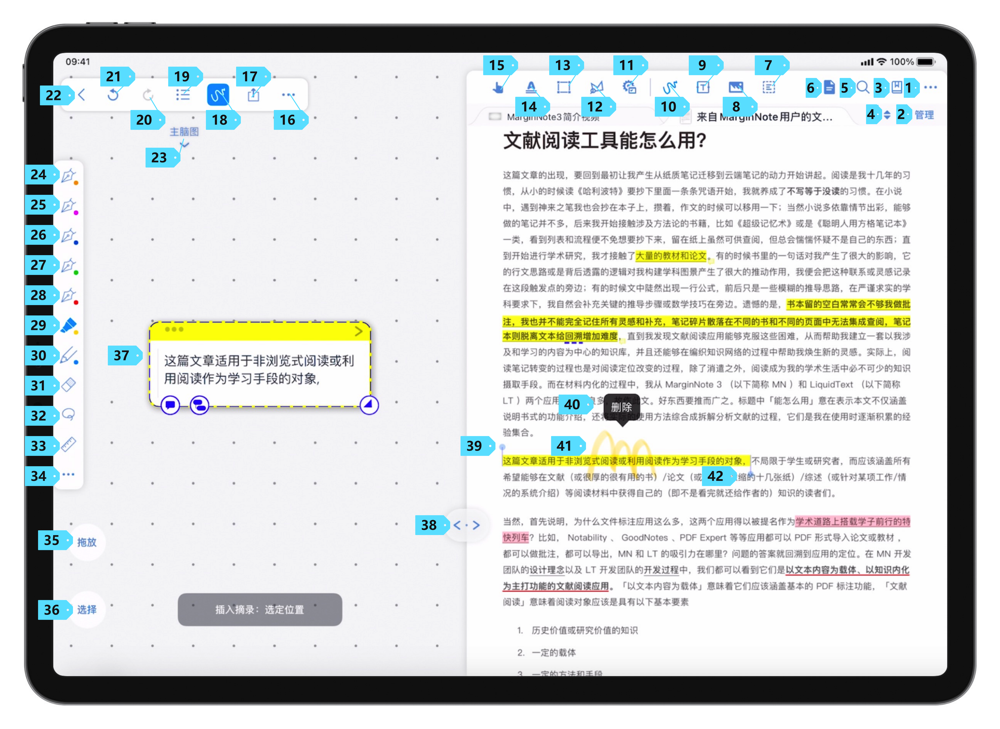
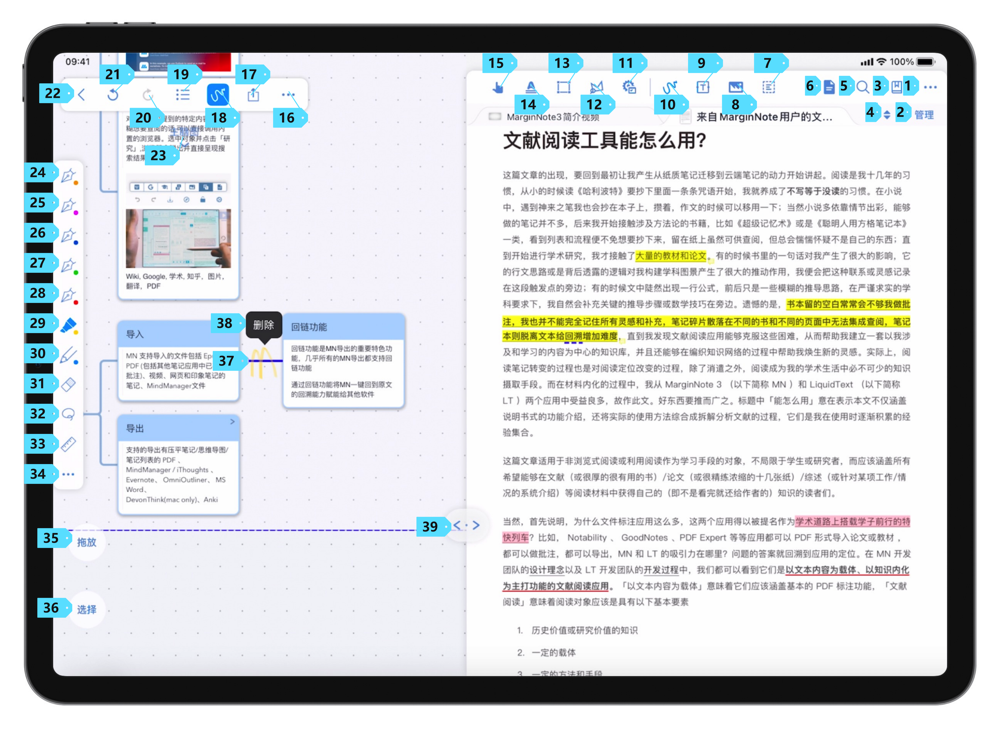
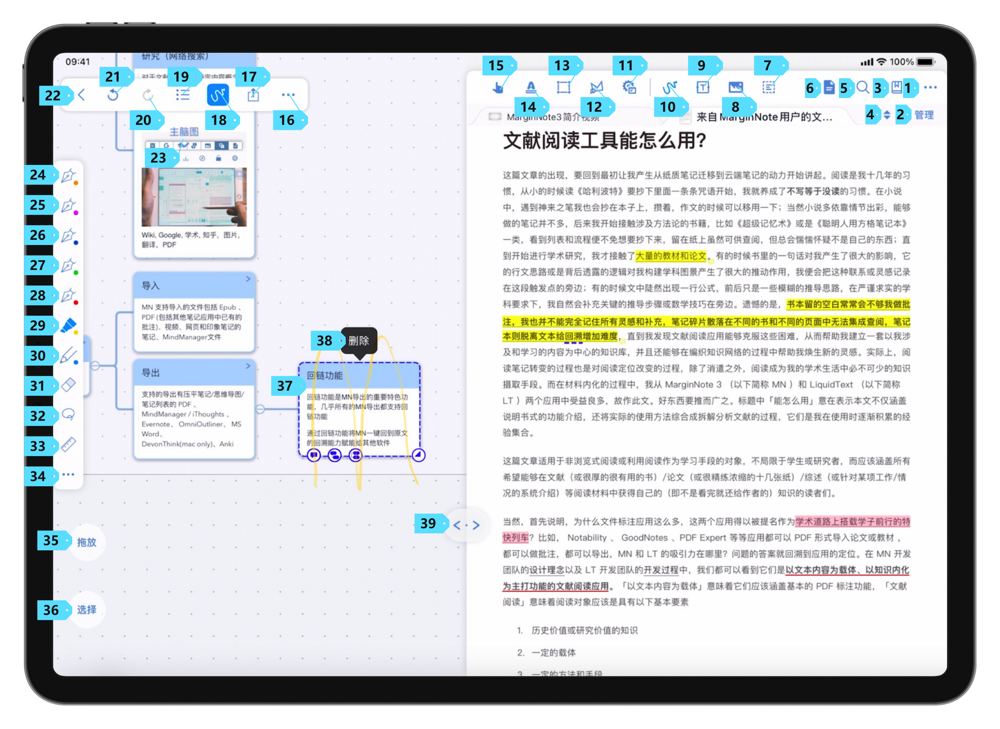
Delete
Draw a wavy line (〰️) [4] on the card or link you want to delete, and select "Delete" in the pop-up menu to delete the card or link.
Outline View
In the menu of MindMap Workspace, tap Outline icon to open the Outline View.
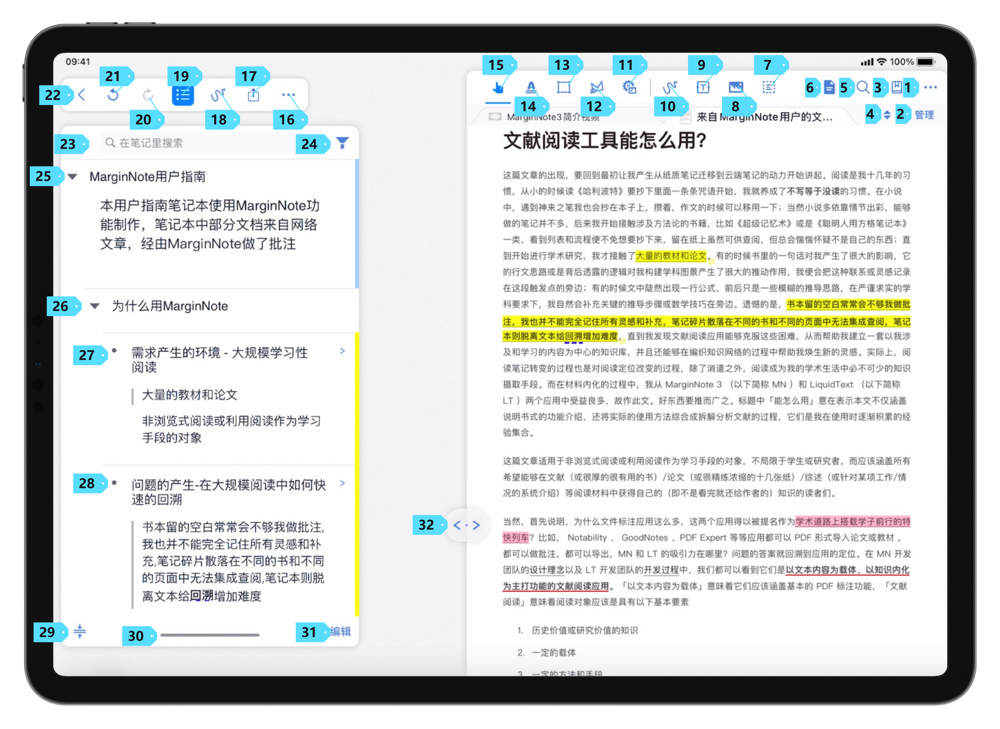
| No. | Name | Function |
|---|---|---|
| 23 | MindMap Layers | Tap to open the MindMap Layers, and switch between Child MindMaps. |
| 23 | Search Box | Enter text to search for content in the MindMap. |
| 24 | Filter | Tap to open the filter page. You can filter contents by "Tag", "Document", or "Color". |
| 29 | Expand | Tap to expand or collapse the outline. |
| 31 | Edit | Tap to enter the outline editing mode. |
Outline Editing Mode
Tap to "Edit" enter the outline editing mode.
| No. | Name | Function |
|---|---|---|
| 30 | Order | Tap to view the pop-up menu. You can choose to: "Sort by page order", "Sort by create date", "Expand All", "Collapse All" |
| 31 | Emphasize | Tap to enter the Emphasis mode in the outline. Under this mode, tap the bubble to emphasize outline content. When the Emphasis mode is enabled, the bottom of the outline will display "Sync Emphasis to Title". If selected, all the emphasis in the outline list will be synchronized. |
| 32 | Select | Tap to enter the Select state. In the Select state, you can select multiple card and carry out batch operations on cards with the batch operation toolbar. |
| 33 | Outline Swipe Gesture | Tap to enable the Outline Swipe Gesture. When enabled, you can swipe left/right to indent/outdent content in the outline. |
| 34 | Expand/ Contract | Tap to expand/contract outline view. In the "Expand" view, the outline will expand across the MindMap Workspace. In the "Contract" view, the outline will cover only part of the MindMap Workspace. |
Export Operations
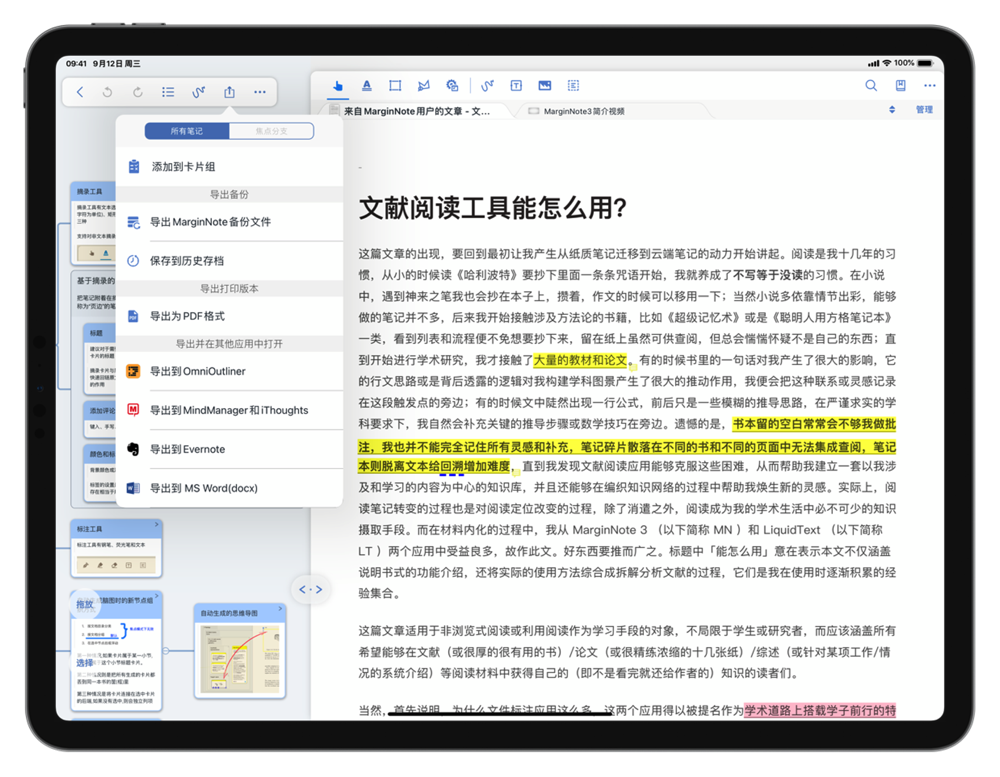
| Name | Function |
|---|---|
| Export for Backup/Restore | Tap to export this MindMap Notebook containing documents as a backup file in marginpkg format. |
| Export for Open in ... | Note data compatibility and advanced workflow with multiple software collaboration have always been the core strengths of MarginNote. MarginNote currently supports multiple export methods, including PDF, mindmap (a format for mind-map software such as Ithoughts, XMind, MindNode, etc.), omnioutliner, devonthink (Mac only), Anki, etc. |
More Operations
Organize Operations
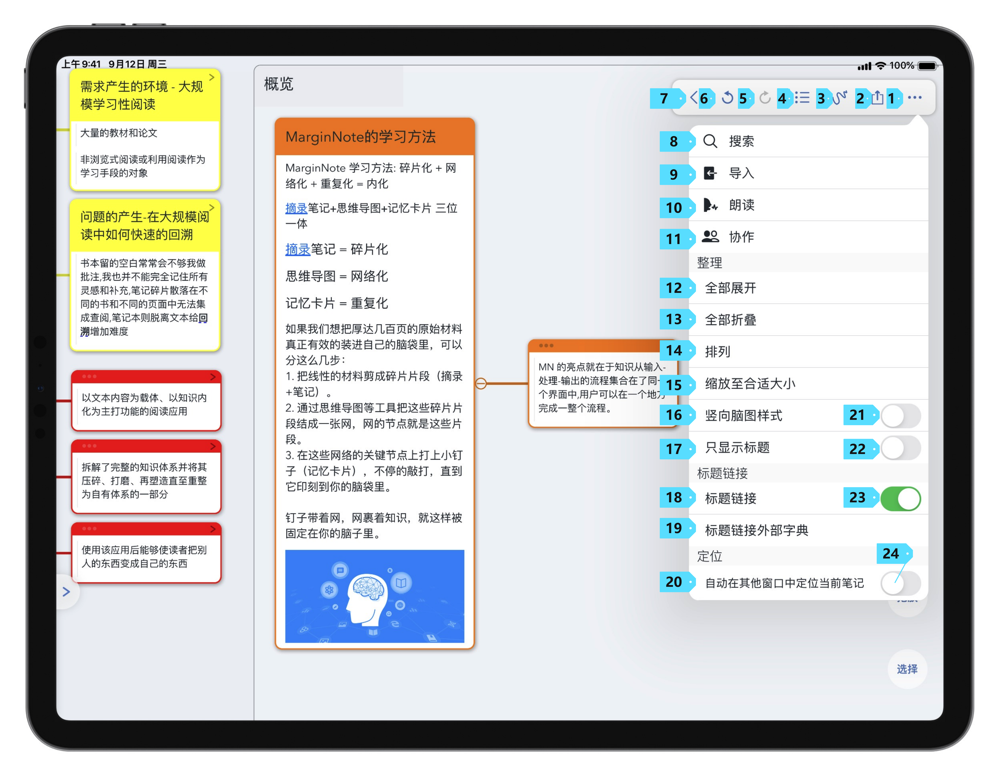
In the MindMap Workspace, tap "More" in the menu bar to view more operations on MindMaps.
| Name | Function |
|---|---|
| Expand All | Tap to expand all collapsed cards. |
| Collapse All | Tap to collapse all expanded cards. |
| Rearrange | Tap to rearrange the cards in the MindMap Workspace and avoid the overlap between cards. |
| Zoom to Fit | Tap to scale the MindMap as fit. |
| Vertical Map Layout | Tap to lay the tree branches vertically. |
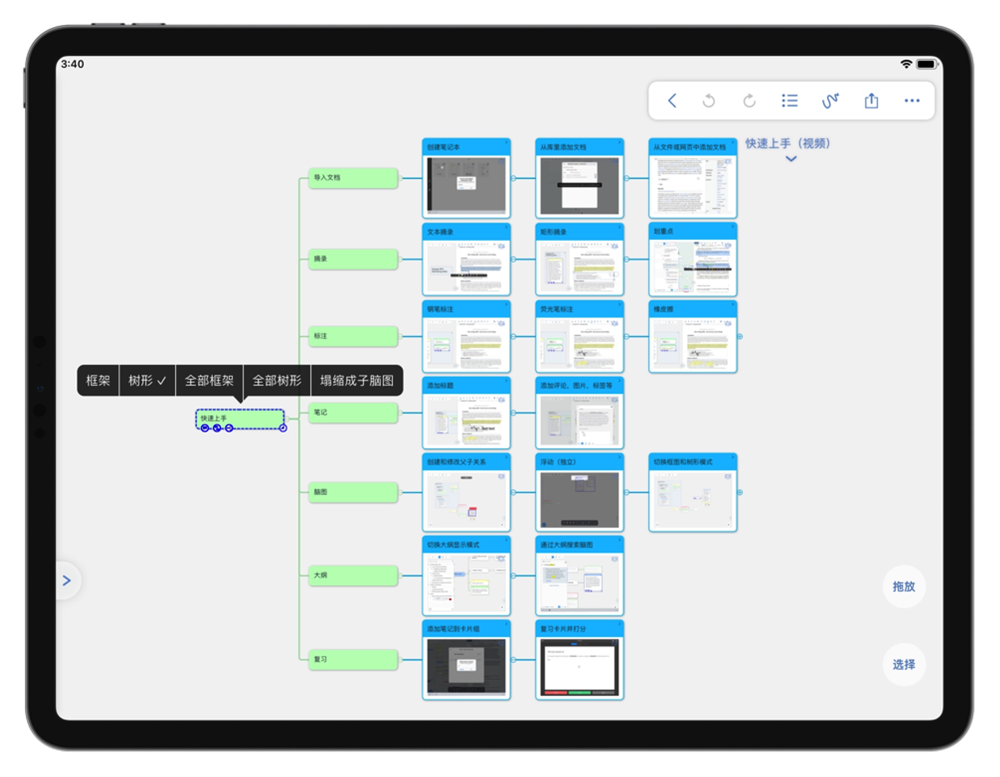
| Title-Only (MindMap) | Tap to display only the titles of cards in the MindMap Workspace. If a card does not have a title, then first non-empty text field will be displayed. |
Locate Settings
In the MindMap Workspace, tap "More" in the menu bar to view settings on auto locating.
| Name | Function |
|---|---|
| Auto Locate Document Location | When enabled, if you select a card in the MindMap Workspace, the Document Workspace will auto locate the corresponding excerpt. |
| Auto Locate MindMap Location | When enabled, if you select an excerpt in the Document Workspace, the MindMap Workspace will auto locate the corresponding card. |
| Auto Locate Current Node in Other Windows (opens new window)#3.5 | When enabled, if you open multiple windows of MarginNote 3, the selected note in one window will also displayed in another window. |
Batch Operation Toolbar
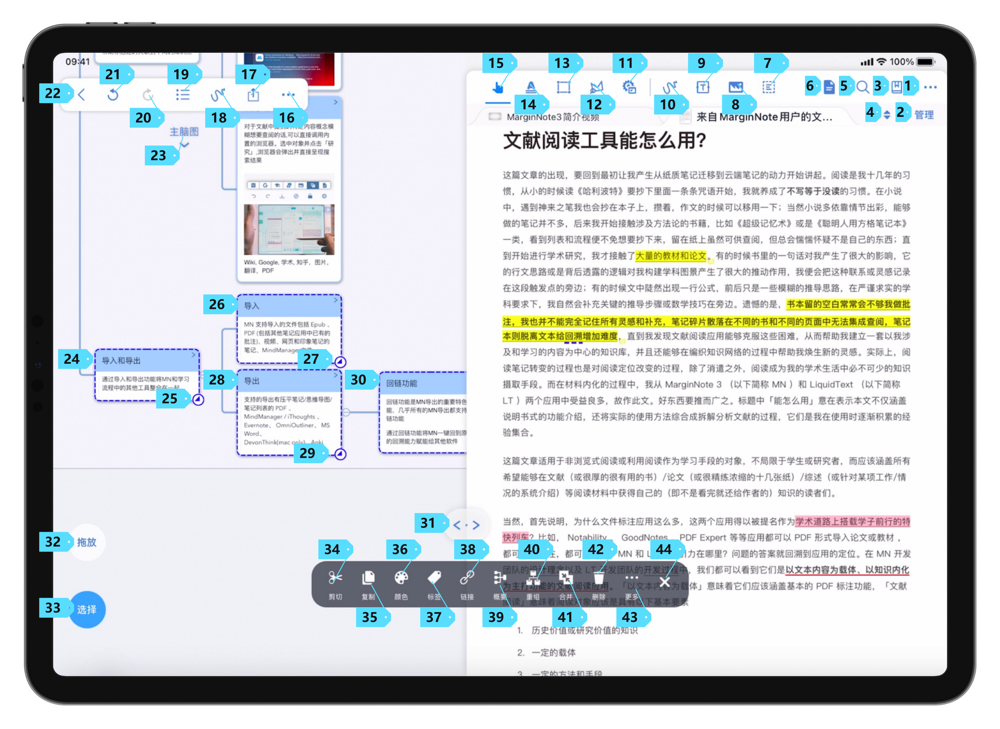
In the Multiple Select mode, MarginNote will display Batch Operation Toolbar. In the MindMap Workspace, you can long press and drag to select multiple cards to enter the Multiple Select mode. You can also tap the "Select" button to enter the Multiple Select mode. In the Outline View, tap "Edit" to enter the editing mode. Tap "Select" to enter the Multiple Select mode.
| No. | Name | Function |
|---|---|---|
| 34 | Cut | Tap to batch cut the selected cards. |
| 35 | Paste | Tap to batch paste the selected cards. |
| 36 | Color | Tap to batch change the colors and styles of the selected cards. |
| 37 | Tag | Tap to batch add tags to the selected cards. |
| 38 | Link | Tap to batch add links to the selected cards. |
| 39 | Summary (opens new window) #3.3 | Tap to add summary to the selected cards. It should be noted that the selected cards cannot be a Child MindMap. |
| 40 | Regroup | Tap and MarginNote 3 will place the selected cards into an empty frame node. |
| 41 | Merge | Tap to merge the selected cards. |
| 42 | Delete | Tap to batch delete the selected cards. |
| 43 | More | Tap to view more batch operations. |
| 44 | Close | Tap to exit the Multiple Select mode. |
In the "More" settings, you can further adjust the cards.
| Name | Function |
|---|---|
| Remove from MindMap to Unadded state (opens new window) #3.1.5 | Tap to remove cards from the MindMap, and change the state of the cards into "Unadded to MindMap". You can add such cards back to the MindMap by tapping the Excerpt Settings and selecting "View Excerpts Not in MindMap". |
| Export to other MindMap Notebook | Tap to export cards to other MindMap Notebooks. |
| Clear Formatting (opens new window) #3.6.8 | Tap to clear the formatting for all cards, and display text by default format of MarginNote 3. |
| Add to Card Deck | Tap to batch add cards from MarginNote 3 to the card deck. |